6SEALING THE WINDOW TO THE EXTERIOR WALL CLADDING (CONTINUED)
ALL ALL ALL ALL ALL ALL
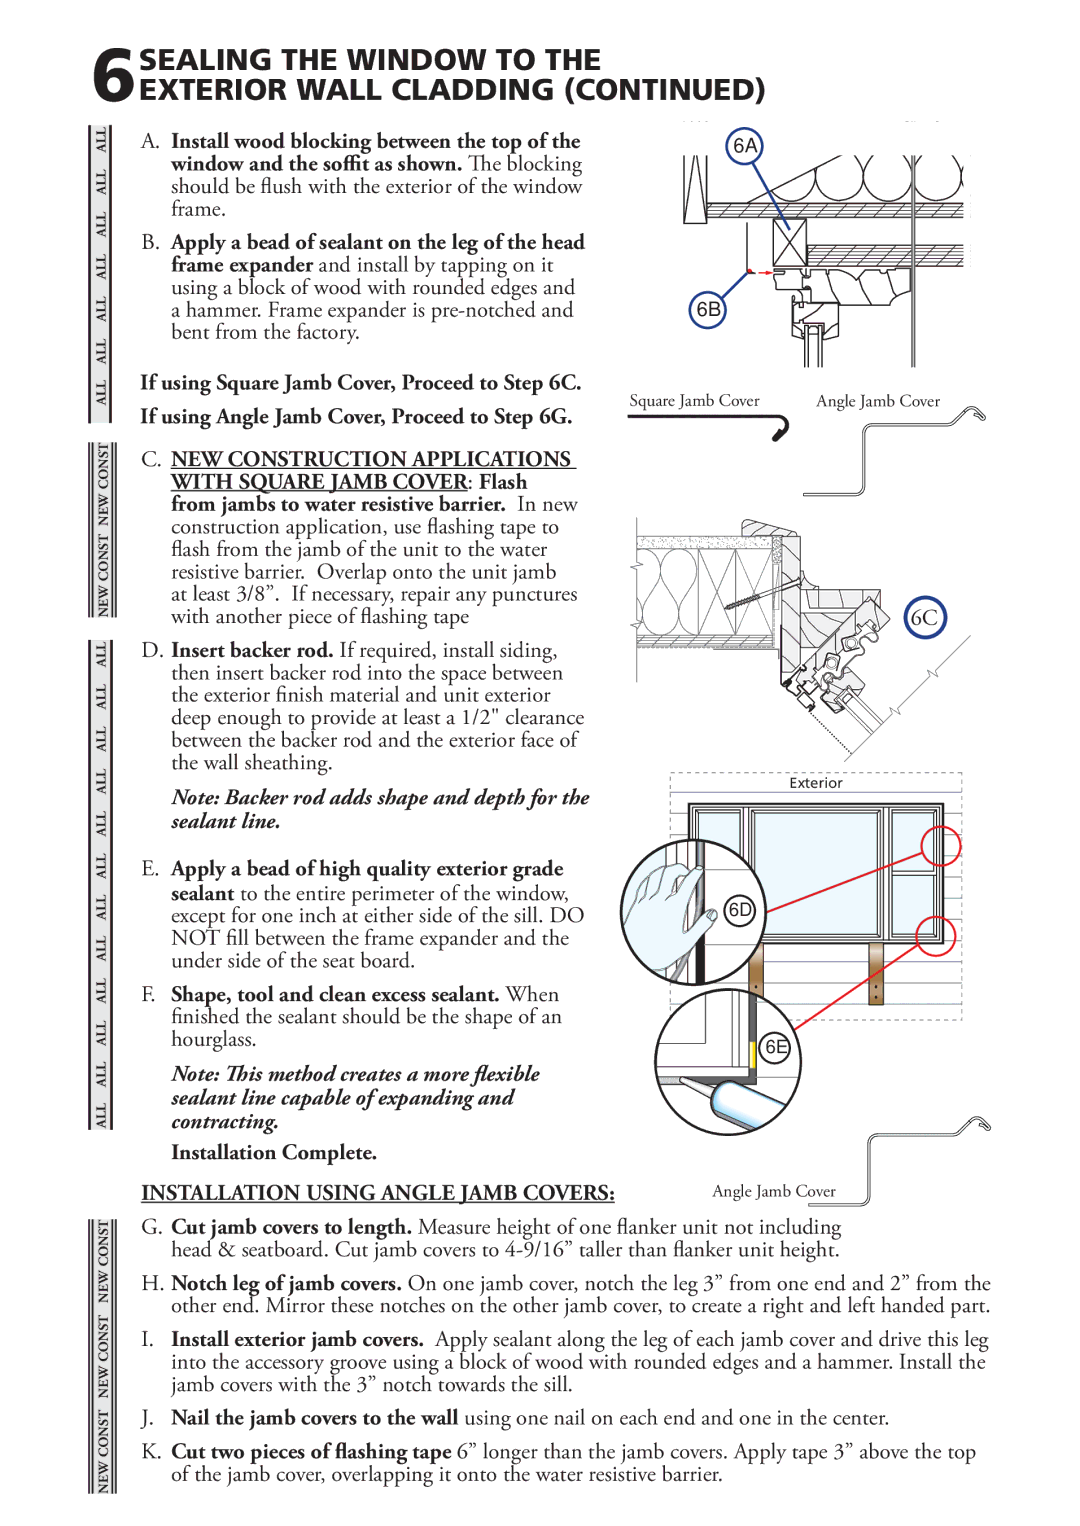
A.Install wood blocking between the top of the window and the soffit as shown.The blocking should be flush with the exterior of the window frame.
B.Apply a bead of sealant on the leg of the head frame expander and install by tapping on it using a block of wood with rounded edges and a hammer. Frame expander is
6A |
6B |
![]()
![]() ALL ALL ALL NEW CONST NEW CONST ALL
ALL ALL ALL NEW CONST NEW CONST ALL![]()
![]()
If using Square Jamb Cover, Proceed to Step 6C. | Angle Jamb Cover |
Square Jamb Cover | |
If using Angle Jamb Cover, Proceed to Step 6G. |
|
C. NEW CONSTRUCTION APPLICATIONS |
|
WITH SQUARE JAMB COVER: Flash |
|
from jambs to water resistive barrier. In new |
|
construction application, use flashing tape to |
|
flash from the jamb of the unit to the water |
|
resistive barrier. Overlap onto the unit jamb |
|
at least 3/8”. If necessary, repair any punctures |
|
with another piece of flashing tape | 6C |
D. Insert backer rod. If required, install siding, |
|
then insert backer rod into the space between |
|
the exterior finish material and unit exterior |
|
deep enough to provide at least a 1/2" clearance |
|
between the backer rod and the exterior face of |
|
the wall sheathing. |
|
ALL ALL ALL ALL ALL ALL ALL ALL ALL
Note: Backer rod adds shape and depth for the sealant line.
E.Apply a bead of high quality exterior grade sealant to the entire perimeter of the window, except for one inch at either side of the sill. DO NOT fill between the frame expander and the under side of the seat board.
F.Shape, tool and clean excess sealant. When finished the sealant should be the shape of an hourglass.
Note: This method creates a more flexible sealant line capable of expanding and contracting.
Installation Complete.
Exterior
6D |
![]()
![]() NEW CONST NEW CONST NEW CONST
NEW CONST NEW CONST NEW CONST![]()
![]()
INSTALLATION USING ANGLE JAMB COVERS:
G. Cut jamb covers to length. Measure height of one flanker unit not including head & seatboard. Cut jamb covers to
H. Notch leg of jamb covers. On one jamb cover, notch the leg 3” from one end and 2” from the other end. Mirror these notches on the other jamb cover, to create a right and left handed part.
I.Install exterior jamb covers. Apply sealant along the leg of each jamb cover and drive this leg into the accessory groove using a block of wood with rounded edges and a hammer. Install the jamb covers with the 3” notch towards the sill.
J.Nail the jamb covers to the wall using one nail on each end and one in the center.
K.Cut two pieces of flashing tape 6” longer than the jamb covers. Apply tape 3” above the top of the jamb cover, overlapping it onto the water resistive barrier.
