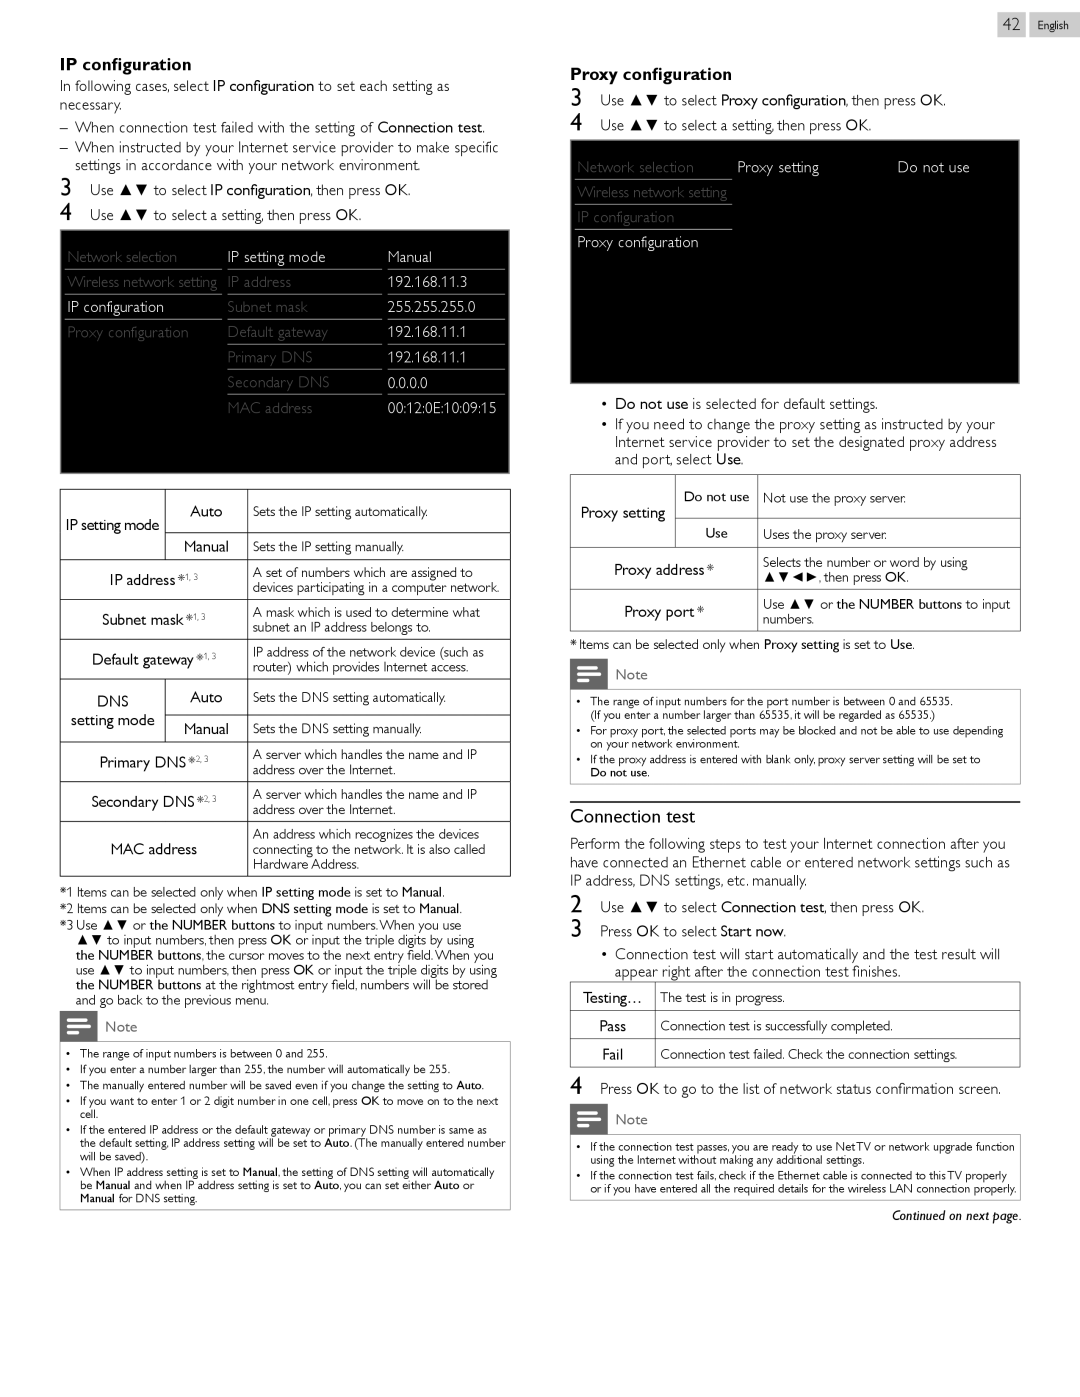
IP configuration

In following cases, select IP configuration to set each setting as necessary.

When connection test failed with the setting of Connection test.

When instructed by your Internet service provider to make specific settings in accordance with your network environment.

3 Use ▲▼ to select IP configuration, then press OK. 4 Use ▲▼ to select a setting, then press OK.

42 English

Proxy configuration

3 Use ▲▼ to select Proxy configuration, then press OK. 4 Use ▲▼ to select a setting, then press OK.

Network selection

Proxy setting

Do not use

Wireless network setting

IP configuration

Proxy configuration

Network selection

Wireless network setting

IP configuration

Proxy configuration

IP setting mode

IP address

Subnet mask

Default gateway

Primary DNS

Secondary DNS

MAC address

Manual

192.168.11.3

255.255.255.0

192.168.11.1

192.168.11.1

0.0.0.0

00:12:0E:10:09:15

Do not use is selected for default settings.

If you need to change the proxy setting as instructed by your Internet service provider to set the designated proxy address and port, select Use.

IP setting mode

Auto

Sets the IP setting automatically.


Manual

Sets the IP setting manually.


IP address *1, 3

A set of numbers which are assigned to


devices participating in a computer network.

Subnet mask *1, 3

A mask which is used to determine what


subnet an IP address belongs to.

Default gateway *1, 3

IP address of the network device (such as


router) which provides Internet access.

DNS

Auto

Sets the DNS setting automatically.

setting mode


Manual

Sets the DNS setting manually.


Primary DNS *2, 3

A server which handles the name and IP


address over the Internet.

Secondary DNS *2, 3

A server which handles the name and IP


address over the Internet.

MAC address

An address which recognizes the devices

connecting to the network. It is also called


Hardware Address.

*1 Items can be selected only when IP setting mode is set to Manual.

*2 Items can be selected only when DNS setting mode is set to Manual.

*3 Use ▲▼ or the NUMBER buttons to input numbers.When you use ▲▼ to input numbers, then press OK or input the triple digits by using the NUMBER buttons, the cursor moves to the next entry field.When you use ▲▼ to input numbers, then press OK or input the triple digits by using the NUMBER buttons at the rightmost entry field, numbers will be stored and go back to the previous menu.

Note

The range of input numbers is between 0 and 255.

If you enter a number larger than 255, the number will automatically be 255.

The manually entered number will be saved even if you change the setting to Auto.

If you want to enter 1 or 2 digit number in one cell, press OK to move on to the next cell.

If the entered IP address or the default gateway or primary DNS number is same as the default setting, IP address setting will be set to Auto. (The manually entered number will be saved).

When IP address setting is set to Manual, the setting of DNS setting will automatically be Manual and when IP address setting is set to Auto, you can set either Auto or Manual for DNS setting.

Proxy setting

Do not use

Not use the proxy server.


Use

Uses the proxy server.


Proxy address *

Selects the number or word by using

▲▼◄►, then press OK.


Proxy port *

Use ▲▼ or the NUMBER buttons to input

numbers.


* Items can be selected only when Proxy setting is set to Use.

Note

The range of input numbers for the port number is between 0 and 65535. (If you enter a number larger than 65535, it will be regarded as 65535.)

For proxy port, the selected ports may be blocked and not be able to use depending on your network environment.

If the proxy address is entered with blank only, proxy server setting will be set to Do not use.

Connection test

Perform the following steps to test your Internet connection after you have connected an Ethernet cable or entered network settings such as IP address, DNS settings, etc. manually.

2 Use ▲▼ to select Connection test, then press OK.

3 Press OK to select Start now.

Connection test will start automatically and the test result will appear right after the connection test finishes.

Testing…

The test is in progress.


Pass

Connection test is successfully completed.


Fail

Connection test failed. Check the connection settings.

4 Press OK to go to the list of network status confirmation screen.

Note

If the connection test passes, you are ready to use Net TV or network upgrade function using the Internet without making any additional settings.

If the connection test fails, check if the Ethernet cable is connected to this TV properly or if you have entered all the required details for the wireless LAN connection properly.

Continued on next page.

Page 42
Image 42
Philips 46PFL5907, 55PFL5907 user manual Connection test, Proxy configuration, IP configuration

55PFL5907, 46PFL5907 specifications

The Philips 46PFL5907 and 55PFL5907 are advanced LED LCD televisions that exemplify the combination of cutting-edge technology and elegant design. These models cater to users who demand exceptional picture quality, smart capabilities, and immersive audio experiences.

A standout feature of both models is their Full HD resolution. With a resolution of 1920 x 1080 pixels, they deliver stunning clarity and detail, making them ideal for watching movies, sports, and gaming. The Ambilight technology is one of the unique selling points of these televisions. This innovative system projects a halo of light onto the wall surrounding the TV, which not only enhances the viewing experience but also creates an atmospheric effect in the room, further immersing viewers in the content.

The Philips 5907 series incorporates the Pixel Precise HD engine, which optimizes images by enhancing contrast, color accuracy, and sharpness. This technology ensures that users experience vibrant colors and true-to-life images, regardless of the source content. Additionally, the Motion Rate 400 technology significantly reduces motion blur, allowing for crystal-clear playback of fast-moving scenes—a vital feature for sports enthusiasts and action movie lovers.

Smart TV functionality is another highlight, enabling viewers to access a plethora of online content. With built-in Wi-Fi and access to popular streaming services, users can enjoy their favorite TV shows, movies, and music directly from the TV without the need for external devices. The user-friendly interface makes navigation seamless, whether you are browsing apps, social media, or web content.

Audio quality is also impressive, thanks to the integrated speakers that utilize the Perfect Natural Motion technology. This feature enhances sound clarity, making dialogues clearer and more engaging. Combined with the strong visual performance, the overall entertainment experience is significantly enriched.

The design of the Philips 46PFL5907 and 55PFL5907 is sleek and modern, characterized by thin bezels and a stylish finish that allows them to blend seamlessly into any living space. The television stands are robust yet elegant, complementing the aesthetic appeal.

In summary, the Philips 46PFL5907 and 55PFL5907 are well-rounded television choices that promise high-definition picture quality, advanced smart features, and an immersive audio experience, making them ideal for any entertainment setup. Their innovative technologies, combined with a contemporary design, ensure that they stand out in the world of home entertainment.