64PH9905
Warranty Verification
Safety Instructions Read before operating equipment
Table of Contents
As you unpack your Dptv please note that
Features
Press Menu or ok button on the remote or Dptv to begin
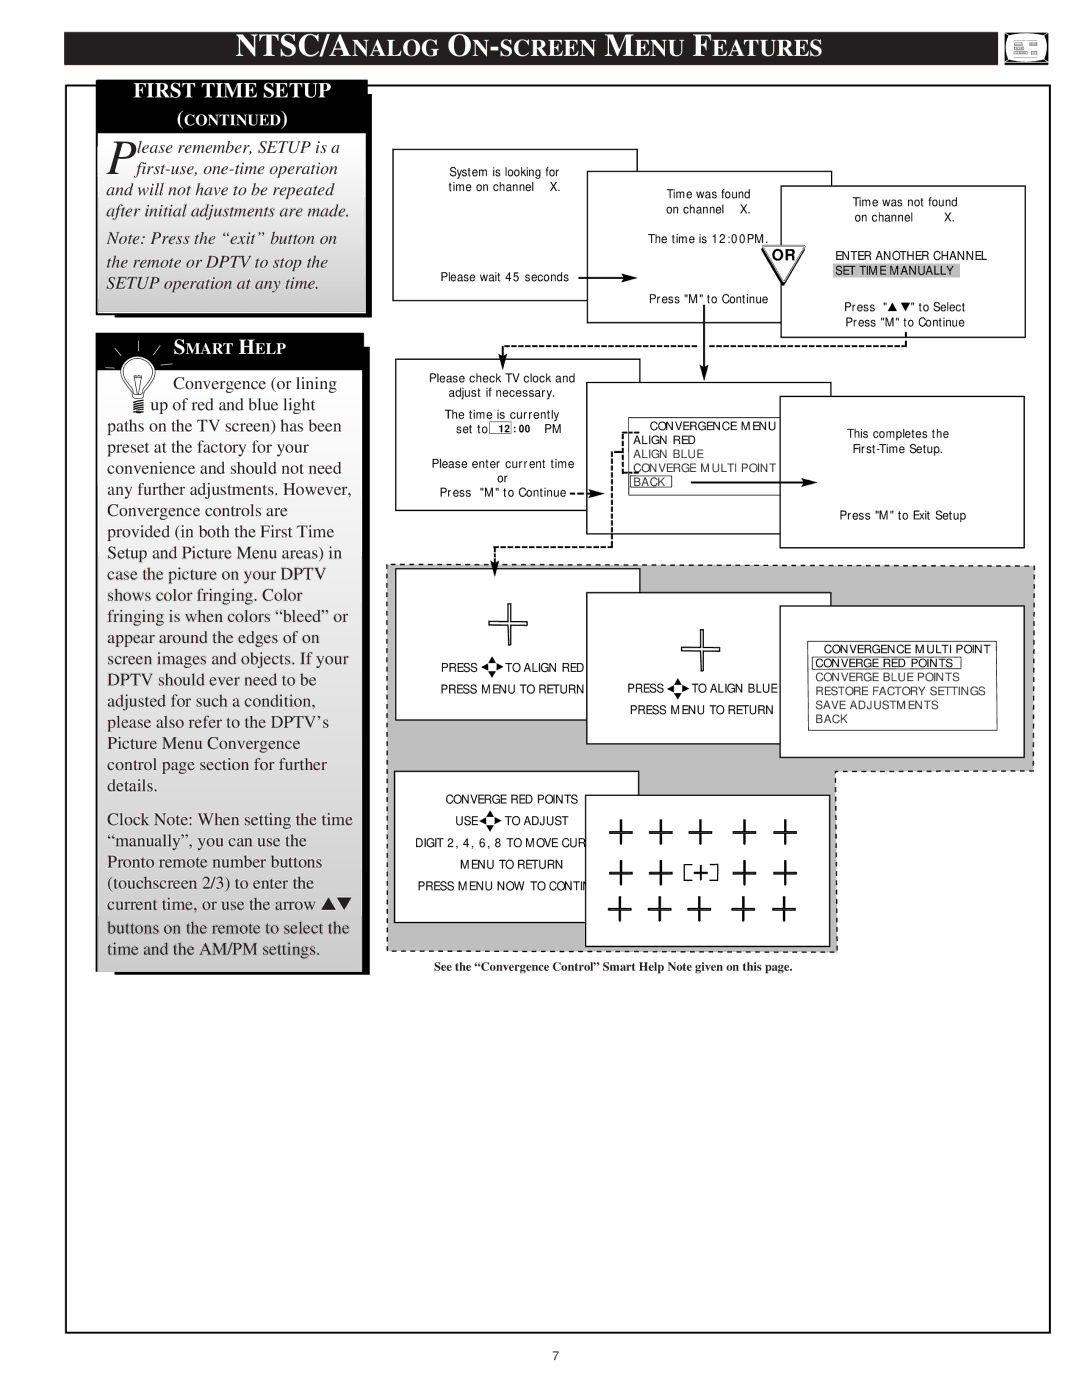
NTSC/ANALOG ON-SCREEN Menu Features
First Time Setup automatically takes
Press CHannel and VOLume + on the DPTV’s
Please remember, Setup is a
Select Clearview control
NTSC/ANALOG Picture Menu Controls
COLOR, Brightness SHARPNESS, TINT, Picture
Clearview
Select Convergence
RED/BLUE Convergence
Press the Menu buttons
Select the Smart Picture control
NTSC/ANALOG Feature Menu Controls
With the Features Menu on- screen, move the RED highlight
Smart Picture
Finished
Change Label
Caption 1, 2, 3
Closed Caption
Select Closed Captioning control
Press the Menu buttons
NORMAL- If you have an Antenna connected
Cable Tuning
Select Cable Channel Tuning control
CABLE- If you do have Cable TV connected
Try it out. Press
Channel Memory AUTO-PROGRAMMING
Select Channel Memory Start AUTO-PROGRAMMING control
Press the exit or Menu button to clear the screen
Press the Menu button to
ADD/DELETE Channels
Select Channel Memory
Press the Channel +
Display Format
With Features Menu 2
Select Display Format control
SET Clock
Channel Display
See instruction details on this
Channel Labels
Do you ever have trouble Remembering on which
Select Channel Labels control
Parental Control
Setup Code Number
Select the Parental Control
Parental Control Channel Blocking
Press Channel or Channel
Select the Content
Content Advisory
Enter the correct Parental
Movie Ratings set viewing
Content Advisory Movie Ratings
Select the Movie Ratings Menu option
Categories TV-Y7, TV-PG, etc
Content Advisory Parental Guidelines
Select the Parental Guidelines Menu option
Select the Review
Content Advisory Blocking Options
Review Settings
Select the Blocking Options Menu control
Press the Menu arrow
NTSC/ANALOG Sound Menu Controls
BASS, TREBLE, Balance
Select BASS, or TREBLE, or
Second Audio Program SAP
Stereo
Select Stereo sound control
Second Audio Program
Select Display Volume control
Display Volume
Ntsc Analog Sound Menu Controls
Automatic Volume Limiter
Menu button
Gently tap the Pronto touchscreen with your finger to
Pronto Remote NTSC/ANALOG Features
Pronto Analog TV Mode
Ntsc mode commands are sent From the remote
AUX1/2 Inputs
AUDIO/VIDEO Ntsc Analog Connections
Connect the Video OUT jack
He Audio/Video Output jacks
AUX 3 Inputs
For more convenient Direct
AUDIO/VIDEO Outputs
Connect the S-VIDEO S
AUX1 S-VIDEO Inputs
Turn the VCR on and place it
Press the ext input button on
AUDIO/VIDEO DVD Component Input Connections
Component Video Inputs
Connect the Component Y PB
System Audio Outputs
System Audio Output Connections
Connect the Right and Left System Audio OUT jacks on
DTV Setup Autoprogram
ATSC/DIGITAL ON-SCREEN Menu Features
Select DTV Setup control
ATSC/DIGITAL Picture Menu Controls
Select the Atsc Convergence control
RED/BLUE Convergence
Connect both external
Surround Sound
Place the speakers so
Surround Sound
ATSC/DIGITAL Sound Menu Controls
Dolby Digital Surround
Dolby Digital Surround Additional Connections
Select Bass or Treble sound
Auto Volume
Select Auto Volume sound
BASS, Treble
Menu
ATSC/DIGITAL Speakers Menu Controls
Speakers
Select the Atsc Speakers
Press the Menu arrow
Test Tone
Control is turned On
Select Test Tone sound control
Buttons to select the Captions
ATSC/DIGITAL Features Menu Controls
Select the Atsc Features Menu
Captions Format
ADD/DELETE Channel
Select the Atsc Features Menu
Press the Menu buttons to
Press 0, 7, 1, 1 on the remote
Select the Parental
Press the Menu
Menu or ok buttons to highlight
Channel 19 Blocked Select Channel to Allow Viewing M to Exit
Press the Menu button to
System. Program Content Advisory
Parental Guidelines
Level TV-Y, TV-Y7, etc
Major Parental Guideline Categories TV-Y7, TV-PG, etc
Press the Menu to
Parental Guideline rating
Current Parental Guideline
Status will also be shown Enabled
On, or Disabled Off
TV screen will display
Refer to the 64PH9905 Quick Use
Pronto Remote Atsc Digital Features
Pronto Digital TV Mode
Other details on the initial use Pronto remote control also
Cable optional from the VGA
Monitor Features Menu Controls
Connect a 15 pin VGA signal
VGA/SVGA/HDCOMPONENT
Press the Left/Right
Press the exit button to clear the screen when complete
Monitor Menu Controls
Replay
Dptv Displays Wrong Channel or incorrect program
Tips if Something Isnt Working
Index
Glossary to Television Terms
Philips Consumer Electronics Company
Texas
Limited Warranty