| ow that you have completed |
| Nthe required connections on |
| the previous page you are ready to |
| follow the simple steps shown |
| below. |
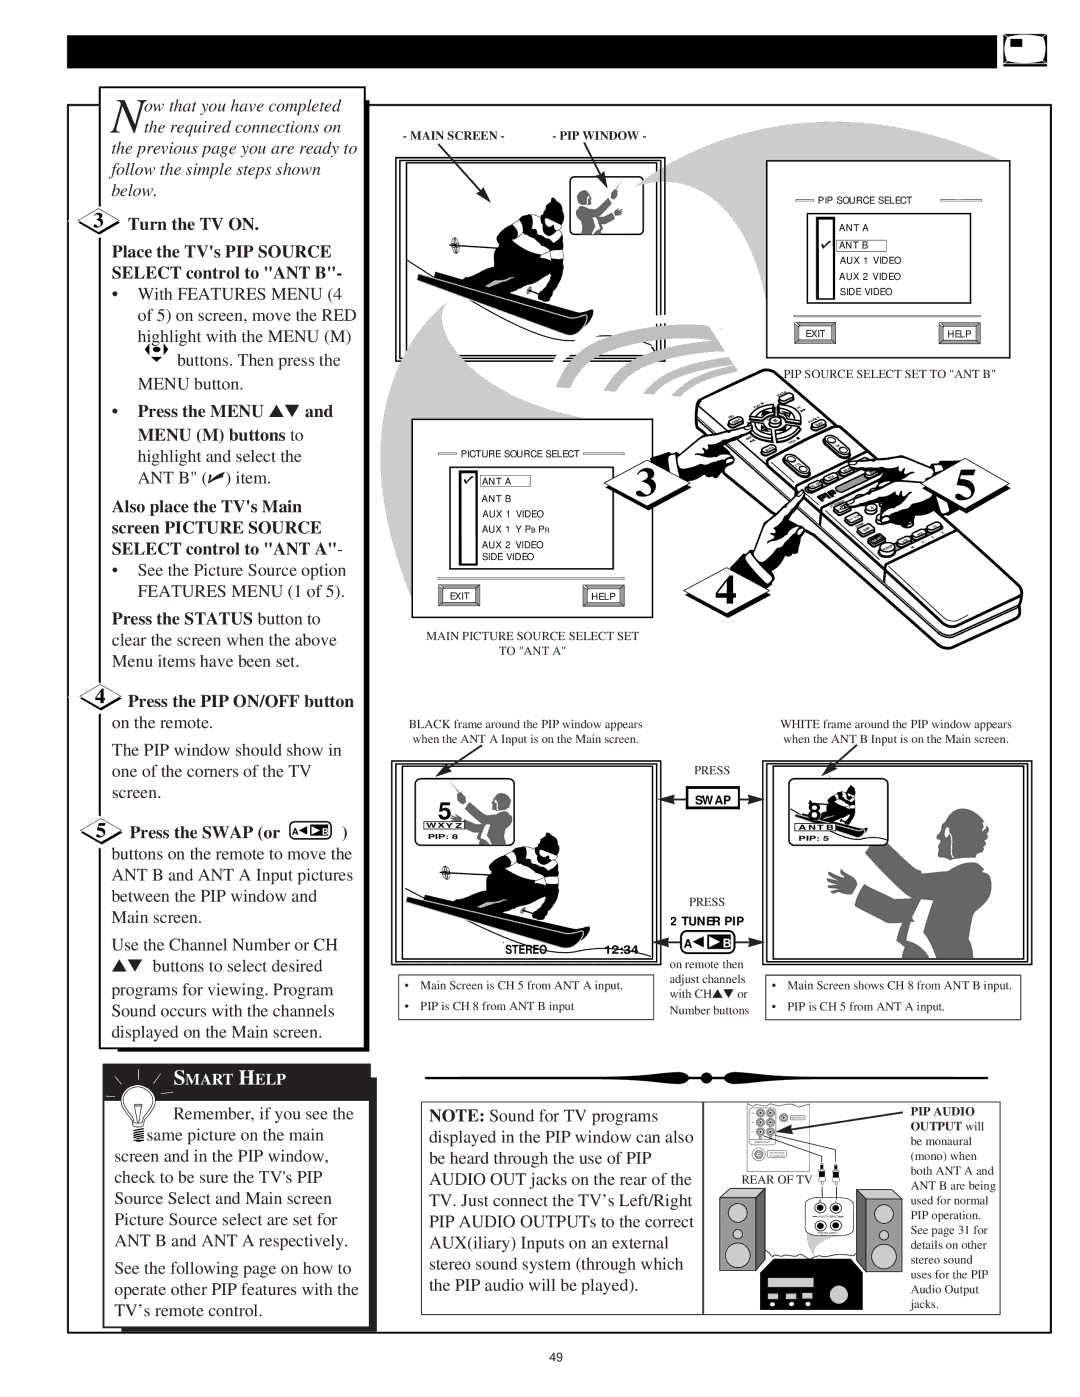
3 | Turn the TV ON. |
| Place the TV's PIP SOURCE |
| SELECT control to "ANT B"- |
| • With FEATURES MENU (4 |
| of 5) on screen, move the RED |
| highlight with the MENU (M) |
| buttons. Then press the |
| MENU button. |
- MAIN SCREEN - | - PIP WINDOW - |
PIP SOURCE SELECT |
|
ANT A |
|
ANT B |
|
AUX 1 VIDEO |
|
AUX 2 VIDEO |
|
SIDE VIDEO |
|
EXIT | HELP |
PIP SOURCE SELECT SET TO "ANT B"
STATUS
• Press the MENU ▲▼ and |
MENU (M) buttons to |
highlight and select the |
ANT B" (✔) item. |
Also place the TV's Main |
screen PICTURE SOURCE |
SELECT control to "ANT A"- |
• See the Picture Source option |
FEATURES MENU (1 of 5). |
Press the STATUS button to |
|
|
| ▶ |
|
|
| PLAY |
|
| • |
|
|
| REC | MENU |
|
|
| |
|
| CLEAR | M |
|
|
| |
|
|
| − |
|
|
| REW |
|
|
| ◀◀ |
PICTURE SOURCE SELECT |
|
| MUTE |
| 3 |
| |
ANT A |
|
| |
ANT B |
|
| |
AUX 1 VIDEO |
|
|
|
AUX 1 Y PB PR |
|
|
|
AUX 2 VIDEO |
|
|
|
SIDE VIDEO |
| 4 |
|
EXIT | HELP |
| |
|
|
FF ▶▶ +
■ STOP
VOL
II |
|
|
|
PAUSE |
|
|
|
SURF |
|
|
|
CH |
|
|
|
| FREEZE |
|
|
SWAP | SIZE |
|
|
POS |
|
|
|
ON/OFF |
| 3 |
|
| 2 | 6 |
|
| 1 |
| |
PIP | 5 |
| |
|
| ||
2TUNER B | 4 | 8 | 9 |
A | 5 | ||
◀◀ |
|
|
|
TV/VCR | 7 | 7 |
|
|
ENTER |
|
|
| TV |
SLEEP |
|
| ACC | E |
|
|
| D | |
| SMART | VCR | O |
|
| POWER | M |
|
|
| clear the screen when the above | ||
| Menu items have been set. | ||
4 | Press the PIP ON/OFF button | ||
| on the remote. | ||
| The PIP window should show in | ||
| one of the corners of the TV | ||
| screen. | ||
5 | Press the SWAP (or A◀ |
| ) |
◀ B | |||
| |||
| buttons on the remote to move the | ||
| ANT B and ANT A Input pictures | ||
| between the PIP window and | ||
| Main screen. | ||
| Use the Channel Number or CH | ||
| ▲▼ buttons to select desired | ||
| programs for viewing. Program | ||
| Sound occurs with the channels | ||
| displayed on the Main screen. | ||
SMART HELP
MAIN PICTURE SOURCE SELECT SET
TO "ANT A"
BLACK frame around the PIP window appears |
| WHITE frame around the PIP window appears | ||
when the ANT A Input is on the Main screen. |
| when the ANT B Input is on the Main screen. | ||
|
| PRESS |
| |
5 |
| SWAP | 8 | |
|
| |||
W X Y Z |
|
| A N T B | |
PIP: 8 |
|
| PIP: 5 | |
|
| PRESS |
| |
|
| 2 TUNER PIP |
| |
STEREO | 12:34 | A◀ ◀ B |
| |
|
| |||
|
| on remote then |
| |
• Main Screen is CH 5 from ANT A input. | adjust channels | • Main Screen shows CH 8 from ANT B input. | ||
with CH▲▼ or | ||||
• PIP is CH 8 from ANT B input |
| • PIP is CH 5 from ANT A input. | ||
| Number buttons | |||
|
|
| ||
![]()
![]()
![]() Remember, if you see the
Remember, if you see the ![]() same picture on the main
same picture on the main
screen and in the PIP window, check to be sure the TV's PIP Source Select and Main screen Picture Source select are set for ANT B and ANT A respectively.
See the following page on how to operate other PIP features with the TV’s remote control.
NOTE: Sound for TV programs displayed in the PIP window can also be heard through the use of PIP AUDIO OUT jacks on the rear of the TV. Just connect the TV’s Left/Right PIP AUDIO OUTPUTs to the correct AUX(iliary) Inputs on an external stereo sound system (through which the PIP audio will be played).
FIXED
VIDEO OUT
VAR
PIP
RL
AUDIO OUT
ANT A/CABLE 75 V UHF/VHF
REAR OF TV
R L
![]() AUX/TV INPUT
AUX/TV INPUT ![]()
PHONO INPUT
PIP AUDIO
OUTPUT will be monaural (mono) when both ANT A and ANT B are being used for normal PIP operation. See page 31 for details on other stereo sound uses for the PIP Audio Output jacks.
49
