Making Basic Connections to the TV

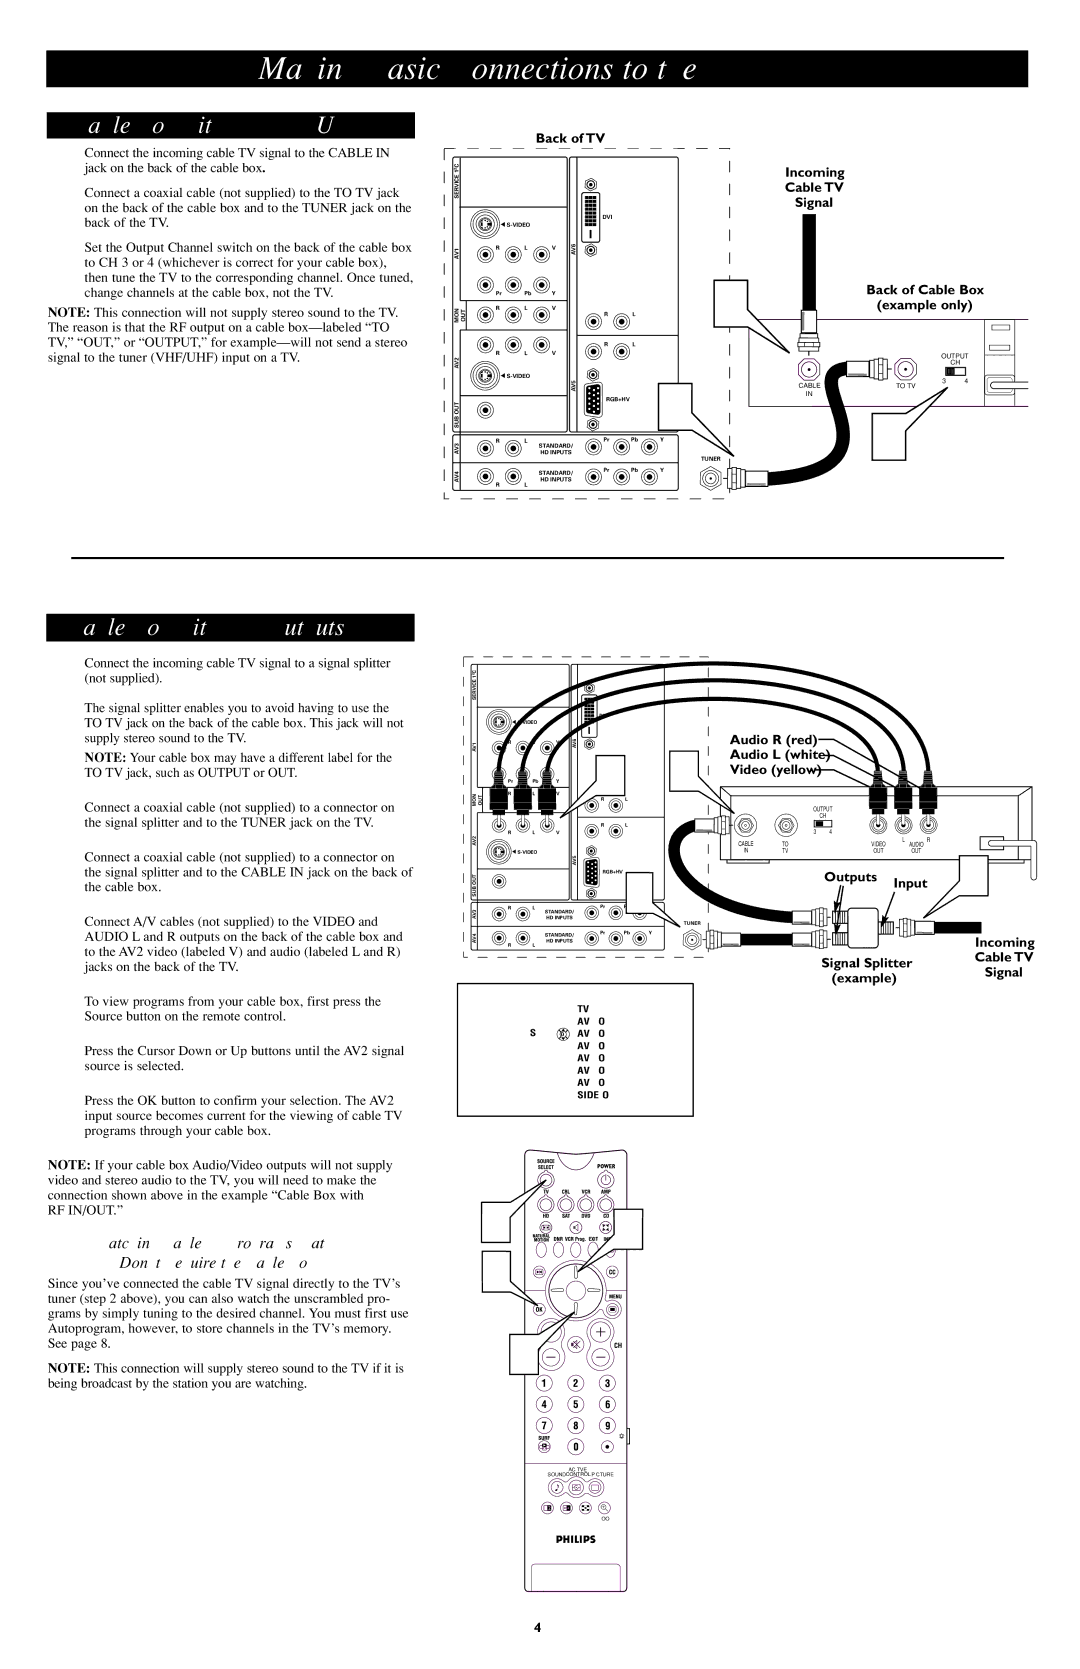
Cable Box with RF IN/OUT

1 Connect the incoming cable TV signal to the CABLE IN jack on the back of the cable box.

2 Connect a coaxial cable (not supplied) to the TO TV jack on the back of the cable box and to the TUNER jack on the back of the TV.

3 Set the Output Channel switch on the back of the cable box to CH 3 or 4 (whichever is correct for your cable box), then tune the TV to the corresponding channel. Once tuned, change channels at the cable box, not the TV.

NOTE: This connection will not supply stereo sound to the TV. The reason is that the RF output on a cable box—labeled “TO TV,” “OUT,” or “OUTPUT,” for example—will not send a stereo signal to the tuner (VHF/UHF) input on a TV.


Back of TV


C


Incoming


2


1


SERVICE


Cable TV


Signal


DVI


G S-VIDEO


AV1


R

L

V

AV6


Pr

Pb

Y


1

Back of Cable Box

MON

OUT

R

L

V


R

L


(example only)


R

L


AV2


R

L

V


OUTPUT


CH


G S-VIDEO


AV5


3

4


2

CABLE


TO TV


RGB+HV


IN


AV3 SUB OUT


3


R

L

HD INPUTS

Pr

Pb

Y

TUNER


STANDARD/


AV4


STANDARD/

Pr

Pb

Y


R

L

HD INPUTS


Cable Box with A/V Outputs

1 Connect the incoming cable TV signal to a signal splitter (not supplied).

The signal splitter enables you to avoid having to use the TO TV jack on the back of the cable box. This jack will not supply stereo sound to the TV.

NOTE: Your cable box may have a different label for the TO TV jack, such as OUTPUT or OUT.

2 Connect a coaxial cable (not supplied) to a connector on the signal splitter and to the TUNER jack on the TV.

3 Connect a coaxial cable (not supplied) to a connector on the signal splitter and to the CABLE IN jack on the back of the cable box.

4 Connect A/V cables (not supplied) to the VIDEO and AUDIO L and R outputs on the back of the cable box and to the AV2 video (labeled V) and audio (labeled L and R) jacks on the back of the TV.

5 To view programs from your cable box, first press the Source button on the remote control.

6 Press the Cursor Down or Up buttons until the AV2 signal source is selected.

7 Press the OK button to confirm your selection. The AV2 input source becomes current for the viewing of cable TV programs through your cable box.

C


2


SERVICE 1


DVI


G S-VIDEO


AV1


R

L

V

AV6


4


3


Pr

Pb

Y


MON

OUT

R

L

V


R

L


R

L


AV2


R

L

V


G S-VIDEO


AV5


SUB OUT


RGB+HV

2


AV3


R

L

STANDARD/

Pr


HD INPUTS


TUNER


AV4


STANDARD/

Pr

Pb

Y


R

L

HD INPUTS


TV

AV1:Other

Source OK AV2:Other

AV3:Other

AV4:Other

AV5:Other

AV6:Other

SIDE:Other

Audio R (red)

Audio L (white)

Video (yellow)

OUTPUT

CH


3

4


CABLE

TO

VIDEO

L AUDIO R


IN

TV

OUT

OUT

1


Outputs

Input


Incoming

Signal SplitterCable TV

(example)Signal

NOTE: If your cable box Audio/Video outputs will not supply video and stereo audio to the TV, you will need to make the connection shown above in the example “Cable Box with RF IN/OUT.”

Watching Cable TV Programs That

Don’t Require the Cable Box

Since you’ve connected the cable TV signal directly to the TV’s tuner (step 2 above), you can also watch the unscrambled pro- grams by simply tuning to the desired channel. You must first use Autoprogram, however, to store channels in the TV’s memory. See page 8.

NOTE: This connection will supply stereo sound to the TV if it is being broadcast by the station you are watching.

56 7

6

ACITVE

SOUND CONTROL PICTURE

1 2

ZOOM

4

Page 4
Image 4
Philips AV5, AV4, AV3, AV6, AV2 user manual Cable Box with RF IN/OUT, Cable Box with A/V Outputs, Back of TV, Back of Cable Box

AV6, AV4, AV3, AV5, AV2 specifications

Philips has long been a name synonymous with innovation and quality in the audio-visual industry. Among its extensive range of offerings, the AV series stands out as a benchmark for functionality and user experience. The AV2, AV3, AV4, AV5, and AV6 models each carry distinct features, technologies, and characteristics that cater to diverse audio-visual needs.

The Philips AV2 model is well-known for its simplicity and accessibility, making it an ideal choice for beginners. It features a basic set of functionalities including essential audio and video playback compatibility, as well as straightforward connectivity options such as HDMI and USB ports. Its compact design is perfect for those with limited space, while still delivering satisfying performance for casual viewing.

Moving to the AV3 model, users will find enhanced features that amplify their audio-visual experience. This model incorporates advanced sound processing technologies that improve sound clarity and volume control. The AV3 supports multi-channel audio output, allowing users to create a more immersive experience when watching movies or playing games. It also boasts a sleek design that fits seamlessly into modern entertainment setups.

The Philips AV4 model takes things a step further with its Smart TV integration, allowing users to access streaming services like Netflix and YouTube directly through the device. This model also features a higher resolution display, supporting 4K content, which ensures that visuals are vibrant and life-like. Its connectivity options are extensive, supporting both wireless and wired connections, making it easy to stream content from various devices.

For those seeking ultimate performance, the AV5 model offers high-definition picture quality and superior audio capabilities. It utilizes cutting-edge technologies like Dolby Atmos and HDR to create a completely immersive audio-visual experience. The AV5 model is tailored for audiophiles and film enthusiasts, providing an unparalleled listening environment with deep bass and crystal-clear treble.

Lastly, the AV6 model is the flagship of the series, complete with all the bells and whistles. It features a state-of-the-art display with 8K resolution, built-in gaming modes, and advanced AI-enhanced audio. The AV6's smart features include voice control and integration with smart home devices, making it a versatile choice for tech-savvy users.

In summary, the Philips AV series models—AV2, AV3, AV4, AV5, and AV6—offer a range of features and technologies tailored to different user needs. From simple, user-friendly designs to high-performance, cutting-edge technologies, these models provide options for everyone looking to enhance their audio-visual experience.