E9015ED_EN.qx3 03.7.29 6:32 PM Page 14

Programming a Recording (TIMER)

English

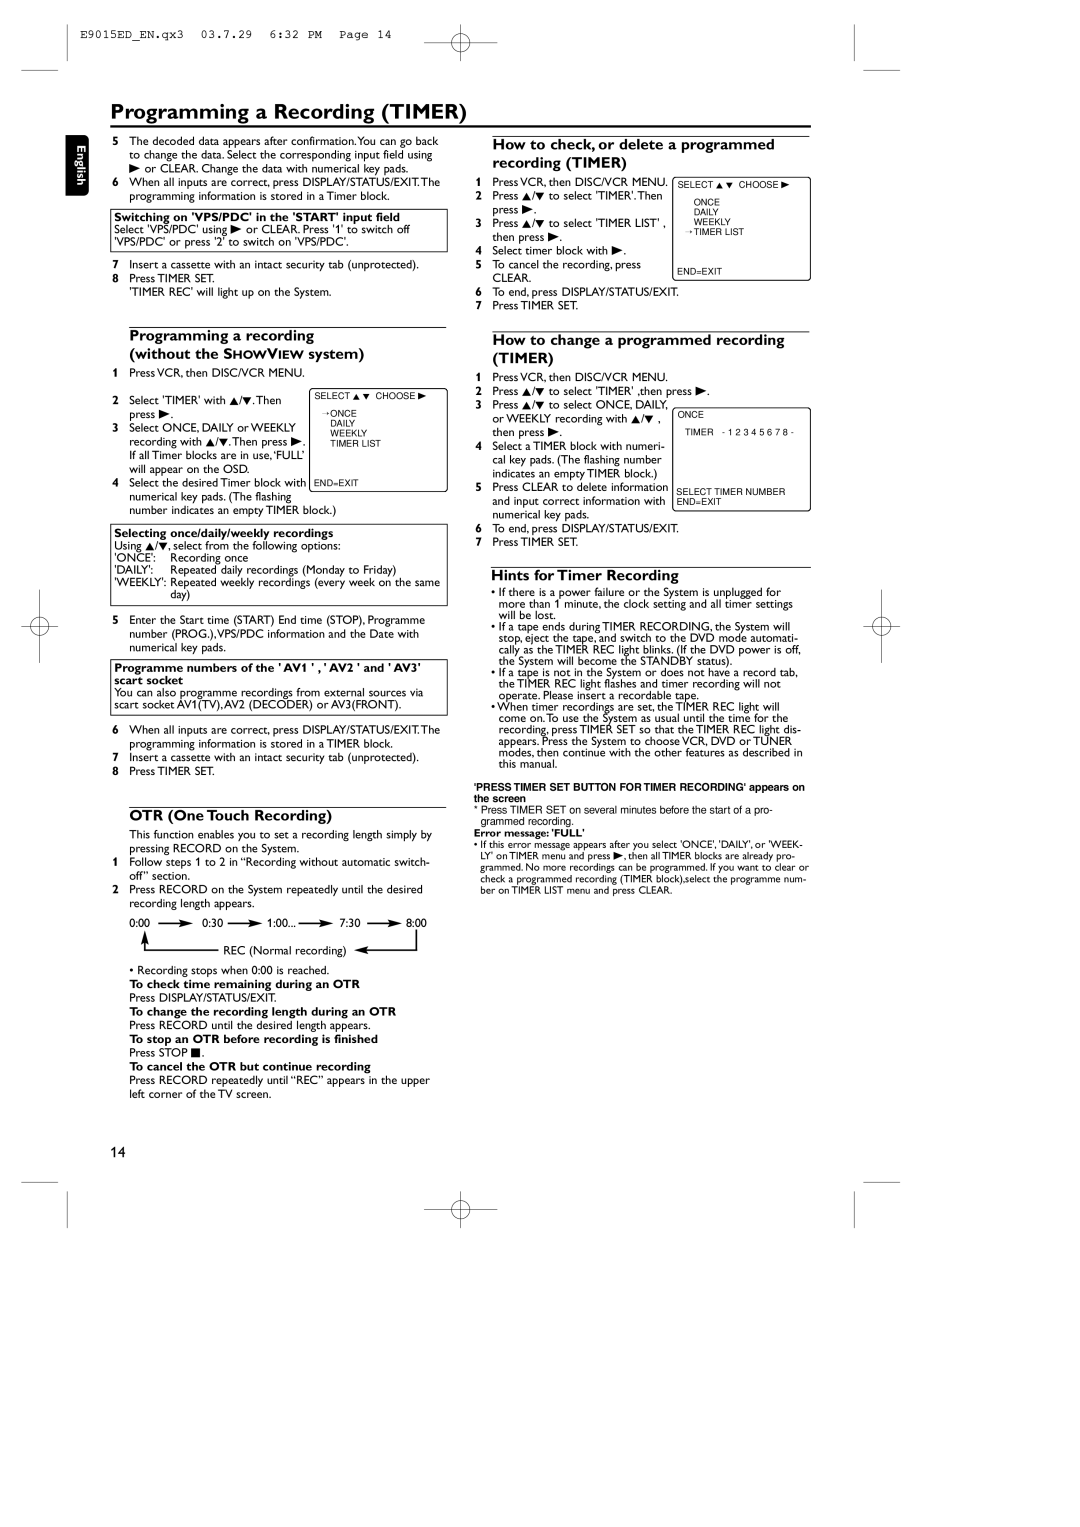
5The decoded data appears after confirmation.You can go back to change the data. Select the corresponding input field using B or CLEAR. Change the data with numerical key pads.

6When all inputs are correct, press DISPLAY/STATUS/EXIT.The programming information is stored in a Timer block.

Switching on 'VPS/PDC' in the 'START' input field Select 'VPS/PDC' using B or CLEAR. Press '1' to switch off 'VPS/PDC' or press '2' to switch on 'VPS/PDC'.

7Insert a cassette with an intact security tab (unprotected).

8Press TIMER SET.

'TIMER REC' will light up on the System.

How to check, or delete a programmed recording (TIMER)

1

Press VCR, then DISC/VCR MENU.

SELECT K L CHOOSE B

2

Press K/L to select 'TIMER'.Then

ONCE


press B.

3

DAILY

Press K/L to select 'TIMER LIST' ,

WEEKLY


then press B.

TIMER LIST

4


Select timer block with B.


5

To cancel the recording, press

END=EXIT


CLEAR.


6To end, press DISPLAY/STATUS/EXIT.

7Press TIMER SET.

Programming a recording (without the SHOWVIEW system)

1

Press VCR, then DISC/VCR MENU.


2

Select 'TIMER' with K/L.Then

SELECT K L CHOOSE B


press B.

ONCE

3

Select ONCE, DAILY or WEEKLY

DAILY

WEEKLY


recording with K/L.Then press B.


TIMER LIST

If all Timer blocks are in use,‘FULL’ will appear on the OSD.

4Select the desired Timer block with END=EXIT numerical key pads. (The flashing

number indicates an empty TIMER block.)

Selecting once/daily/weekly recordings Using K/L, select from the following options: 'ONCE': Recording once

'DAILY': Repeated daily recordings (Monday to Friday)

'WEEKLY': Repeated weekly recordings (every week on the same day)

5Enter the Start time (START) End time (STOP), Programme number (PROG.),VPS/PDC information and the Date with numerical key pads.

Programme numbers of the ' AV1 ' , ' AV2 ' and ' AV3' scart socket

You can also programme recordings from external sources via scart socket AV1(TV),AV2 (DECODER) or AV3(FRONT).

6When all inputs are correct, press DISPLAY/STATUS/EXIT.The programming information is stored in a TIMER block.

7Insert a cassette with an intact security tab (unprotected).

8Press TIMER SET.

OTR (One Touch Recording)

This function enables you to set a recording length simply by pressing RECORD on the System.

1Follow steps 1 to 2 in “Recording without automatic switch- off” section.

2Press RECORD on the System repeatedly until the desired recording length appears.

0:00


0:30


1:00...


7:30


8:00


REC (Normal recording)

• Recording stops when 0:00 is reached.

To check time remaining during an OTR

Press DISPLAY/STATUS/EXIT.

To change the recording length during an OTR Press RECORD until the desired length appears.

To stop an OTR before recording is finished Press STOP C.

To cancel the OTR but continue recording

Press RECORD repeatedly until “REC” appears in the upper left corner of the TV screen.

How to change a programmed recording (TIMER)

1Press VCR, then DISC/VCR MENU.

2Press K/L to select 'TIMER' ,then press B.

3Press K/L to select ONCE, DAILY,


or WEEKLY recording with K/L ,

ONCE


4

then press B.

TIMER - 1 2 3 4 5 6 7 8 -

Select a TIMER block with numeri-


cal key pads. (The flashing number


5

indicates an empty TIMER block.)


Press CLEAR to delete information

SELECT TIMER NUMBER


and input correct information with

END=EXIT

numerical key pads.

6To end, press DISPLAY/STATUS/EXIT.

7Press TIMER SET.

Hints for Timer Recording

If there is a power failure or the System is unplugged for more than 1 minute, the clock setting and all timer settings will be lost.

If a tape ends during TIMER RECORDING, the System will stop, eject the tape, and switch to the DVD mode automati- cally as the TIMER REC light blinks. (If the DVD power is off, the System will become the STANDBY status).

If a tape is not in the System or does not have a record tab, the TIMER REC light flashes and timer recording will not operate. Please insert a recordable tape.

When timer recordings are set, the TIMER REC light will come on.To use the System as usual until the time for the recording, press TIMER SET so that the TIMER REC light dis- appears. Press the System to choose VCR, DVD or TUNER modes, then continue with the other features as described in this manual.

'PRESS TIMER SET BUTTON FOR TIMER RECORDING' appears on the screen

*Press TIMER SET on several minutes before the start of a pro- grammed recording.

Error message: 'FULL'

If this error message appears after you select 'ONCE', 'DAILY', or 'WEEK- LY' on TIMER menu and press B, then all TIMER blocks are already pro- grammed. No more recordings can be programmed. If you want to clear or check a programmed recording (TIMER block),select the programme num- ber on TIMER LIST menu and press CLEAR.

14

Page 14
Image 14
Philips 0VMN03813, E9015ED, MX5100VR/00 manual Programming a Recording Timer

MX5100VR/00, E9015ED, 0VMN03813 specifications

Philips has long been a trusted name in consumer electronics, and among its diverse lineup of products, the 0VMN03813, E9015ED, and MX5100VR/00 stand out for their innovative features and reliable performance. Each of these models is designed to cater to the needs of modern users who demand versatility and efficiency in their devices.

Starting with the Philips 0VMN03813, this model exemplifies cutting-edge technology and user-friendly design. With a powerful processor, it ensures smooth operation for various applications. The display quality is exceptional, providing vibrant colors and sharp images, making it an ideal choice for multimedia consumption. Additionally, the 0VMN03813 is equipped with advanced connectivity options, including Wi-Fi and Bluetooth, enabling easy connection to other devices and internet access for streaming and downloading.

Next in line is the Philips E9015ED, a product that focuses on delivering high sound quality. This model is tailored for audiophiles who appreciate rich audio experiences. The E9015ED incorporates enhanced noise-cancellation technology, allowing users to immerse themselves in their favorite music without distractions. With a robust battery life, users can enjoy long listening sessions without the worry of frequent recharging. The design is sleek and ergonomic, ensuring comfort during extended use.

Lastly, the Philips MX5100VR/00 adds another dimension to the product lineup. This model is particularly innovative in its approach to user interaction, featuring intuitive controls and an easy-to-navigate interface. The MX5100VR/00 excels in versatility, functioning seamlessly across multiple platforms and devices. It is perfect for both casual users and professionals who rely on precision and efficiency for their tasks. The enhanced durability of this model means that it can withstand the rigors of daily use, making it an excellent investment for anyone in need of a reliable technology solution.

In conclusion, the Philips 0VMN03813, E9015ED, and MX5100VR/00 are exemplary products that highlight the brand's commitment to quality and innovation. Each product caters to specific user needs, equipped with modern technologies and features designed to improve performance and usability. Whether for entertainment, audio enjoyment, or efficient multitasking, these models represent the forefront of Philips' offerings in the tech market.