Functional Overview
En | Front and Rear panels |
|
|
|
|
|
|
| |
glis h |
| DVD VIDEO DIGITAL SURROUND SYSTEM |
|
|
|
|
| VOLUME |
|
|
|
|
|
|
|
|
| ||
|
|
|
|
|
|
|
| P |
|
|
|
| OPEN/CLOSE |
| SOURCE | PROGRAM | AY/ AU |
| |
|
|
|
| PL | SE |
| |||
|
|
|
|
|
| EV |
| N |
|
|
|
|
|
|
|
| E |
| |
|
|
|
|
|
| R |
| X |
|
|
|
|
|
|
| P |
| T |
|
|
|
|
|
|
|
|
| STOP |
|
| STANDBY | PROGRESSIVE SCAN |
|
|
|
|
|
|
|
| ON |
|
|
|
|
|
|
| |
| 1 | 2 | 3 | 4 | 5 6 7879 0 | ! | |||
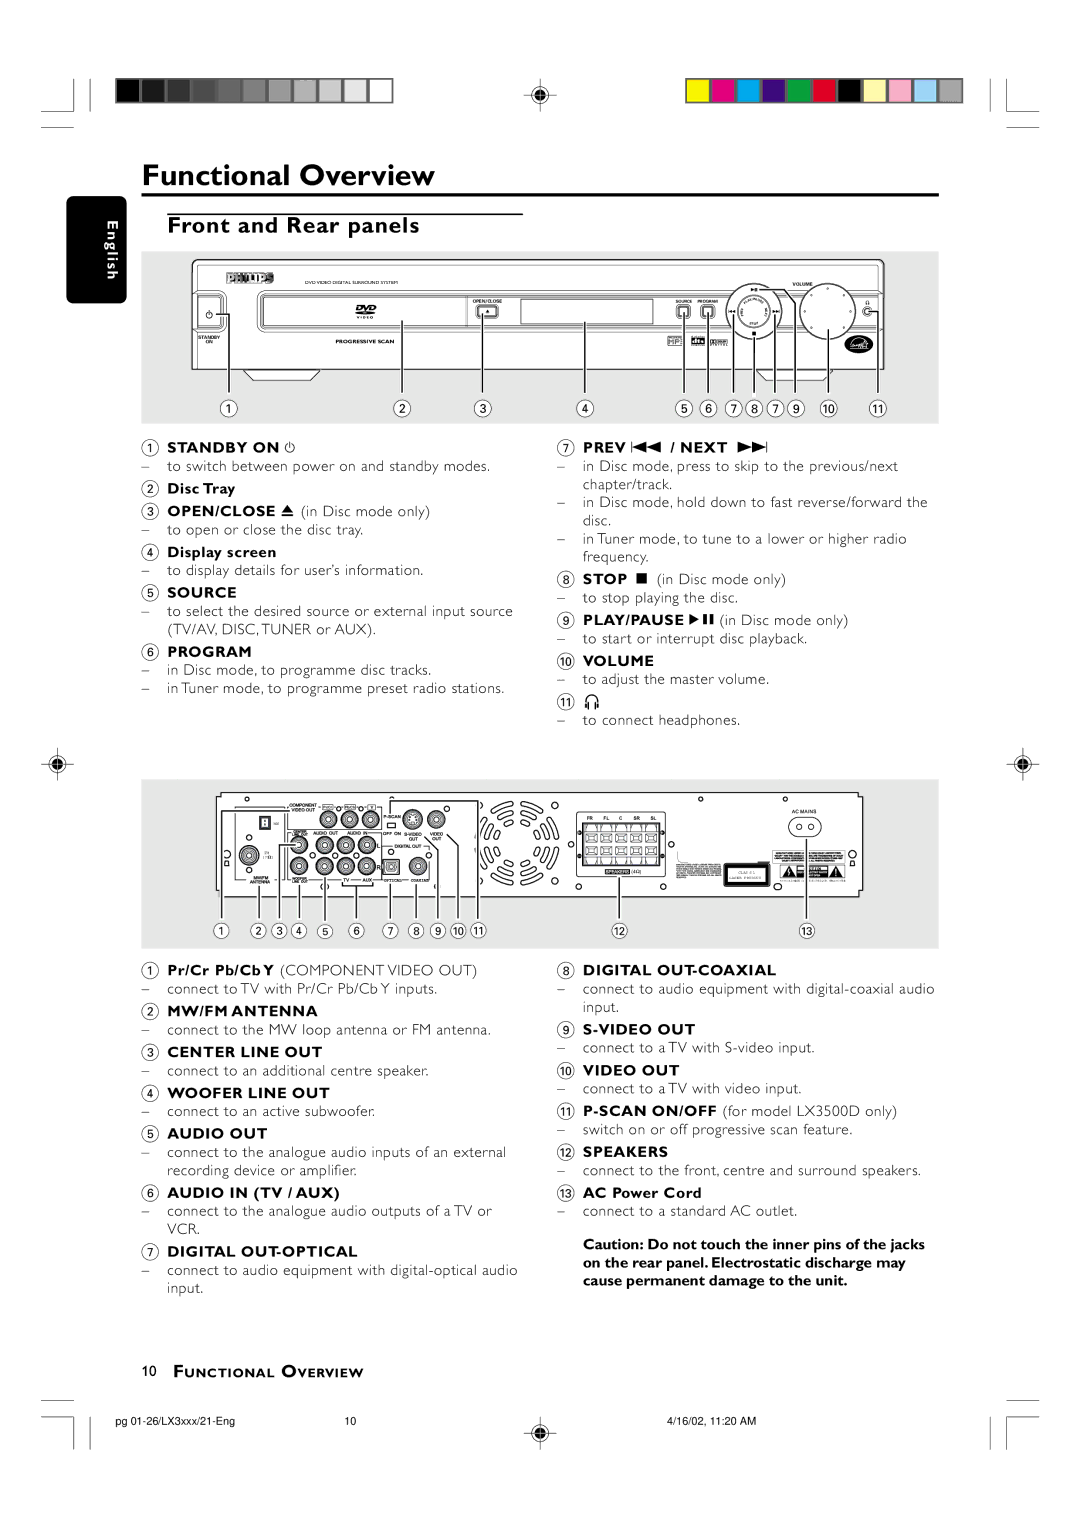
1STANDBY ON y
–to switch between power on and standby modes.
2Disc Tray
3OPEN/CLOSE 0 (in Disc mode only)
– to open or close the disc tray.
4Display screen
–to display details for user’s information.
5SOURCE
–to select the desired source or external input source (TV/AV, DISC, TUNER or AUX).
6PROGRAM
–in Disc mode, to programme disc tracks.
–in Tuner mode, to programme preset radio stations.
7 PREV S / NEXT T
–in Disc mode, press to skip to the previous/next chapter/track.
–in Disc mode, hold down to fast reverse/forward the disc.
–in Tuner mode, to tune to a lower or higher radio frequency.
8STOP Ç (in Disc mode only)
– to stop playing the disc.
9PLAY/PAUSEÉÅ(in Disc mode only)
– to star t or interrupt disc playback.
0VOLUME
–to adjust the master volume.
!n
–to connect headphones.
| COMPONENT | Pr/Cr | Pb/Cb | Y |
|
|
|
|
|
|
|
| |
| VIDEO OUT |
|
|
|
|
|
|
|
|
|
|
| |
|
|
|
|
|
|
|
| FR | FL | C | SR | SL | |
| MW |
|
|
|
|
|
|
|
|
|
|
|
|
| CENTER | AUDIO OUT | AUDIO IN | OFF ON | VIDEO | + |
|
|
| + | |||
| LINE OUT |
|
|
| |||||||||
|
|
|
|
|
|
| OUT | OUT |
|
|
|
|
|
|
|
|
|
| L | DIGITAL OUT |
|
|
|
|
|
| |
FM |
|
|
|
|
|
|
|
|
|
|
|
|
|
(75 ) |
|
|
|
|
|
|
|
|
|
|
|
|
|
|
|
|
|
| R |
|
|
|
| SPEAKERS (4 ) |
| ||
|
|
|
|
|
|
|
|
|
|
| |||
MW/FM | WOOFER |
|
| TV | AUX | OPTICAL | COAXIAL |
|
|
|
|
|
|
ANTENNA | LINE OUT |
|
|
|
|
|
|
|
| ||||
1 2 34 5 6 7 8 90! | @ |
1
MANUFACTURED UNDER LICENSE FORM DOLBY LABORATORIES,
DOLBY AND THE
LABORATORIES. CONFIDENTIAL UNPUBLISHED ![]() 1992-1997
1992-1997
DOLBY LABORATORIES, INC. ALL RIGHTS RESERVED.
CAUTION
CLAS S 1
LASER PRODUCT
AVIS:RISQUE DE CHOC
#
1Pr/Cr Pb/Cb Y (COMPONENT VIDEO OUT)
– connect to TV with Pr/Cr Pb/Cb Y inputs.
2MW/FM ANTENNA
–connect to the MW loop antenna or FM antenna.
3CENTER LINE OUT
–connect to an additional centre speaker.
4WOOFER LINE OUT
–connect to an active subwoofer.
5AUDIO OUT
–connect to the analogue audio inputs of an external recording device or amplifier.
6AUDIO IN (TV / AUX)
–connect to the analogue audio outputs of a TV or VCR.
7DIGITAL
–connect to audio equipment with
8DIGITAL
–connect to audio equipment with
9
–connect to a TV with
0VIDEO OUT
–connect to a TV with video input.
!
– switch on or off progressive scan feature.
@SPEAKERS
–connect to the front, centre and surround speakers.
#AC Power Cord
–connect to a standard AC outlet.
Caution: Do not touch the inner pins of the jacks on the rear panel. Electrostatic discharge may cause permanent damage to the unit.
10FUNCTIONAL OVERVIEW
pg | 10 | 4/16/02, 11:20 AM |
