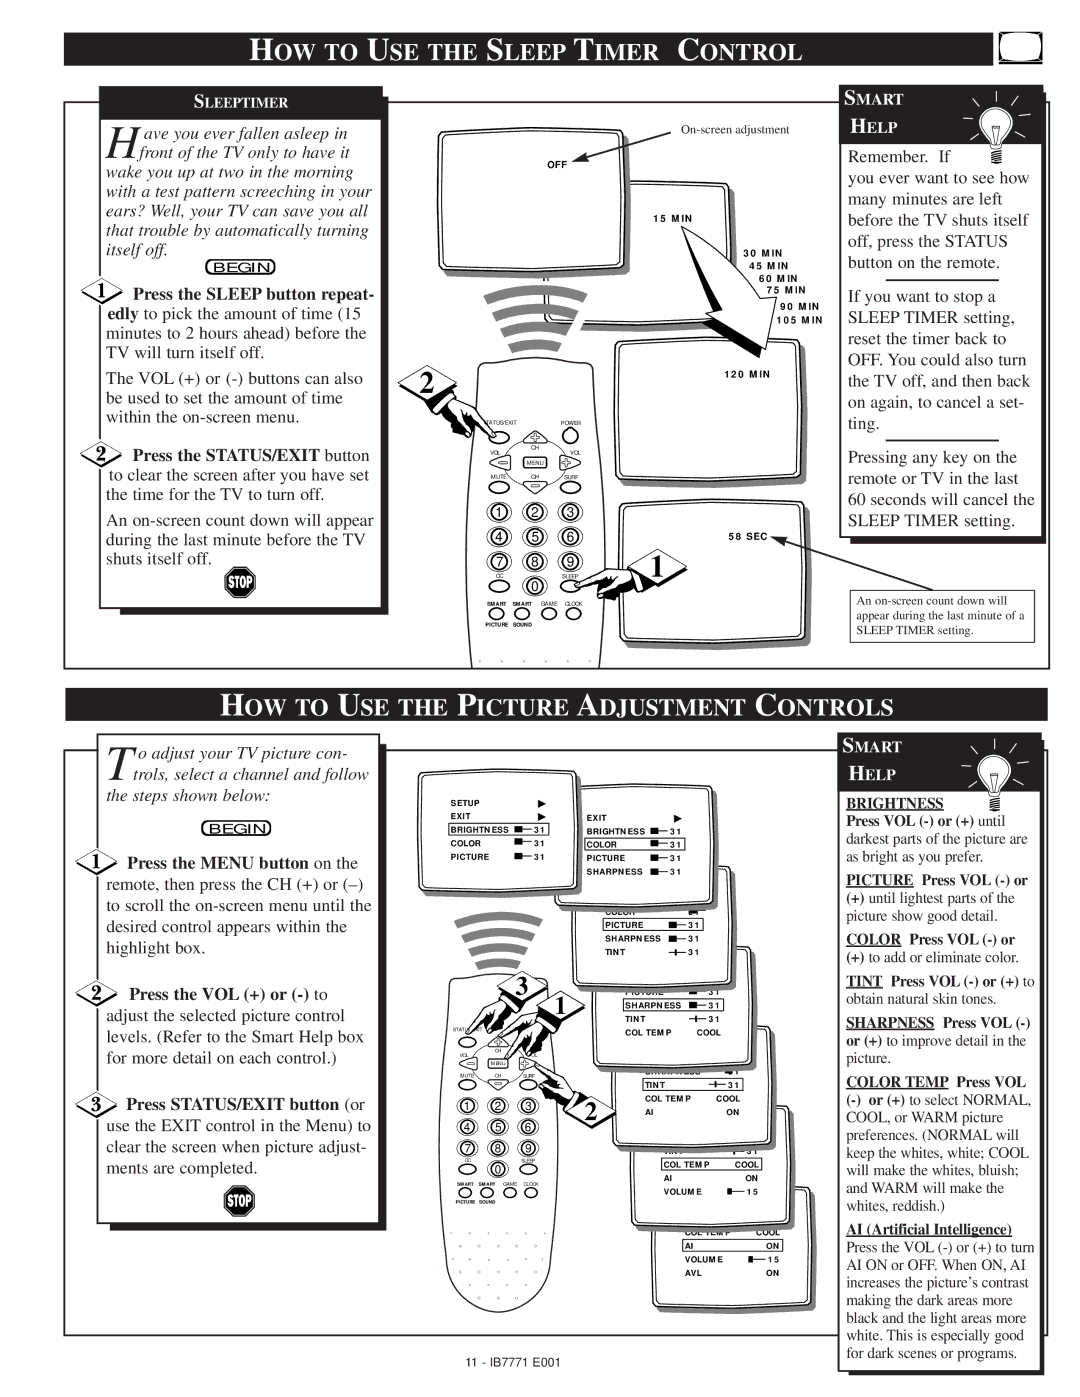
HOW TO USE THE SLEEP TIMER CONTROL
SLEEPTIMER
H ave you ever fallen asleep in front of the TV only to have it wake you up at two in the morning
with a test pattern screeching in your ears? Well, your TV can save you all that trouble by automatically turning itself off.
BEGIN
![]() Press the SLEEP button repeat- edly to pick the amount of time (15 minutes to 2 hours ahead) before the TV will turn itself off.
Press the SLEEP button repeat- edly to pick the amount of time (15 minutes to 2 hours ahead) before the TV will turn itself off.
The VOL (+) or
![]() Press the STATUS/EXIT button to clear the screen after you have set the time for the TV to turn off.
Press the STATUS/EXIT button to clear the screen after you have set the time for the TV to turn off.
An
On-screen adjustment
OFF
15 MIN
30 MIN
45 MIN
60 MIN
75 MIN
90 MIN
105 MIN
2 |
|
| 120 MIN |
|
|
| |
STATUS/EXIT | POWER |
| |
VOL | CH | VOL |
|
|
| ||
| MENU |
|
|
MUTE | CH | SURF |
|
1 | 2 | 3 |
|
4 | 5 | 6 | 58 SEC |
7 | 8 | 9 | 1 |
CC | 0 | SLEEP | |
|
|
| |
SMART | SMART GAME | CLOCK |
|
PICTURE SOUND |
|
| |
SMART
HELP
Remember. If ![]() you ever want to see how many minutes are left before the TV shuts itself off, press the STATUS button on the remote.
you ever want to see how many minutes are left before the TV shuts itself off, press the STATUS button on the remote.
If you want to stop a SLEEP TIMER setting, reset the timer back to OFF. You could also turn the TV off, and then back on again, to cancel a set- ting.
Pressing any key on the remote or TV in the last 60 seconds will cancel the SLEEP TIMER setting.
An
HOW TO USE THE PICTURE ADJUSTMENT CONTROLS
T o adjust your TV picture con- trols, select a channel and follow
the steps shown below:
BEGIN
![]() Press the MENU button on the remote, then press the CH (+) or
Press the MENU button on the remote, then press the CH (+) or
Press the VOL (+) or
adjust the selected picture control levels. (Refer to the Smart Help box for more detail on each control.)
![]() Press STATUS/EXIT button (or use the EXIT control in the Menu) to clear the screen when picture adjust- ments are completed.
Press STATUS/EXIT button (or use the EXIT control in the Menu) to clear the screen when picture adjust- ments are completed.
SETUP▶
EXIT▶
BRIGHTNESS ![]() 31
31
COLOR31
PICTURE 31
3
STATUS/EXITPOWER
CH
VOL | VOL |
MENU
MUTE CH SURF
1 2 3
4 5 6
7 8 9
CCSLEEP
0
SMART SMART GAME CLOCK
PICTURE SOUND
EXIT |
|
| ▶ |
BRIGHTNESS |
|
| 31 |
|
| ||
COLOR |
|
| 31 |
PICTURE |
|
| 31 |
SHARPNESS |
|
| 31 |
| BRIGHTNESS | 31 | |
| COLOR | 31 | |
| PICTURE | 31 | |
| SHARPNESS | 31 | |
| TINT | 31 | |
| COLOR | 31 | |
1 | PICTURE | 31 | |
SHARPNESS | 31 | ||
| |||
| TINT | 31 | |
| COL TEMP | COOL |
| PICTURE |
| 31 |
| SHARPNESS |
| 31 |
| TINT |
| 31 |
2 | COL TEMP | COOL | |
AI |
| ON | |
| SHARPNESS | 31 | |
| TINT |
| 31 |
| COL TEMP |
| COOL |
| AI |
| ON |
| VOLUME |
| 15 |
TINT |
|
| 31 | |
COL TEMP |
| COOL | ||
AI |
|
|
| ON |
VOLUME |
|
| 15 | |
AVL |
|
|
| ON |
SMART
HELP
BRIGHTNESS ![]() Press VOL
Press VOL
darkest parts of the picture are as bright as you prefer.
PICTURE Press VOL
(+)until lightest parts of the picture show good detail.
COLOR Press VOL
(+)to add or eliminate color.
TINT Press VOL
obtain natural skin tones.
SHARPNESS Press VOL (-) or (+) to improve detail in the picture.
COLOR TEMP Press VOL
AI (Artificial Intelligence)
Press the VOL
11 - IB7771 E001