INSTALLATION MANUAL

CDX-FM673

MANUEL D’INSTALLATION


<KFJFF/00H00000> <CRD3322-A/N> UC

This product conforms to CEMA cord colors.

Le code de couleur des câbles utilisé pour ce pro- duit est conforme à CEMA.

Published by Pioneer Corporation.

Copyright © 2000 by Pioneer Corporation.

All rights reserved.

Publication de Pioneer Corporation.


Copyright © 2000 Pioneer Corporation.

Printed in Thailand

Tous droits de reproduction et de traduction réservés.

Imprimé en Thaïlande

Connecting the Units/Connexion des appareils

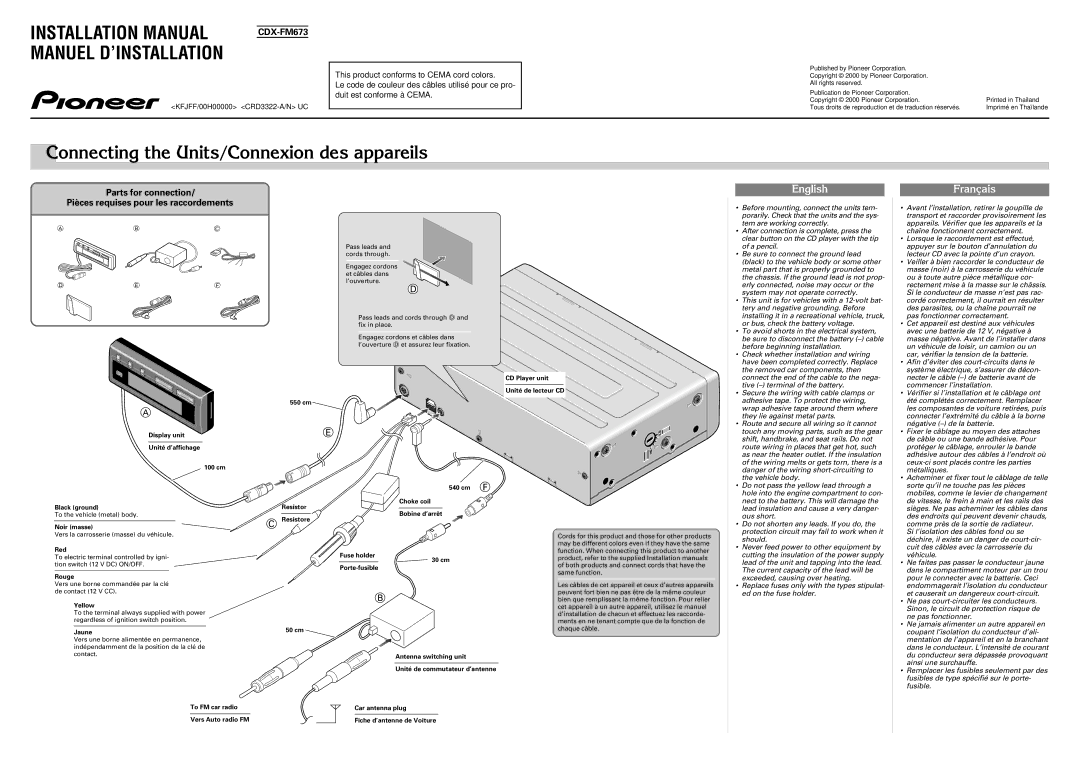
Parts for connection/

EnglishFrançais

Pièces requises pour les raccordements

ABC

Pass leads and cords through.

Engagez cordons et câbles dans

l’ouverture.

DEFD

• Before mounting, connect the units tem-


porarily. Check that the units and the sys-


tem are working correctly.

After connection is complete, press the


clear button on the CD player with the tip


of a pencil.

• Be sure to connect the ground lead


(black) to the vehicle body or some other


metal part that is properly grounded to


the chassis. If the ground lead is not prop-


erly connected, noise may occur or the


system may not operate correctly.

This unit is for vehicles with a 12-volt bat-


tery and negative grounding. Before

• Avant l’installation, retirer la goupille de

transport et raccorder provisoirement les

appareils. Vérifier que les appareils et la

chaîne fonctionnent correctement.

• Lorsque le raccordement est effectué,

appuyer sur le bouton d’annulation du

lecteur CD avec la pointe d’un crayon.

• Veiller à bien raccorder le conducteur de

masse (noir) à la carrosserie du véhicule

ou à toute autre pièce métallique cor-

rectement mise à la masse sur le châssis.

Si le conducteur de masse n’est pas rac-

cordé correctement, il ourrait en résulter

des parasites, ou la chaîne pourrait ne

A

Display unit

Unité d’affichage

100 cm

Pass leads and cords through D and fix in place.

Engagez cordons et câbles dans l’ouverture D et assurez leur fixation.

CD Player unit

Unité de lecteur CD

550 cm

E

installing it in a recreational vehicle, truck,

or bus, check the battery voltage.

• To avoid shorts in the electrical system,

be sure to disconnect the battery (–) cable

before beginning installation.

• Check whether installation and wiring

have been completed correctly. Replace

the removed car components, then

connect the end of the cable to the nega-

tive (–) terminal of the battery.

• Secure the wiring with cable clamps or

adhesive tape. To protect the wiring,

wrap adhesive tape around them where

they lie against metal parts.

• Route and secure all wiring so it cannot

touch any moving parts, such as the gear

shift, handbrake, and seat rails. Do not

route wiring in places that get hot, such

as near the heater outlet. If the insulation

of the wiring melts or gets torn, there is a

danger of the wiring short-circuiting to

the vehicle body.


pas fonctionner correctement.

• Cet appareil est destiné aux véhicules


avec une batterie de 12 V, négative à


masse négative. Avant de l’installer dans


un véhicule de loisir, un camion ou un


car, vérifier la tension de la batterie.

Afin d’éviter des court-circuits dans le


système électrique, s’assurer de décon-


necter le câble (–) de batterie avant de


commencer l’installation.

Vérifier si l’installation et le câblage ont


été complétés correctement. Remplacer


les composantes de voiture retirées, puis


connecter l’extrémité du câble à la borne


négative (–) de la batterie.

• Fixer le câblage au moyen des attaches


de câble ou une bande adhésive. Pour


protéger le câblage, enrouler la bande


adhésive autour des câbles à l’endroit où


ceux-ci sont placés contre les parties


métalliques.

Acheminer et fixer tout le câblage de telle

Black (ground)

To the vehicle (metal) body.

Noir (masse)

Vers la carrosserie (masse) du véhicule.

Red

To electric terminal controlled by igni- tion switch (12 V DC) ON/OFF.

Rouge

540 cm F

Choke coil

Resistor

Bobine d’arrêt

C Resistore

Fuse holder

30 cm

Porte-fusible

Cords for this product and those for other products may be different colors even if they have the same function. When connecting this product to another product, refer to the supplied Installation manuals of both products and connect cords that have the same function.

• Do not pass the yellow lead through a

hole into the engine compartment to con-

nect to the battery. This will damage the

lead insulation and cause a very danger-

ous short.

• Do not shorten any leads. If you do, the

protection circuit may fail to work when it

should.

• Never feed power to other equipment by

cutting the insulation of the power supply

lead of the unit and tapping into the lead.

The current capacity of the lead will be

exceeded, causing over heating.

sorte qu’il ne touche pas les pièces

mobiles, comme le levier de changement

de vitesse, le frein à main et les rails des

sièges. Ne pas acheminer les câbles dans

des endroits qui peuvent devenir chauds,

comme près de la sortie de radiateur.

Si l’isolation des câbles fond ou se

déchire, il existe un danger de court-cir-

cuit des câbles avec la carrosserie du

véhicule.

• Ne faites pas passer le conducteur jaune

dans le compartiment moteur par un trou

pour le connecter avec la batterie. Ceci

Vers une borne commandée par la clé de contact (12 V CC).

Yellow

B


To the terminal always supplied with power


regardless of ignition switch position.


Jaune

50 cm


Vers une borne alimentée en permanence,


indépendamment de la position de la clé de


contact.

Antenna switching unit


Unité de commutateur d’antenne

To FM car radio

Car antenna plug

Vers Auto radio FM

Fiche d’antenne de Voiture

Les câbles de cet appareil et ceux d’autres appareils peuvent fort bien ne pas être de la même couleur bien que remplissant la même fonction. Pour relier cet appareil à un autre appareil, utilisez le manuel d’installation de chacun et effectuez les raccorde- ments en ne tenant compte que de la fonction de chaque câble.

• Replace fuses only with the types stipulat-

ed on the fuse holder.

endommagerait l’isolation du conducteur

et causerait un dangereux court-circuit.

• Ne pas court-circuiter les conducteurs.

Sinon, le circuit de protection risque de

ne pas fonctionner.

• Ne jamais alimenter un autre appareil en

coupant l’isolation du conducteur d’ali-

mentation de l’appareil et en la branchant

dans le conducteur. L’intensité de courant

du conducteur sera dépassée provoquant

ainsi une surchauffe.

• Remplacer les fusibles seulement par des

fusibles de type spécifié sur le porte-

fusible.

Page 20
Image 20
Pioneer CDX-FM673 operation manual Parts for connection, Pièces requises pour les raccordements

CDX-FM673 specifications

The Pioneer CDX-FM673 is a versatile and robust car audio system that has garnered attention among music enthusiasts and casual listeners alike. This unit stands out for its integration of modern technology with classic audio functions, providing an impressive listening experience tailored for today's drivers.

One of the primary features of the CDX-FM673 is its CD playback capability, allowing users to enjoy their favorite albums on the go. In addition to CDs, this audio system also supports MP3 playback, which means users can enjoy compressed audio files without significant loss of sound quality. This feature is particularly beneficial for those who prefer to create playlists or have large music libraries stored on CDs.

The unit includes an AM/FM radio tuner, providing a broad range of listening options. The digital tuning feature allows for easy navigation through various stations, ensuring that drivers can find their favorite local broadcasts with minimal effort. The built-in memory presets allow users to save commonly listened-to stations for quick access.

The CDX-FM673 boasts an impressive audio output quality, showcasing Pioneer’s commitment to enhancing sound clarity and depth. The unit incorporates a 4-channel output, delivering powerful sound that can effectively fill a car's interior. Coupled with a built-in equalizer, users can customize their audio experience, adjusting bass, midrange, and treble levels to suit personal preferences.

Another notable characteristic of the CDX-FM673 is its user-friendly interface. The display is easy to read, even in bright daylight, and the controls are intuitively placed for convenient access while driving. The ergonomic design of the buttons ensures that drivers can switch tracks or adjust volume with minimal distraction.

In terms of connectivity, the Pioneer CDX-FM673 is designed to accommodate various audio sources. Although it primarily functions as a traditional CD player, users can also connect portable devices through auxiliary inputs. This feature allows seamless integration with smartphones and other media players, making it easy to play music directly from personal libraries.

Durability is also a key characteristic of the Pioneer CDX-FM673. Built to withstand the rigors of vehicle environments, it is designed to resist vibrations and shocks, ensuring longevity and reliable performance over time.

In summary, the Pioneer CDX-FM673 successfully blends classic and modern audio technology. With its CD and MP3 playback, powerful output, customizable audio settings, and user-friendly design, this car audio system is an excellent choice for anyone looking to enhance their in-car listening experience. Whether you're a devoted audiophile or simply someone who enjoys good music on the road, the CDX-FM673 offers quality and versatility that will not disappoint.