Basic Settings
Basic settings refer to those settings that are mandatory. Basic settings are set during initial setup. These settings can be changed later.
A. Centerline
Adjust the monitor connected to the rear view camera. Adjust so that the vehicle centerline is displayed in the center of the screen.
Note:
•The centerline serves as a reference for vehicle width when parked (orange line).
1.Press the ENTER button.
2.Adjust so that the centerline is in the center of the screen using the + and
– buttons.
Adjust so that the number of lines is the same on both sides of the screen.
Adjust the angle so that an object (such as the tire blocks) serving as a reference along the horizontal lines is displayed.
Horizontal lines
Note:
•Adjustment can be made within the range of –511 to +511.
•Some portions may not be able to be seen depend- ing on the settings.
3. Press the ENTER button. |
When performing this procedure starting |
from “First Time Setup”, proceed to |
section C entitled “Position (Horizontal)”. |
When performing this procedure starting |
3.Press the ENTER button.
When performing this procedure starting from “First Time Setup”, proceed to section D entitled “View Diagonal”. When performing this procedure starting from “Changing Basic Settings or Other Settings”, return to step 5 of “Changing Basic Settings or Other Settings”.
D. View Diagonal
Adjust the inclination of the rear view camera image as viewed from the location where the rear view camera is installed.
1.Press the ENTER button.
2.Adjust view diagonal with the + and
– buttons.
Adjust view diagonal so that the white lines of the parking space are displayed symmetrically.
E. View Angle
Adjust the view angle (high angle mode) as viewed from directly overhead.
1.Press the ENTER button.
2.Adjust the angle with the + and
– buttons.
Adjust the angle so that the white lines are aligned with the vertical lines.
Vertical lines
Note:
•Adjustment can be made within the range of –511 to +511.
3. Press the ENTER button. |
F. Vertical Guideline (Width)
Adjust the width within the vertical guidelines.
1.Press the ENTER button.
2.Adjust the position with the + and
– buttons.
Adjust the position using the white lines of the parking space as a reference.
Vertical guidelines
Note:
•Adjustment can be made within the range of –255 to +255.
3. | Press the ENTER button. |
4. | Press the ENTER button twice. |
Changing Basic Settings or Other Settings
Basic settings set during initial setup can be changed. In addition, other settings can also be made such as View (Wide/Zoom) and Guideline (Shape) on “Advanced Settings”. Begin the setup procedure after parking the vehicle at the location where photographs are to be taken by referring to the section on “Preparations Before Beginning Setup”.
1. Put the vehicle in reverse.
Note:
•When performing setup, always make sure to set the parking brake and step on the brake to make sure the car is stopped.
2. | Simultaneously press the ENTER |
| and + buttons. |
3. | Press the ENTER button four times. |
4. | Take the photograph. |
| Take the photograph to be used for setup. |
| Take the photograph while referring to the |
| section on “Taking Photographs”. |
Advanced Settings
Advanced settings such as View (Wide/Zoom) and Guideline (Shape) can be set using advanced settings.
A. View (Wide/Zoom)
This adjustment is only necessary when only ground is displayed or when the display is too small or illegible when viewed with the high angle mode because of the height of the rear view camera.
1.Press the ENTER button.
2.Adjust the view elevation with the + and – buttons.
Note:
•Adjustment can be made within the range of –63 to +63.
3.Press the ENTER button.
Return to step 5 of “Changing Basic Settings or Other Settings”.
B. Guideline (Shape)
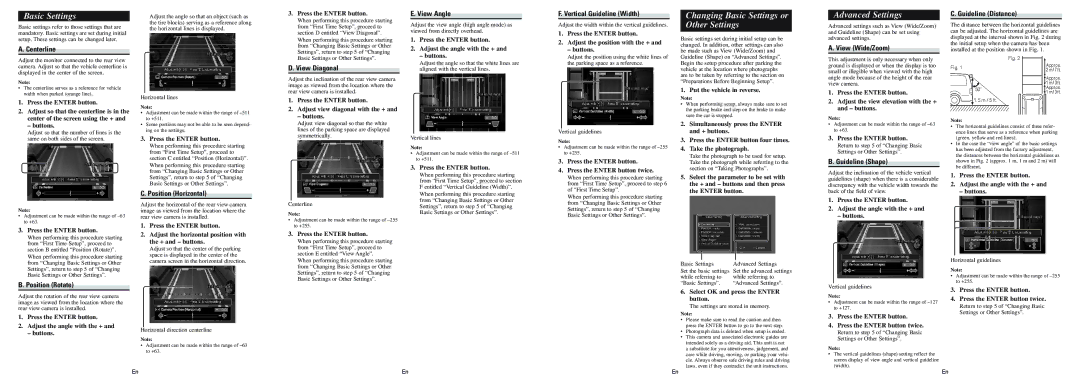
C. Guideline (Distance)
The distance between the horizontal guidelines can be adjusted. The horizontal guidelines are displayed at the interval shown in Fig. 2 during the initial setup when the camera has been installed at the position shown in Fig. 1.
Fig. 1 | Fig. 2 | | Approx. |
|
| |
| | 2 m / 7 ft. |
| | |
 Approx. 1 m / 3 ft.
 50˚
50˚
 Approx.
 1 m / 3 ft.
1.5 m / 5 ft.
Note:
•The horizontal guidelines consist of three refer- ence lines that serve as a reference when parking (green, yellow and red lines).
•In the case the “view angle” of the basic settings has been adjusted from the factory adjustment, the distances between the horizontal guidelines as shown in Fig. 2 (approx. 1 m, 1 m and 2 m) will be different.
Note:
•Adjustment can be made within the range of –63 to +63.
from “Changing Basic Settings or Other |
Settings”, return to step 5 of “Changing |
Basic Settings or Other Settings”. |
C. Position (Horizontal)
Adjust the horizontal of the rear view camera image as viewed from the location where the rear view camera is installed.
1. Press the ENTER button. |
Centerline
Note:
•Adjustment can be made within the range of –255 to +255.
When performing this procedure starting |
from “First Time Setup”, proceed to section |
F entitled “Vertical Guideline (Width)”. |
When performing this procedure starting |
from “Changing Basic Settings or Other |
Settings”, return to step 5 of “Changing |
Basic Settings or Other Settings”. |
When performing this procedure starting |
from “First Time Setup”, proceed to step 6 |
of “First Time Setup”. |
When performing this procedure starting |
from “Changing Basic Settings or Other |
Settings”, return to step 5 of “Changing |
Basic Settings or Other Settings”. |
5. Select the parameter to be set with |
the + and – buttons and then press |
the ENTER button. |
Adjust the inclination of the vehicle vertical guidelines (shape) when there is a considerable discrepancy with the vehicle width towards the back of the field of view.
1.Press the ENTER button.
2.Adjust the angle with the + and
– buttons.
1.Press the ENTER button.
2.Adjust the angle with the + and
– buttons.
3.Press the ENTER button.
When performing this procedure starting from “First Time Setup”, proceed to section B entitled “Position (Rotate)”. When performing this procedure starting from “Changing Basic Settings or Other Settings”, return to step 5 of “Changing Basic Settings or Other Settings”.
B. Position (Rotate)
Adjust the rotation of the rear view camera image as viewed from the location where the rear view camera is installed.
1.Press the ENTER button.
2.Adjust the angle with the + and
– buttons.
2. Adjust the horizontal position with |
the + and – buttons. |
Adjust so that the center of the parking |
space is displayed in the center of the |
camera screen in the horizontal direction. |
Horizontal direction centerline
Note:
•Adjustment can be made within the range of –63 to +63.
3.Press the ENTER button.
When performing this procedure starting from “First Time Setup”, proceed to section E entitled “View Angle”.
When performing this procedure starting from “Changing Basic Settings or Other Settings”, return to step 5 of “Changing Basic Settings or Other Settings”.
Basic Settings | Advanced Settings |
Set the basic settings | Set the advanced settings |
while referring to | while referring to |
“Basic Settings”. | “Advanced Settings”. |
6.Select OK and press the ENTER button.
The settings are stored in memory.
Note:
• Please make sure to read the caution and then press the ENTER button to go to the next step.
• Photograph data is deleted when setup is ended.
• This camera and associated electronic guides are intended solely as a driving aid. This unit is not a substitute for you attentiveness, judgement, and care while driving, moving, or parking your vehi- cle. Always observe safe driving rules and driving
Vertical guidelines
Note:
•Adjustment can be made within the range of –127 to +127.
3.Press the ENTER button.
4.Press the ENTER button twice.
Return to step 5 of “Changing Basic Settings or Other Settings”.
Note:
• The vertical guidelines (shape) setting reflect the |
screen display of view angle and vertical guideline |
Horizontal guidelines
Note:
•Adjustment can be made within the range of –255 to +255.
3.Press the ENTER button.
4.Press the ENTER button twice.
Return to step 5 of “Changing Basic Settings or Other Settings”.