08 Tuner Setup

Tuner Setup

08

Setting up TV channels

This section describes how to search and set up TV channels that you can watch under the current conditions. Unless you set up TV channels using Scan Channels, you may not be able to tune in any channels.

Scanning Channels Automatically

You can automatically scan channels for the frequency ranges available.

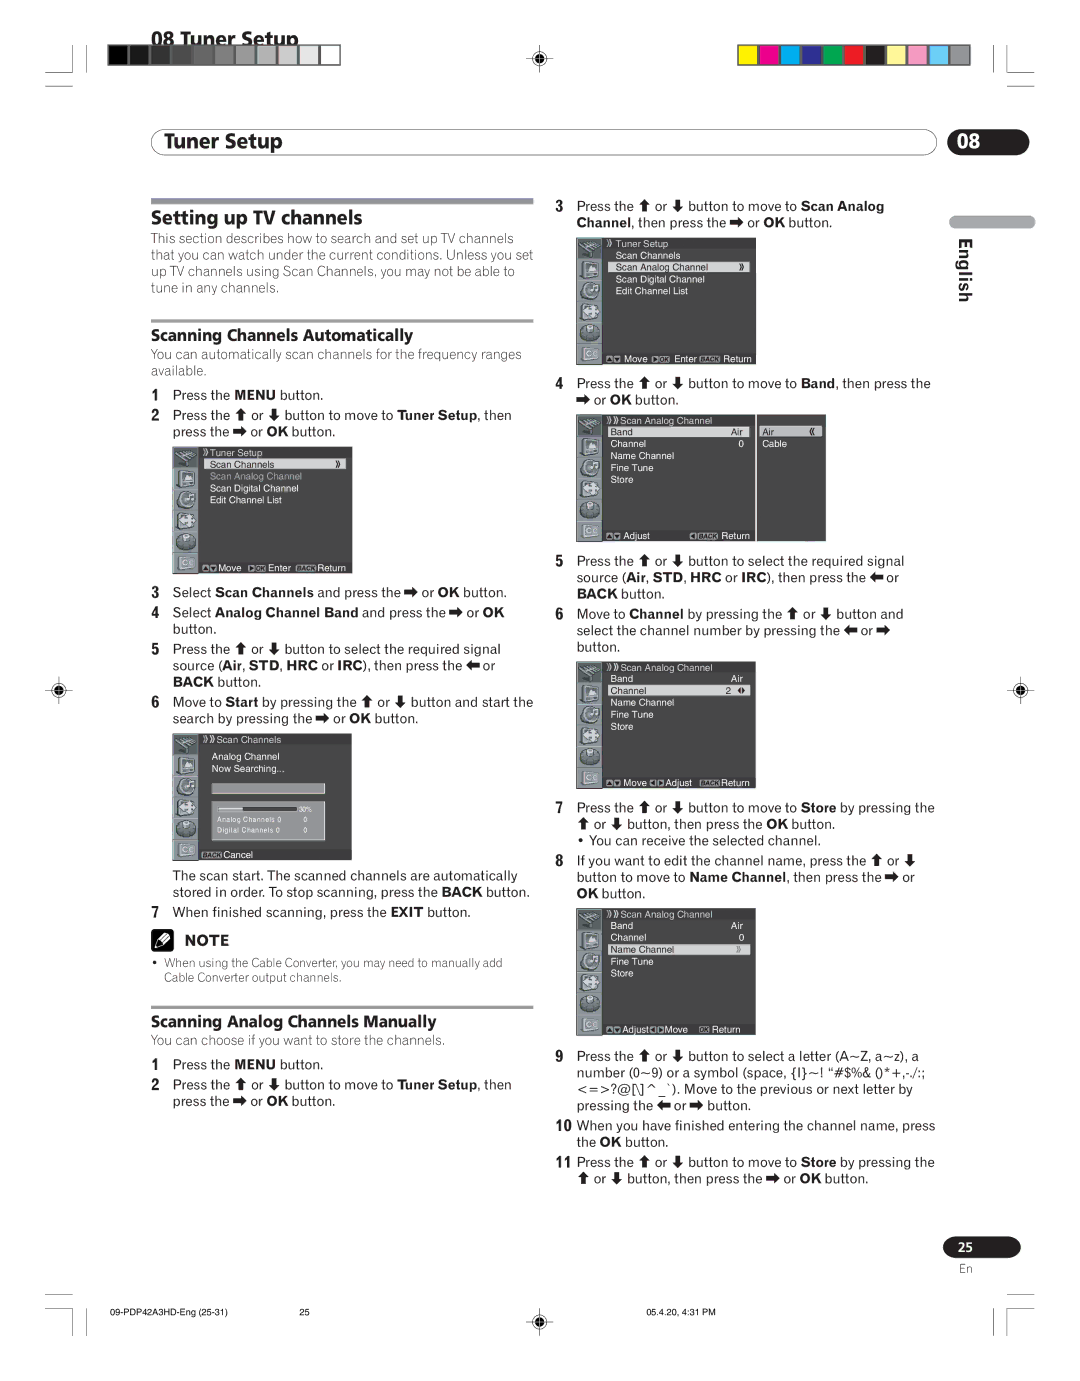
1Press the MENU button.

2Press the c or d button to move to Tuner Setup, then press the \ or OK button.

Tuner Setup

Scan Channels

Scan Analog Channel

Scan Digital Channel

Edit Channel List

Move Enter Return

3Select Scan Channels and press the \ or OK button.

4Select Analog Channel Band and press the \ or OK button.

5Press the c or d button to select the required signal source (Air, STD, HRC or IRC), then press the [ or BACK button.

6Move to Start by pressing the c or d button and start the search by pressing the \ or OK button.

Scan Channels

Analog Channel

Now Searching...


30%

Analog Channels 0

0

Digital Channels 0

0


Cancel

The scan start. The scanned channels are automatically stored in order. To stop scanning, press the BACK button.

7When finished scanning, press the EXIT button.

When using the Cable Converter, you may need to manually add Cable Converter output channels.

Scanning Analog Channels Manually

You can choose if you want to store the channels.

1Press the MENU button.

2Press the c or d button to move to Tuner Setup, then press the \ or OK button.

3Press the c or d button to move to Scan Analog Channel, then press the \ or OK button.

Tuner Setup

Scan Channels

Scan Analog Channel

Scan Digital Channel

Edit Channel List

Move EnterReturn

4Press the c or d button to move to Band, then press the \ or OK button.

Scan Analog Channel


Band

Air


Air

Channel

0


Cable

Name Channel


Fine Tune


Store


Adjust Return

5Press the c or d button to select the required signal source (Air, STD, HRC or IRC), then press the [ or BACK button.

6Move to Channel by pressing the c or d button and select the channel number by pressing the [ or \ button.

Scan Analog Channel


Band

Air

Channel

2

Name Channel

Fine Tune

Store

MoveAdjust Return

7Press the c or d button to move to Store by pressing the c or d button, then press the OK button.

• You can receive the selected channel.

8If you want to edit the channel name, press the c or d button to move to Name Channel, then press the \ or OK button.

Scan Analog Channel


Band

Air

Channel

0


Name Channel


Fine Tune


Store


Adjust Move Return

9Press the c or d button to select a letter (A~Z, a~z), a number (0~9) or a symbol (space, {I}~! “#$%& ()*+,-./:; <=>?@[\]^_`). Move to the previous or next letter by pressing the [ or \ button.

10When you have finished entering the channel name, press the OK button.

11Press the c or d button to move to Store by pressing the c or d button, then press the \ or OK button.

English

25

En

09-PDP42A3HD-Eng (25-31)

25

05.4.20, 4:31 PM

Page 25
Image 25
Pioneer PDP-42A3HD Tuner Setup, Setting up TV channels, Scanning Channels Automatically, Scanning Analog Channels Manually

PDP-42A3HD specifications

The Pioneer PDP-42A3HD is a notable plasma television that represents the peak of home entertainment technology in the early 2000s. Launched in 2005, this model was part of Pioneer’s extensive line of flat-screen televisions, which were renowned for their high-quality displays and cutting-edge technology.

One of the primary features of the PDP-42A3HD is its impressive 42-inch display size, which offers a magnificent viewing experience. The screen features a resolution of 1024 x 768 pixels, providing an excellent balance of clarity and detail for the viewer. With a contrast ratio of 10,000:1, colors appear vibrant, while blacks are deep and rich, enhancing the overall picture quality.

Another significant characteristic of the PDP-42A3HD is its use of plasma display technology. Unlike traditional LCD screens, plasmas utilize gases to illuminate phosphors, which results in superior color accuracy and better viewing angles. This makes the Pioneer model highly advantageous for group viewing, as colors remain consistent even when viewed from the side.

The television also incorporates Pioneer’s exclusive “Deep Color” technology, which allows for a wider range of colors and finer gradation between shades. This results in a more lifelike and immersive viewing experience, which is especially noticeable in cinematic and high-definition content. Furthermore, the PDP-42A3HD supports various HD formats, making it an appropriate choice for users looking to enjoy high-definition broadcasts.

Connectivity options on the PDP-42A3HD include multiple HDMI inputs, component video inputs, and even a PC input, showcasing the versatility of the device for connecting various sources. This makes it compatible with many types of media devices, from gaming consoles to Blu-ray players.

Another noteworthy aspect of the Pioneer PDP-42A3HD is its sleek design. The unit features a modern aesthetic with a thin bezel that allows for an immersive experience, reducing distractions from the screen.

In summary, the Pioneer PDP-42A3HD plasma television stands out due to its impressive display quality, advanced technologies, and appealing design. Though newer technologies have since emerged, the PDP-42A3HD remains a classic example of Pioneer’s commitment to delivering high-quality home entertainment solutions that cater to the needs of passionate viewers.