Page
Wash hands after handling
Risk of Electric Shock Do not Open
Table of Contents
Additional Picture and Sound Adjustment Options
Use Other Equipment With Your Flat Panel TV
131
Helpful Information 123
Appendix 136
Also shipped with the PRO-151FD 60 panel
Flat Panel TV Shipment Checklist
Shipped with both models
Stand kit
Speaker accessories
Also shipped with the PRO-111FD 50 panel
Control Buttons and More on the Flat Panel TV
Command Side of the Panel left side
Control Options Get to Know Your Flat Panel TV
Elite Series Models Face of Panel
Power On button
Back of the Panel
Insert the Batteries into the Remote Control
Operating the Remote Control
Remote Control Issues
Operating Range for the Remote Control
Buttons on the Remote Control
25 CH +
17 TV/DTV
Swap
Player/Recorder Control
Install Your Flat Panel TV
Choose a Location and the Mounting Method
Check the Location for Suitability
Lift and/or Move Your Panel the How To’s
Attach the Stand to the Panel
Install the Panel Using a Stand
Use or Remove the Included Stand
Front surface of the base cover may be scratched
Line up the column supports with Installation bolts
Attach the Light-Blocking Shield
Attach/Detach the Speaker
Stand-Mounted Panel
PRO-111FD Speaker bracket For TOP-Right
PRO-151FD
Insert the cable in the groove on the speaker
Connect the Speaker Cables
Wall/Ceiling Mounting
Anchor the Panel When Using a Stand
Mount the Flat Panel TV
20 mm 13/16 inch min
Attach the Color Sensor
When side-mounted speakers are installed
Attach the Color Sensor to the Rear Panel
When side-mounted speakers are not installed
Do not use the screws supplied for the speakers
Connect cable or Satellite using STB Set Top Box
Add Analog conventional and Digital TV Channels
Hdmi equipment
DVD player Subwoofer AV receiver
Connect a VCR
Personal computer
Route then Bundle the Power Cord and Cables
Connect the Power Cord to the Panel
Latch Lever
Turn on the Flat Panel TV
Turn the Flat Panel TV ON/OFF
Turn OFF the Flat Panel TV
Choose Analog or Digital TV Channels
Program the Flat Panel TV for Television Viewing
Explore the Home Menu
AV Source Option
TV Screen Components
Assign a Language
Set the Clock
Auto Installation
Create the List of Channels
Select Program Entry
Panel automatically begins creating your list of channels
Manual Channel Selection
Use the arrow buttons / to enter a channel number
Software Keyboard screen appears
Software Keyboard
Cursor moves to the next character space
Skip or Delete Unwanted Channels
Channel Delete setting is complete
Analog TV channels Manual Adjust Store No
Confirmation screen appears
Channel List
Set Favorite Channels
Edit the Input List
Alternate Method to Store your Favorite Channels
Sort Favorite Channels
Software keyboard appears
Quick Start for Watching Television
Adjust the Volume/Sound
Turn On the Sleep Timer
Change the Channel/Sub-Channel
Room Lighting Sensor
Adjust the Picture and Sound Quality
Adjust the Picture for Your Room Lighting
Option Description
Blue LED Dimmer
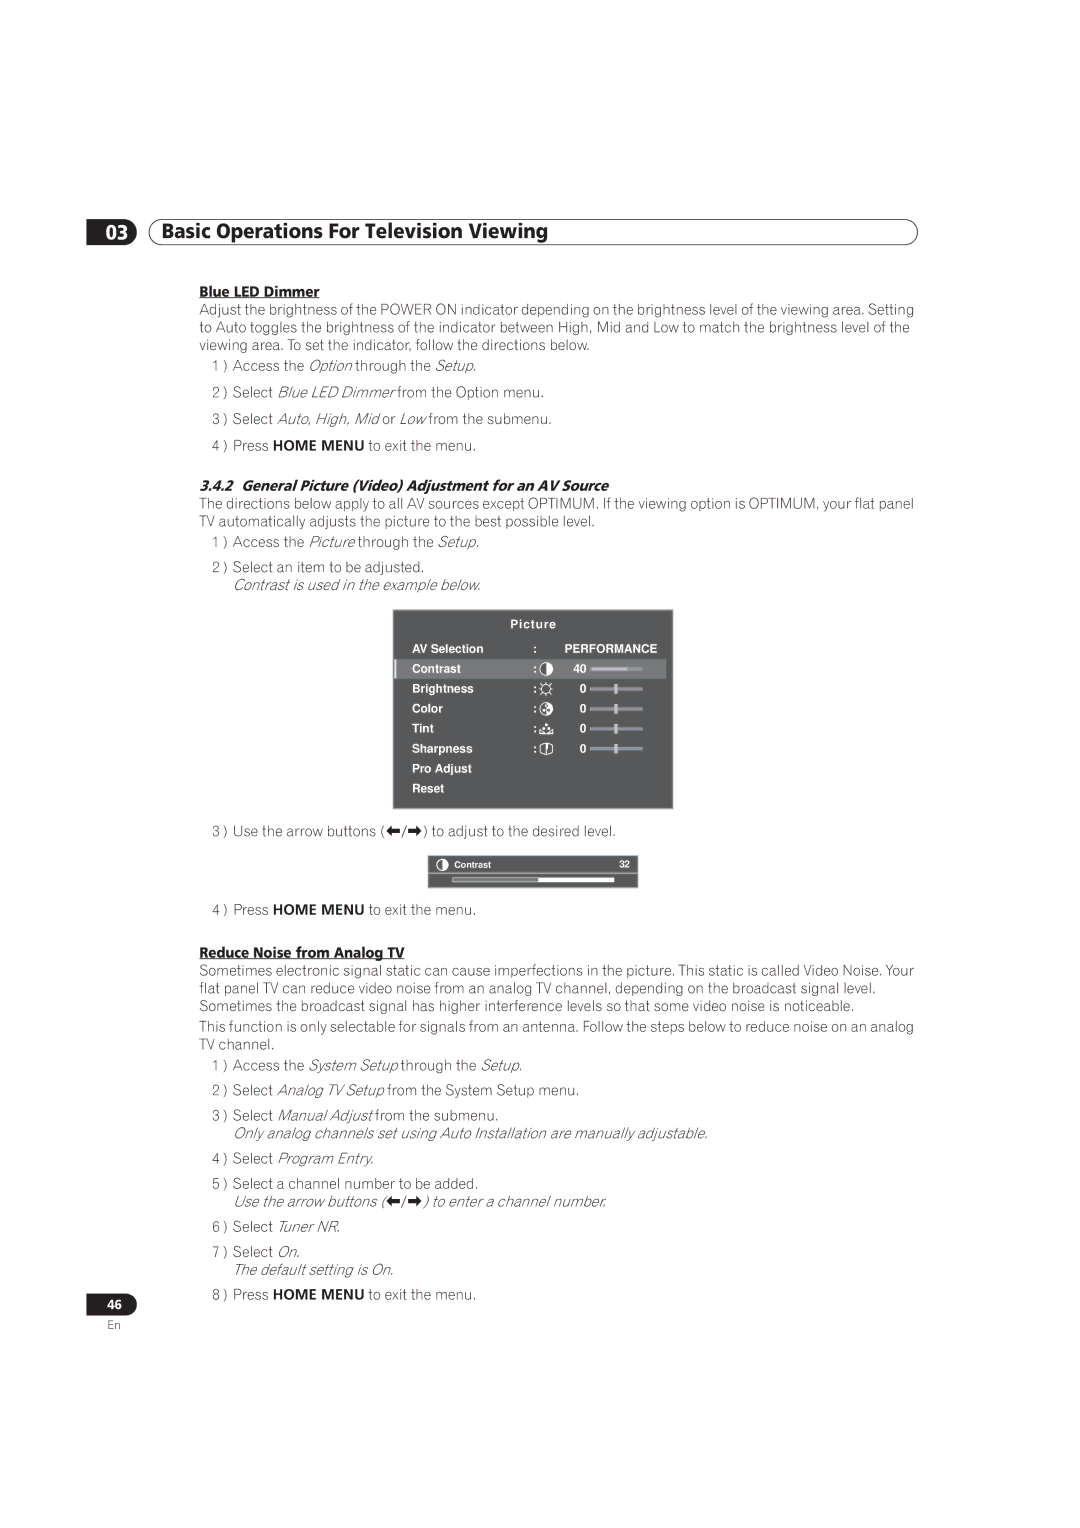
General Picture Video Adjustment for an AV Source
Default setting is On
Contrast is used in the example below
Compare Images When Adjusting the Picture
Restore Default Picture
Picture Image Position
Display a Graphical Picture/Sound Adjustment Screen
Optimum Performance
Sound Control
General Sound Audio Adjustment
Restore Default Sound Setting
Option Left Button Right Button
Block Programs, Channels, or Content
Assign a Parental Control Block Password
Select Parental Control Password entry screen appears
Activate Parental Control
Unavailable Ratings menu Digital Regional Ratings menu
Mpaa Ratings menu
Canadian English Ratings menu Canadian French Ratings menu
Program Rating of None
Block Not Rated Programs
New Ratings System for Digital Broadcasts
Delete a New Ratings System
Temporarily Remove a Block
Shown in this section differ, depending upon the menu
Smart Starts for New Owners
Extend Your Panel Life
Select Orbiter from the Option menu
Activate Energy Save to Reduce Power Usage
Turn On the Image Orbiter
Trigger the Screen-Saving Video Pattern Periodically
AV Source through the Remote Control
Choose an AV Option Video, Game, etc
Choose an AV Source through the Home Menu
Choose a PC Source
Choose a Screen Size Automatically or Manually
Adjust Specific Picture Elements
Set the Panel to Recognize a Game Console
Automatic Screen Sizing
AV Option Description
Manual Screen Sizing
PC Option Description
Option Left Arrow Right Arrow
Correct the Picture for an AV or PC Source
AV Source
PC Source
Assign Advanced Picture Functions
Adjust for Screen Masking black bars on sides
HD Wide Mode
Detect Masks
Parameter Description
Mode Parameter Description
Lighten Side Masks
Select a PureCinema Level for High Quality Image
Select the Picture Detail Options
Select an Intelligent Mode Option
Option Parameter Description
Adjust the Color Temperature
Use CTI and Color Space
Left Arrow Right Arrow
Use the Color Management
Reduce Noise from the Image
Select 3DNR, Field NR, Block NR or Mosquito NR
Analog tuner is selected
Adjust Color Signals
Select 3DYC or I-P Mode
720p or 1080p
Screen Picture-in-Picture P-in-P
View in Multi-Screen
Split/Swap/Shift the Screen
Tools Menu appears on screen
Freeze the Picture
Sequence still in progress
InfoBanner
Use the Banner Feature
InfoBanner additional
Activate Closed Captioning CC
Select Alternatives for/to Sound
Types of Closed Caption
Select Digital Service
Closed Caption for Digital Programs
Select SAP
Switch Languages Using MTS
Select English, Français or Español
Select STEREO, SAP or Mono
Use Auto Volume Control AVC
Apply Sound Effect Settings
SRS FOCUS, SRS, SRS TruBass, SRS Definition
AV/PC Source Picture Off
Manage the Power
AV Source No Signal
AV Source Non-Operational
PC Source -Power Management
Mode indicator lights up
Program the Remote Control to Operate Other Equipment
Use the Learning Feature
Learn session is canceled in 30 seconds and the indicator
Issue a Library Search for a Manufacturer Code
Assign a Manufacturing Code to the Remote Control
Selected mode indicator flashes when the remote control is
Ready to be programmed
Clear Added Manufacturer Codes from the Remote Control
Control a Pioneer Receiver
Control a Cable CBL or Satellite SAT System
Return
Control a Video Cassette Recorder VCR
Stop
Control a DVD Player/DVR Recorder/BD Player
DVD TOP Menu
Use Hdmi Inputs
Supported Video Signals
Supported PC Signals
Specify the Hdmi Input Type
Specify an Audio Hdmi Signal Type
Specify a Digital Hdmi Signal Type
Type Description
Control Equipment with the Panel’s Remote Through Hdmi
Control Function Controlled Function Description Equipment
Tools
Control an AV System
Control a Recorder
Control a Player
AV Amp & BD Player
Add an AV Amp or a BD Player
BD Player only
Turn OFF the Power With an Hdmi Command
Specific Hdmi Control Commands
Play Source Sound Using an Hdmi Command
Turn on the Power With an Hdmi Command
Connect a Game Console or Camcorder
Test the Power Control On/Off
Use the IR Repeater OUT
Operate the Home Media Gallery
Network Connections
Usable Media Servers
Connect via an Ethernet Hub
Connect directly to a Media Server
Confirm the IP Address
Connect a USB Device
Readable Data Files
Readable Data Format
Remove a USB Device
Run the Home Media Gallery
Use the Media Navigator
Navigate through a USB Device’s Files and Folders
Screen Components
Sample screens
HMG Playlist
Show Your Movie Files on the Flat Panel TV
Mode Keys used Function
Play Your Music Files on the Flat Panel TV
FF
Music Player key guide
STOP,
RWD
Enter while
Photo Player key guide
FF, Tools
Delete Server
Update Server List
Use the Tools Menu
USB Device
Detailed Display
Favorites Entry
To remove the Home Media Gallery from Favorites, select Off
Sort
Order Bottom-Up or Top-Down
Search
Selected photo content appears in full screen
Slide Show
Press / to select from Playlist 1 to Playlist
Add to HMG Playlist
Select Server
Play Mode
Change Name
Change View
Time Search
Sound
Picture
Information
Music Player
Audio
Move
Editing completes and Move finishes
Repeat Mode
Delete from HMG Playlist
Random
Rotate
Zoom
Network Setup
HMG Setup
Flat panel TV seeks and acquires an IP Address if available
Other useful functions
Reset to Default
Access Default Settings through the HMG Setup
Auto Connection
Message Problem
Add Other Audio Equipment
Dolby Digital
Manual Image Position and Clock Adjustments
Automatic Image Position and Clock Adjustments
Add a Computer PC
Frequently Asked Questions FAQs
How can I protect the remote so it holds up longer?
How do I clean my flat panel TV?
Cleaning Methods
Why won’t my Pioneer flat panel TV turn on?
Check Your Software/Hardware Version
General
Troubleshooting & Service Information
Issue Possible Solutions
Picture/Sound
Operated. Please check
Image
Device cannot be
Connection
Home Media Gallery/NETWORK
Home Media Gallery/PLAYBACK
Home Media Gallery/USB
Home Media Gallery/Slide Show
Other
Check the Signal Strength
To add the channels, select Add
Physical Location & Temperature Considerations
Installation Details
Usage Guidelines
Phosphor Properties
Signal Interference or Noise
Image Information Including Retention & After-Image Lag
Screen Protection
Image Retention a.k.a. Burn-In
After-Image Lag
Image Orbiter
Safety
Safety Precautions
Legal Notices
Information to User
Operating Environment
Radio Interference
For Canadian model
Rating Description
Ratings Charts for Various Audience Classifications
TV Ratings age-based
2 U.S. TV Parental Guideline Ratings age/category-based
Canadian English Ratings age-based
Canadian French Ratings age-based
Brand/Code Brand/Code Brand/Code Brand/Code Brand/Code
Manufacturer Codes to Program into the Remote Control
Cable
Satellite
VCR Brands a F
Brand/Code
VCR Brands G O
KEC
VCR Brands P
VCR Brands W Z
BD HD-DVD
7 PVR
DVD-R
DVD Brands a N
IRT
DVD Brands O Z
12 LD
Specifications
Dimensions
Terminals Rear
OpenSSL OpenSSL License
License
Original SSLeay License
Howl
Tiff
Libupnp
Jpeg image compression
Libpng
Zlib FreeType
Giflib
Libpcap
TinyLogin
Portmap
Libmpeg1
GNU General Public License
Preamble
153
No Warranty
How to Apply These Terms to Your New Programs
GNU Lesser General Public License
156
157
158
159
How to Apply These Terms to Your New Libraries
Linux Source Notice
Glossary
LAN Cable
MAC Media Access Control Address
IP Internet Protocol Address
Mass Storage Class Devices
Index
Numerics
License
Trademarks, Licenses, & Patent Information
Trademarks
Disclaimer Notice
S018BEF
Pioneer Corporation