03Connecting your equipment

Bare wire connections

Make sure that the speaker cable you’re going to use is

properly prepared with about 10 mm (3/8 in.) of insulator stripped from each wire, and the exposed wire strands twisted together (fig. A).

To connect a terminal, unscrew the terminal a few turns until there is enough space to insert the exposed wire (fig. B). Once the wire is in position, tighten the terminal until the wire is firmly clamped (fig. C).

fig. A

fig. B

fig. C

10 mm (3/8 in.)

Banana plug connections

If you want to use speaker cables terminated with banana plugs, screw the speaker terminal fully shut, then plug the banana plug into the end of the speaker terminal.

Important

Please refer to the manual that came with your speakers for details on how to connect the other end of the speaker cables to your speakers.

Other connections on page 51 provides greater detail on alternate speaker setups, such as using speaker system B (page 58), bi-amping and bi-wiring (page 59).

Placing the speakers

Where you put your speakers in the room has a big effect on the quality of the sound. The following guidelines should help you to get the best sound from your system.

The subwoofer can be placed on the floor. Ideally, the other speakers should be at about ear-level when you’re listening to them. Putting the speakers on the floor (except the subwoofer), or mounting them very high on a wall is not recommended.

For the best stereo effect, place the front speakers

2 m to 3 m (6 ft. to 9 ft.) apart, at equal distance from the TV.

22

When placing speakers near the TV, we recommend using magnetically shielded speakers to prevent possible interference, such as discoloration of the picture when the TV is switched on. If you do not have magnetically shielded speakers and notice discoloration of the TV picture, move the speakers farther away from the TV.

If you’re using a center speaker, place the front speakers at a wider angle. If not, place them at a narrower angle.

Place the center speaker above or below the TV so that the sound of the center channel is localized at the TV screen. Also, make sure the center speaker does not cross the line formed by the leading edge of the front left and right speakers.

It is best to angle the speakers towards the listening position. The angle depends on the size of the room. Use less of an angle for bigger rooms.

Surround and surround back speakers should be positioned 60 cm to 90 cm (2 ft. to 3 ft.) higher than your ears and titled slight downward. Make sure the speakers don’t face each other. For DVD-Audio, the speakers should be more directly behind the listener than for home theater playback.

Try not to place the surround speakers farther away from the listening position than the front and center speakers. Doing so can weaken the surround sound effect.

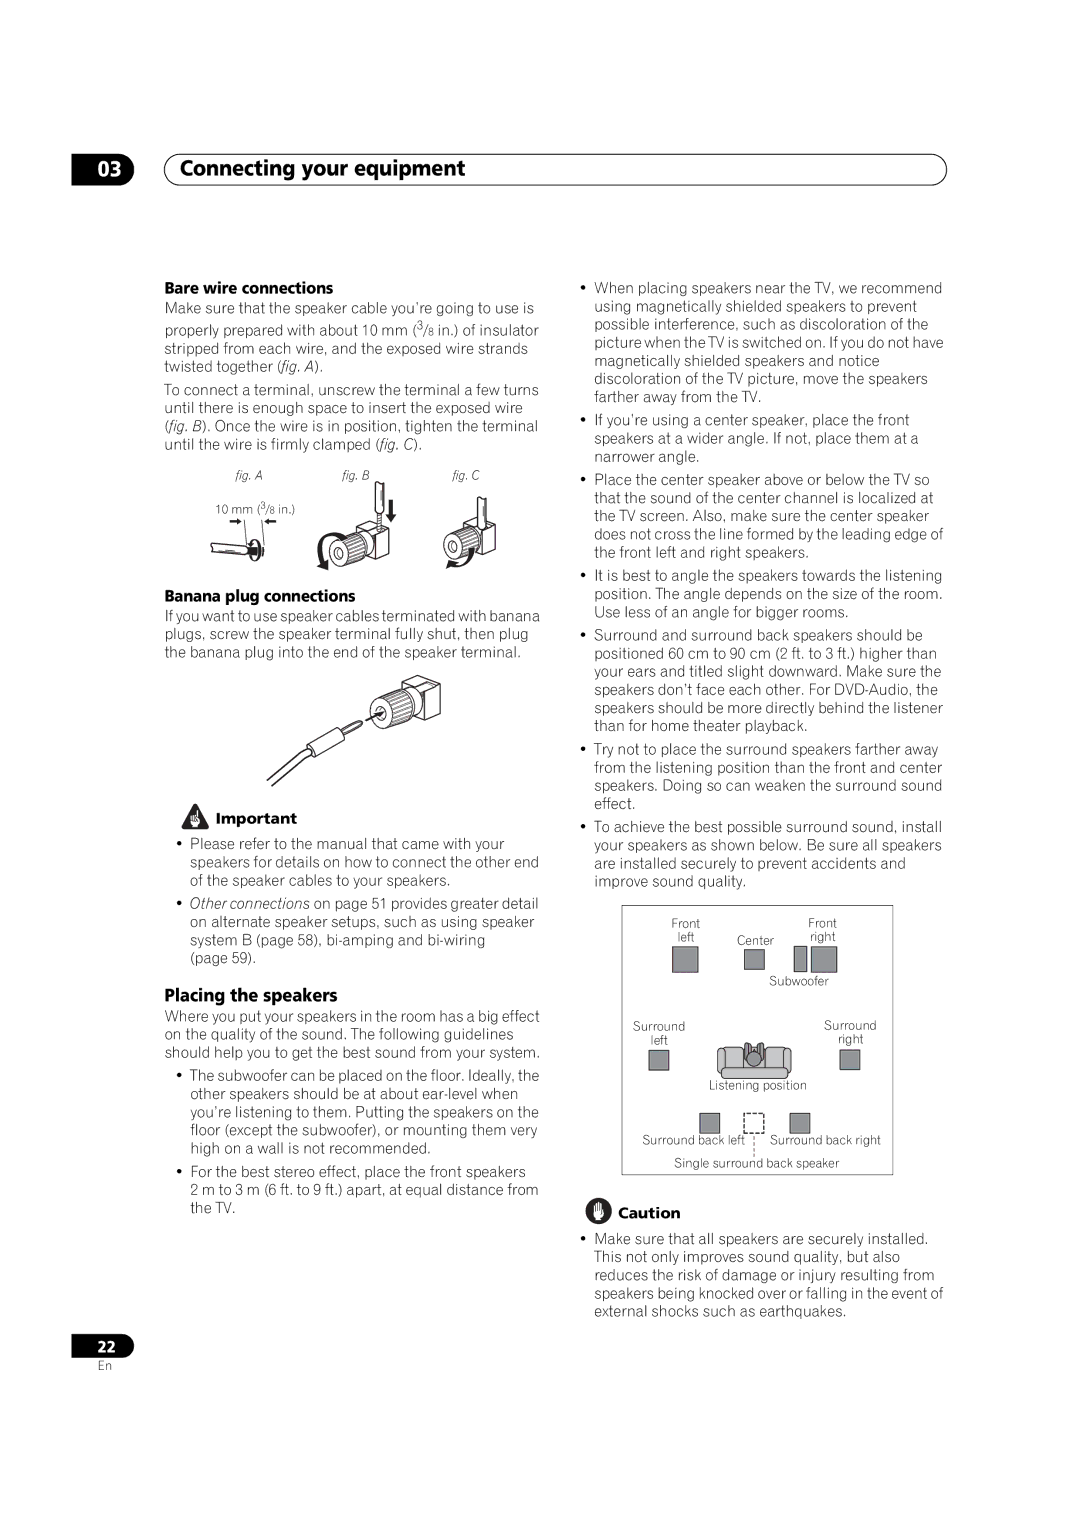
To achieve the best possible surround sound, install your speakers as shown below. Be sure all speakers are installed securely to prevent accidents and improve sound quality.

Front


Front

left

Center

right


Subwoofer

Surround


Surround

left


right


Listening position


Surround back left

Surround back right

Single surround back speaker

Caution

Make sure that all speakers are securely installed. This not only improves sound quality, but also reduces the risk of damage or injury resulting from speakers being knocked over or falling in the event of external shocks such as earthquakes.

En

Page 22
Image 22
Pioneer VSX-1018AH-K manual Placing the speakers, Bare wire connections, Banana plug connections

VSX-1018AH-K specifications

The Pioneer VSX-1018AH-K is a powerful home theater receiver that embodies a blend of quality, features, and innovative technology, making it a standout choice for audio enthusiasts and casual listeners alike. This 7.1-channel receiver boasts a robust output of 110 watts per channel, designed to deliver immersive audio across various environments.

One of the key features of the VSX-1018AH-K is its support for advanced audio formats, including Dolby TrueHD and DTS-HD Master Audio. These formats provide a lossless soundtrack experience, ensuring that audio reproduction remains faithful to the original source. This receiver is also equipped with Pioneer’s proprietary MCACC (Multi-Channel Acoustic Calibration System), which allows users to optimize sound settings based on their specific room acoustics. By analyzing and adjusting the sound fields, MCACC ensures that every listener enjoys an enhanced audio experience.

In terms of connectivity, the VSX-1018AH-K excels with its array of inputs and outputs. It includes multiple HDMI inputs, allowing users to seamlessly connect various devices such as Blu-ray players, gaming consoles, and streaming devices. Additionally, it supports HDMI version 1.3, which means it can handle high-definition video signals and deep color technology, enhancing the overall viewing experience.

For those who appreciate versatility, this receiver also features built-in support for both wireless and wired network audio streaming. Users can connect to their home network to enjoy music stored on their devices or access popular streaming services. The USB port allows for easy connection of flash drives, enabling playback of high-resolution audio files.

Moreover, the receiver is equipped with a user-friendly interface and an intuitive remote control, making it easy to navigate through various settings and options. The graphical user interface is designed for simplicity, enabling users to customize preferences without hassle.

The Pioneer VSX-1018AH-K not only focuses on sound but also on video quality, thanks to its upscale capabilities that can convert standard-definition video to high-definition, ensuring that all media looks great on HD displays. Overall, the Pioneer VSX-1018AH-K represents a comprehensive solution for anyone looking to enhance their home theater system, merging advanced technology with user-friendly features aimed at delivering an unparalleled home entertainment experience.