Controlling the rest of your system

12

Button(s)

Function

Components

ENTER/

Chooses the disc.

Multiple CD

CLASS


player


Use as the ENTER button.

VCR/DVD/BD


player


Displays the setup screen for DVR

DVR player


players.


Changes sides of the LD.

LD player


TOP MENU Displays the disc ‘top’ menu of a

DVD/BD/DVR


DVD player.

player


MENU

Displays menus concerning the

DVD/BD/DVR


current DVD or DVR you are

player


using.


Pauses the tape.

Cassette deck


Stops the tape.

Cassette deck


ENTER

Starts playback.

Cassette deck


/

Fast rewinds/fast forwards the

Cassette deck


tape.


///

Navigates DVD menu/options.

DVD/DVR

 & ENTER


player


CH +/–

Selects channels.

VCR/DVD/DVR


player


AUDIO

Changes the audio language or

DVD/BD/DVR


channel.

player


DISPLAY

Press to display information.

DVD/BD/DVR


player


HDD

Switches to the hard disk controls

DVR player


when using a DVD/HDD recorder.


DVD

Switches to the DVD controls

DVR player


when using a DVD/HDD recorder.


Operating other Pioneer components with this receiver’s sensor

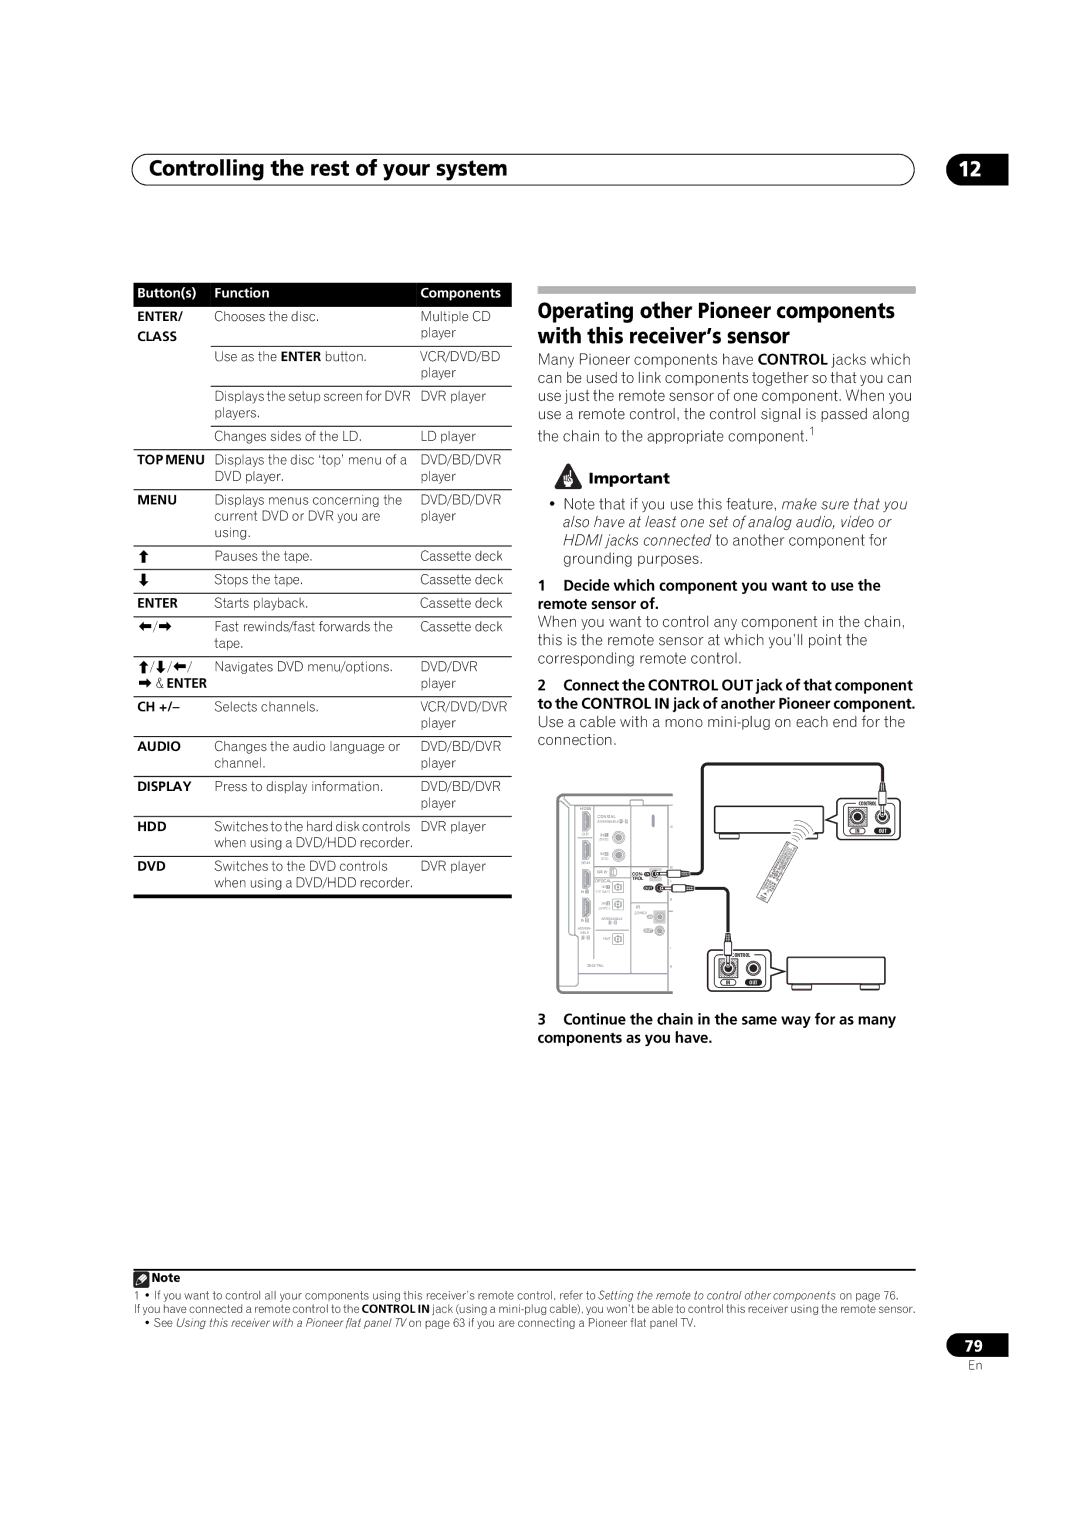
Many Pioneer components have CONTROL jacks which can be used to link components together so that you can use just the remote sensor of one component. When you use a remote control, the control signal is passed along

the chain to the appropriate component.1

Important

Note that if you use this feature, make sure that you also have at least one set of analog audio, video or HDMI jacks connected to another component for grounding purposes.

1Decide which component you want to use the remote sensor of.

When you want to control any component in the chain, this is the remote sensor at which you’ll point the corresponding remote control.

2Connect the CONTROL OUT jack of that component to the CONTROL IN jack of another Pioneer component. Use a cable with a mono mini-plug on each end for the connection.

CONTROL

HDMI


COAXIAL


ASSIGNABLE 1 - 2


VI


OUT

IN 1


IN

OUT


(DVD)


IN 2


BD IN

(CD)


XM IN


AU


CON- IN


OPTICAL

TROL

L


IN 1

IN 1

OUT


(TV SAT)


IN 2


R


IR


(DVR1)


ZONE2


IN 2

ASSIGNABLE

IN


1 - 2


ASSIGN-


OUT


ABLE


1 - 2

OUT


L


CONTROL


DIGITAL


R


IN OUT

3Continue the chain in the same way for as many components as you have.

Note

1 • If you want to control all your components using this receiver’s remote control, refer to Setting the remote to control other components on page 76.

If you have connected a remote control to the CONTROL IN jack (using a mini-plug cable), you won’t be able to control this receiver using the remote sensor.

• See Using this receiver with a Pioneer flat panel TV on page 63 if you are connecting a Pioneer flat panel TV.

79

En

Page 79
Image 79
Pioneer VSX-1018AH-K manual Decide which component you want to use the remote sensor

VSX-1018AH-K specifications

The Pioneer VSX-1018AH-K is a powerful home theater receiver that embodies a blend of quality, features, and innovative technology, making it a standout choice for audio enthusiasts and casual listeners alike. This 7.1-channel receiver boasts a robust output of 110 watts per channel, designed to deliver immersive audio across various environments.

One of the key features of the VSX-1018AH-K is its support for advanced audio formats, including Dolby TrueHD and DTS-HD Master Audio. These formats provide a lossless soundtrack experience, ensuring that audio reproduction remains faithful to the original source. This receiver is also equipped with Pioneer’s proprietary MCACC (Multi-Channel Acoustic Calibration System), which allows users to optimize sound settings based on their specific room acoustics. By analyzing and adjusting the sound fields, MCACC ensures that every listener enjoys an enhanced audio experience.

In terms of connectivity, the VSX-1018AH-K excels with its array of inputs and outputs. It includes multiple HDMI inputs, allowing users to seamlessly connect various devices such as Blu-ray players, gaming consoles, and streaming devices. Additionally, it supports HDMI version 1.3, which means it can handle high-definition video signals and deep color technology, enhancing the overall viewing experience.

For those who appreciate versatility, this receiver also features built-in support for both wireless and wired network audio streaming. Users can connect to their home network to enjoy music stored on their devices or access popular streaming services. The USB port allows for easy connection of flash drives, enabling playback of high-resolution audio files.

Moreover, the receiver is equipped with a user-friendly interface and an intuitive remote control, making it easy to navigate through various settings and options. The graphical user interface is designed for simplicity, enabling users to customize preferences without hassle.

The Pioneer VSX-1018AH-K not only focuses on sound but also on video quality, thanks to its upscale capabilities that can convert standard-definition video to high-definition, ensuring that all media looks great on HD displays. Overall, the Pioneer VSX-1018AH-K represents a comprehensive solution for anyone looking to enhance their home theater system, merging advanced technology with user-friendly features aimed at delivering an unparalleled home entertainment experience.