Additional information

13

Remote control

Symptom

Remedy

Cannot be remote controlled.

• Try replacing the batteries in the remote control (see Loading the batteries on page 7).


• Be sure to operate within 7 meters and a 30º angle of the remote sensor on the front panel (see Operating


range of remote control unit on page 22).


• Check that there are no obstacles between the receiver and the remote control.


• Make sure that there is no fluorescent or other strong light shining on to the remote sensor.


• Check the connections of the CONTROL IN jack (see Operating other Pioneer components with this unit’s


sensor on page 66).


Other components can't be

• If the battery ran down, the preset codes may have been cleared. Re-enter the preset codes.

operated with the system remote.

• The preset code may be incorrect. Redo the procedure for entering preset codes.


The SR cable is connected, but

• Reinsert the SR cable, making sure it’s connected to the right jack (see Using this receiver with a Pioneer

the connected components can’t

plasma display on page 53).

be operated with the remote.

• Make sure that there is an analog connection between the units. This is necessary for the SR feature to


work.


• Check that the other component is made by Pioneer. The SR feature only works with Pioneer equipment.


USB interface

SymptomRemedy

USB mass storage device is not recognized by the receiver.

Try switching the receiver off, then on again.

Make sure you have completely inserted the USB connector to this receiver.

Check that the memory format is FAT16 or FAT32 (FAT12, NTFS and HFS are not supported).

USB devices with an internal USB hub are not supported.

USB ERR3 shows in the display

• If this message continues to appear after going through all the checks in Important on page 31 of USB

when connecting a USB device.

playback, take the unit to your nearest Pioneer authorized service center or your dealer for servicing.


Can’t play audio files.

• The WMA or MPEG-4 AAC files were recorded using DRM (digital rights management), or the bit rate/


sampling rate is not compatible (see Compressed audio compatibility on page 31). This is not a


malfunction.


HDMI

Symptom

Remedy

The HDMI indicator blinks

• Check all the points below.

continuously.


No picture or sound.

• This receiver is HDCP-compatible. Check that the components you are connecting are also HDCP-


compatible. If they are not, please connect them using the component, S-video or composite video jacks.


• Depending on the connected source component, it’s possible that it will not work with this receiver (even


if it is HDCP-compatible). In this case, connect using the component, S-video or composite video jacks


between source and receiver.


• If the problem still persists when connecting your HDMI component directly to your monitor, please


consult the component or monitor manual or contact the manufacturer for support.


No picture.

• If your display device is not SD (480i/576i) compatible then neither the setup screens or the 480i/576i to


HDMI converted video will be displayed. In this case, connect using the component, S-video or composite


video jacks.


• Depending in the output settings of the source component, it may be outputting a video format that can’t


be displayed. Change the output settings of the source, or connect using the component, S-video or


composite jacks.

No sound, or sound suddenly ceases.

Check that the HDMI AV setting is set to AMP/THROUGH.

If the component is a DVI device, use a separate connection for the audio.

If analog video is being output over HDMI then there will be no HDMI audio output. Please use a separate connection for the audio.

Check the audio output settings of the source component.

Noisy or distorted picture.

• If the problem still persists when connecting your HDMI component directly to your monitor, please


consult the component or monitor manual or contact the manufacturer for support.


71

En

Page 71
Image 71
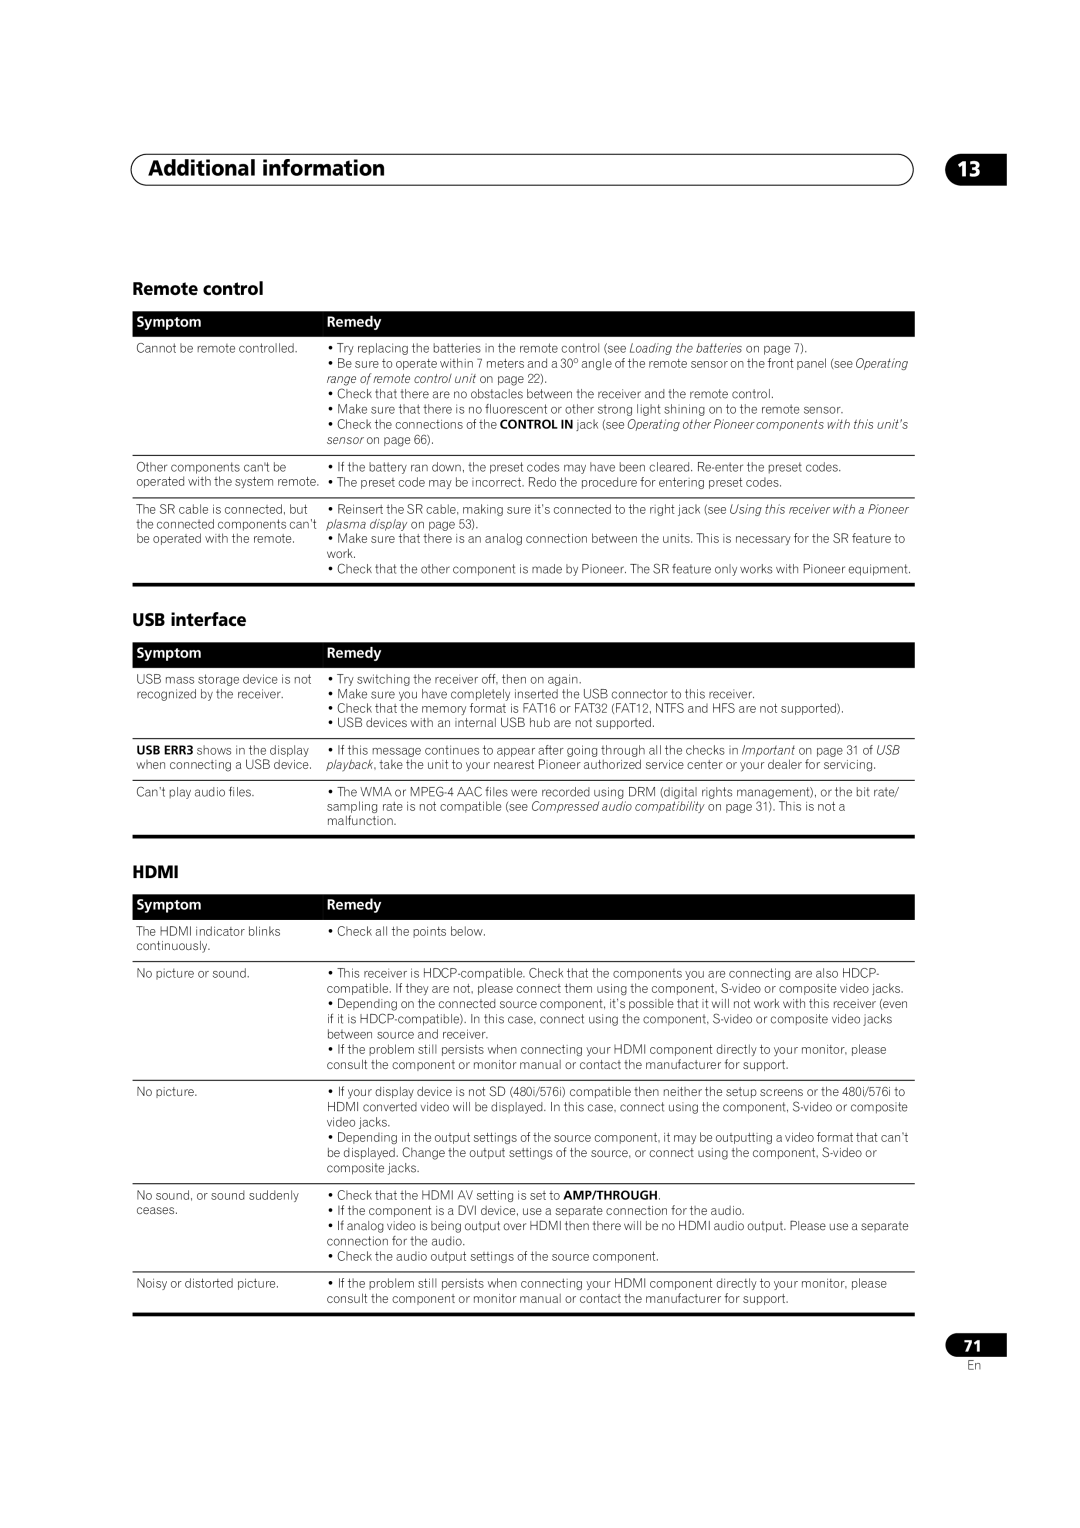
Pioneer VSX-2016AV operating instructions Remote control, USB interface, SymptomRemedy

VSX-2016AV specifications

The Pioneer VSX-2016AV is a versatile and feature-rich AV receiver that has garnered attention for its ability to deliver a cinematic experience in the home. With a focus on sound quality and user-friendly features, the VSX-2016AV stands out as a strong option for both casual listeners and serious home theater enthusiasts.

One of the primary attractions of the VSX-2016AV is its robust audio performance. It supports Dolby TrueHD and DTS-HD Master Audio, ensuring that users can enjoy high-resolution soundtracks from their Blu-ray discs. The receiver also features Pioneer's proprietary Sound Retriever technology that enhances compressed audio files, allowing for a more engaging listening experience, regardless of the source.

The VSX-2016AV does not skimp on connectivity options, offering multiple HDMI inputs and outputs to accommodate a range of devices. This includes support for 4K pass-through, making it future-proof for users with advanced video sources. In addition to HDMI, the receiver also provides options for component video, composite video, and analog audio connections, catering to a variety of setups.

Another standout feature is the integrated MCACC (Multi-Channel Acoustic Calibration System) technology. This system automatically calibrates the receiver to the acoustics of the room, ensuring that users experience optimal sound performance based on their specific environment. The result is a well-balanced audio output that enhances the overall listening experience.

With six channels of amplification, the VSX-2016AV is capable of powering a full surround sound system. The receiver provides a total power output of 100 watts per channel, which is ample for most home theater setups. It also includes various sound modes, allowing users to customize the audio output for movies, music, and gaming.

A user-friendly interface and remote control system make it easy to navigate through the various settings and options. The front panel features a clear display that provides vital information about input selection, volume levels, and audio formats. Additionally, Pioneer's iControlAV app enables smartphone control, allowing users to manage their audio settings seamlessly.

In conclusion, the Pioneer VSX-2016AV combines advanced audio technologies with a robust feature set, making it an excellent choice for home entertainment enthusiasts. Its emphasis on sound quality, along with the convenience of connectivity options and user-friendly controls, ensures that it can meet the needs of a diverse range of users. Whether for movie nights or music listening, this AV receiver stands ready to elevate the home audio experience.