08The System Setup menu

If you still aren't satisfied with the results, the manual Advanced EQ setup (below) provides a more customized calibration of your system using the direct sound of the speakers. This is done with the help of a graphical output that can be displayed on-screen.

How to interpret the graphical output

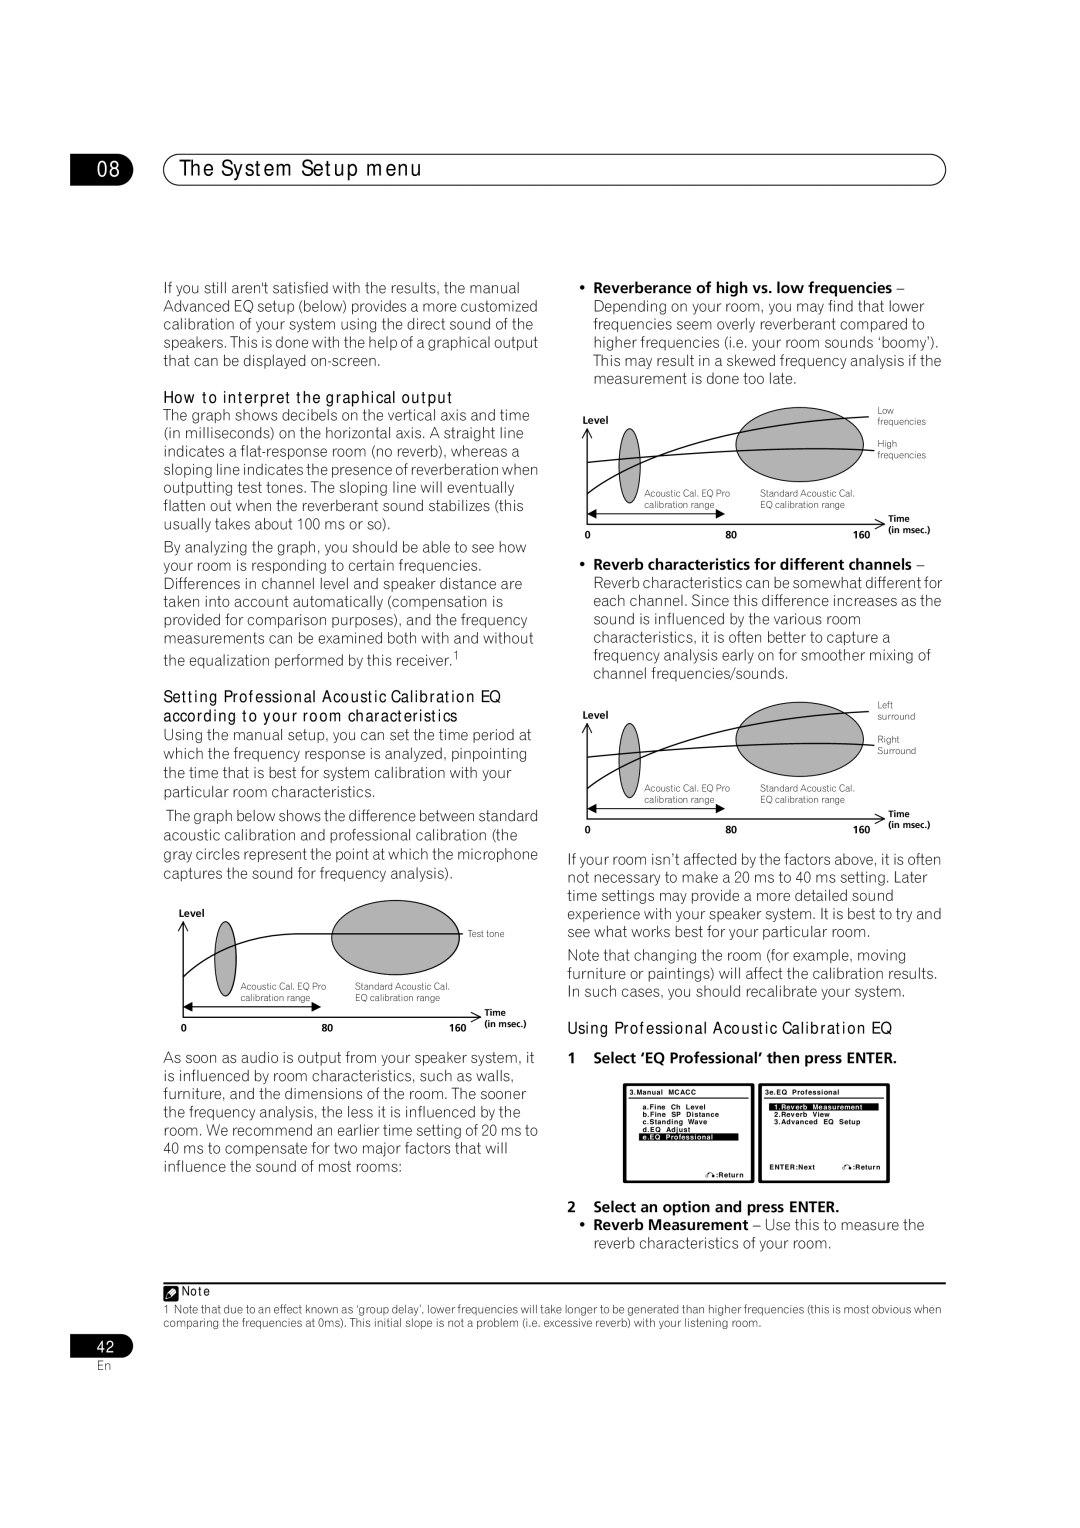
The graph shows decibels on the vertical axis and time (in milliseconds) on the horizontal axis. A straight line indicates a flat-response room (no reverb), whereas a sloping line indicates the presence of reverberation when outputting test tones. The sloping line will eventually flatten out when the reverberant sound stabilizes (this usually takes about 100 ms or so).

By analyzing the graph, you should be able to see how your room is responding to certain frequencies. Differences in channel level and speaker distance are taken into account automatically (compensation is provided for comparison purposes), and the frequency measurements can be examined both with and without

the equalization performed by this receiver.1

Reverberance of high vs. low frequencies – Depending on your room, you may find that lower frequencies seem overly reverberant compared to higher frequencies (i.e. your room sounds ‘boomy’). This may result in a skewed frequency analysis if the measurement is done too late.

Level


Low


frequencies


High


frequencies


Acoustic Cal. EQ Pro

Standard Acoustic Cal.


calibration range

EQ calibration range


Time

0

80

160


(in msec.)


Reverb characteristics for different channels – Reverb characteristics can be somewhat different for each channel. Since this difference increases as the sound is influenced by the various room characteristics, it is often better to capture a frequency analysis early on for smoother mixing of channel frequencies/sounds.

Setting Professional Acoustic Calibration EQ according to your room characteristics

Using the manual setup, you can set the time period at which the frequency response is analyzed, pinpointing the time that is best for system calibration with your particular room characteristics.

The graph below shows the difference between standard acoustic calibration and professional calibration (the gray circles represent the point at which the microphone captures the sound for frequency analysis).

Level


Test tone


Acoustic Cal. EQ Pro

Standard Acoustic Cal.


calibration range

EQ calibration range


Time

0

80

160

(in msec.)


Level


Left


surround


Right


Surround


Acoustic Cal. EQ Pro

Standard Acoustic Cal.


calibration range

EQ calibration range


Time

0

80

160


(in msec.)


If your room isn’t affected by the factors above, it is often not necessary to make a 20 ms to 40 ms setting. Later time settings may provide a more detailed sound experience with your speaker system. It is best to try and see what works best for your particular room.

Note that changing the room (for example, moving furniture or paintings) will affect the calibration results. In such cases, you should recalibrate your system.

Using Professional Acoustic Calibration EQ

As soon as audio is output from your speaker system, it is influenced by room characteristics, such as walls, furniture, and the dimensions of the room. The sooner the frequency analysis, the less it is influenced by the room. We recommend an earlier time setting of 20 ms to 40 ms to compensate for two major factors that will influence the sound of most rooms:

1 Select ‘EQ Professional’ then press ENTER.


3.Manual

MCACC


3e.EQ Professional


a.Fine

Ch

Level


1.Reverb

Measurement


b.Fine

SP

Distance


2.Reverb

View


c.Standing

Wave


3.Advanced EQ

Setup


d.EQ

Adjust


e.EQ

Professional


:Return


ENTER:Next

:Return


2Select an option and press ENTER.

Reverb Measurement – Use this to measure the reverb characteristics of your room.

Note

1Note that due to an effect known as ‘group delay’, lower frequencies will take longer to be generated than higher frequencies (this is most obvious when comparing the frequencies at 0ms). This initial slope is not a problem (i.e. excessive reverb) with your listening room.

42

En

Page 42
Image 42
Pioneer VSX-2016AV operating instructions How to interpret the graphical output, Using Professional Acoustic Calibration EQ

VSX-2016AV specifications

The Pioneer VSX-2016AV is a versatile and feature-rich AV receiver that has garnered attention for its ability to deliver a cinematic experience in the home. With a focus on sound quality and user-friendly features, the VSX-2016AV stands out as a strong option for both casual listeners and serious home theater enthusiasts.

One of the primary attractions of the VSX-2016AV is its robust audio performance. It supports Dolby TrueHD and DTS-HD Master Audio, ensuring that users can enjoy high-resolution soundtracks from their Blu-ray discs. The receiver also features Pioneer's proprietary Sound Retriever technology that enhances compressed audio files, allowing for a more engaging listening experience, regardless of the source.

The VSX-2016AV does not skimp on connectivity options, offering multiple HDMI inputs and outputs to accommodate a range of devices. This includes support for 4K pass-through, making it future-proof for users with advanced video sources. In addition to HDMI, the receiver also provides options for component video, composite video, and analog audio connections, catering to a variety of setups.

Another standout feature is the integrated MCACC (Multi-Channel Acoustic Calibration System) technology. This system automatically calibrates the receiver to the acoustics of the room, ensuring that users experience optimal sound performance based on their specific environment. The result is a well-balanced audio output that enhances the overall listening experience.

With six channels of amplification, the VSX-2016AV is capable of powering a full surround sound system. The receiver provides a total power output of 100 watts per channel, which is ample for most home theater setups. It also includes various sound modes, allowing users to customize the audio output for movies, music, and gaming.

A user-friendly interface and remote control system make it easy to navigate through the various settings and options. The front panel features a clear display that provides vital information about input selection, volume levels, and audio formats. Additionally, Pioneer's iControlAV app enables smartphone control, allowing users to manage their audio settings seamlessly.

In conclusion, the Pioneer VSX-2016AV combines advanced audio technologies with a robust feature set, making it an excellent choice for home entertainment enthusiasts. Its emphasis on sound quality, along with the convenience of connectivity options and user-friendly controls, ensures that it can meet the needs of a diverse range of users. Whether for movie nights or music listening, this AV receiver stands ready to elevate the home audio experience.