PS4660T and PS5560T User Manual
Disclaimer
Copyright 9 May 2013 by Planar Systems, Inc. All rights reserved
Trademark Credits
Installing a PS4660T/PS5560T
Table of Contents
Using the Display in Portrait Mode
VESA Mounts, General Description
Downloading Additional Documentation and Firmware
Accessing Planar’s Technical Support Website
Navigating Through the Menus
Downloading Utility Software
Introduction
Safety Precautions
Safety Information
Important Safety Instructions
What is Temporary Image Retention?
Recommended Usage
Burn-In Versus Temporary Image Retention
European Union Disposal Information
Cooling Requirements
VESA Mounts, General Description
Normal Usage Guidelines
Ambient Light Recommendations
Cleaning the PS4660T/PS5560T
Unpacking the PS4660T/PS5560T
Package Contents
Description
2 Remove the top shipping foam, accessory bag and packing list
Quantity
Foam Cushion Bottom
Part
Contents of the Accessory Kit
Picture
Quantity
PS4660T - Front and Side
Dimensions
40.2in
1021.1mm
PS5560T - Front and Side
PS4660T - Rear
1.8in 45.3mm
2.6in 65.9mm
15.7in
PS5560T - Rear
Plan Your Installation
Installing a PS4660T/PS5560T
Before You Begin
Tools/Equipment List
Connectivity
Prepare Your Installation Location
OSD Keypad
Operating the PS4660T/PS5560T
OSD Keypad Buttons
Descriptions
LED Indicators
Remote Control Receiver
LED On
Condition
Caution Improper ventilation may shorten the life of the display
Using the Display in Portrait Mode
Using the Remote Control
Description
Opens the on-screen menu system. When the menu
Function
Locking/Unlocking the OSD Menus
Changing the Remote Control Battery
1 Remove the battery cover
2 Insert the batteries
Performing Basic Functions
Using the Touch Screen
Drag or select
Right-click
Drag one finger left or right
Quickly drag your finger flick in a desired direction
Multi-Touch Functions
Turning the PS4660T/PS5560T On
Adjusting the Volume
Turning the PS4660T/PS5560T Off
Selecting the Input Source
Setting
OSD Menu Functions
Note Disabled in Graphics mode
Main Menu
Setting
Field
Submenu
PS4660T and PS5560T User Guide
OSD Menus
Video Menus Audio Menu
RTC Submenus
Basic Menus
Same Settings On Work Days Mode
PS4660T and PS5560T User Guide
Advanced Menu System Menu
Advanced Menu
Video Menu
Navigating Through the Menus
Gamma Color Temperature
Color Temperature & Gamma Menu
Range 0~8 Default
Range 0~100 Default
Default
Default
Default
Default
Volume Bass Treble Balance HDMI Audio Input DP Audio Input
Audio Menu
Default
Default HDMI
Default Off
Basic Menu
Default
Default Landscape
OSD Timeout Power LED Real Time Clock
Basic Menu/RTC Real Time Clock Menu
Options 5~120 Default Options Off, On
Real Time Timer Mode
Timer Mode User mode
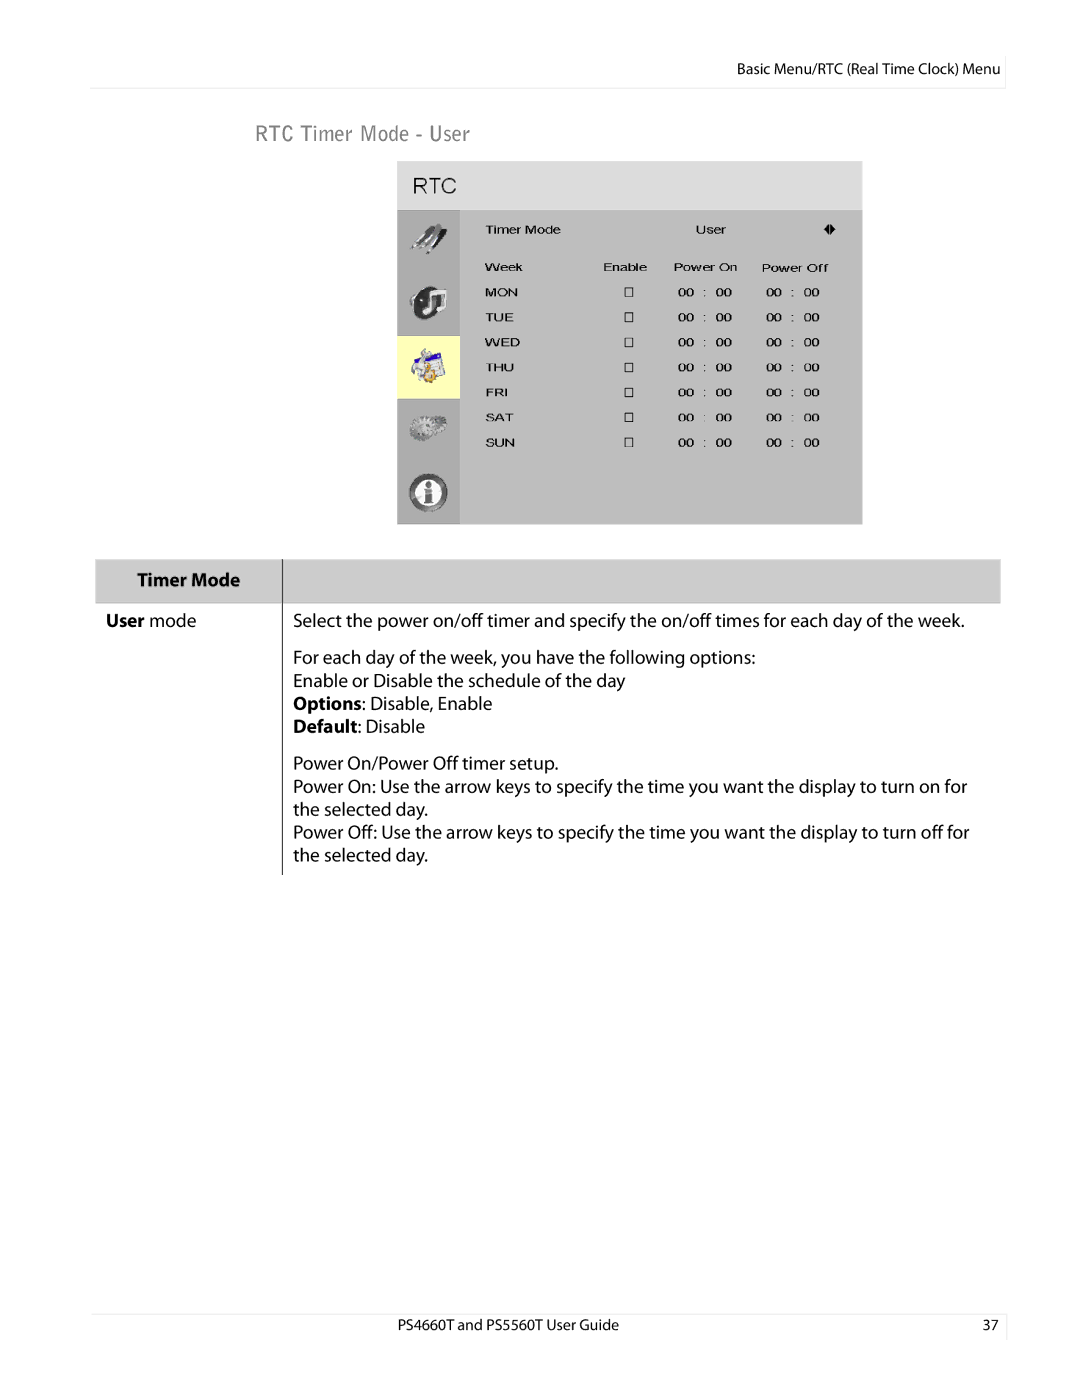
RTC Timer Mode - User
Timer Mode Work Days mode
RTC Timer Mode - Work Days
Timer Mode All Days mode
RTC Timer Mode - All Days
Auto Adjustment Image Position Phase Clock IRFM
Advanced Menu
Options No, Yes Default No
Options On Default Off
Default
Baud Rate Smart Light Control Wake Up From Sleep Factory Reset
Default Off
Options No, Yes Default No
PS4660T and PS5560T User Guide
System Menu
System Menu
Default
Default Settings
The following table shows the default settings for the LCD
Timing
Signal Compatibility
fH KHz
fV Hz
Specification
Specifications
Humidity
Specification
7 keys , SOURCE, , , , , MENU/EXIT
Optical
Check for the following
Troubleshooting
Issue
Downloading Additional Documentation and Firmware
Accessing Planar’s Technical Support Website
Downloading Utility Software
Contents