PLACEMENT
Polk PSW Series subwoofers offer many placement options–in an entertainment center, behind furniture, or next to a sofa or chair. The subwoofer may be placed anywhere in the room, but for the greatest possible bass output place the subwoofer near a corner of the room. Allow at least 6 inches (15cm) of space between any subwoofer driver and a wall or obstruction (Figure 1). The subwoofer should only be placed on its feet. (Figure 2). NEVER LAY
THE SUBWOOFER ON THE AMPLI- FIER END—THIS WILL DAMAGE THE AMPLIFIER.
The PSW650 is not magnetically shield- ed and should not be placed close to a television set. If you see any color dis- tortion in your TV, move the subwoofer a few inches further away from the set.
CONNECTING THE SUBWOOFER TO THE SYSTEM—GENERAL
If you elect to use the speaker level inputs, use two-conductor 16 gauge or thicker speaker wires. If you choose to use the line level inputs, use high quality, shielded RCA type interconnect cables. See your Polk dealer for wire recommendations.
Note that one of the speaker input terminals on the rear of the speaker is marked red (+) and the other black (-). Make certain that you connect the wire from the red (+) terminal of your ampli- fier to the red (+) terminal on your speaker, and the wire from the black (-) terminal of the amplifier to the black (-) terminal on your speaker. Most wire has some indication (such as color coding, ribbing, or writing) on one of the two conductors to help maintain consistency. If your subwoofer doesn’t seem to produce much bass, it is most likely that one of the speaker wires is con- nected backwards. Double check all connections for correct polarity.
Strip 1/2" of insulation from each of the two conductors on both ends to expose the bare wire. Twist the exposed wire of each conductor to form two un-frayed strands. Connect two conductors to the receiver or amp (refer to the owner’s manual supplied with your electronics for assistance with proper hookup). Connect the two conductors on the other end of the wire to the speaker terminals. Repeat for the other channel.
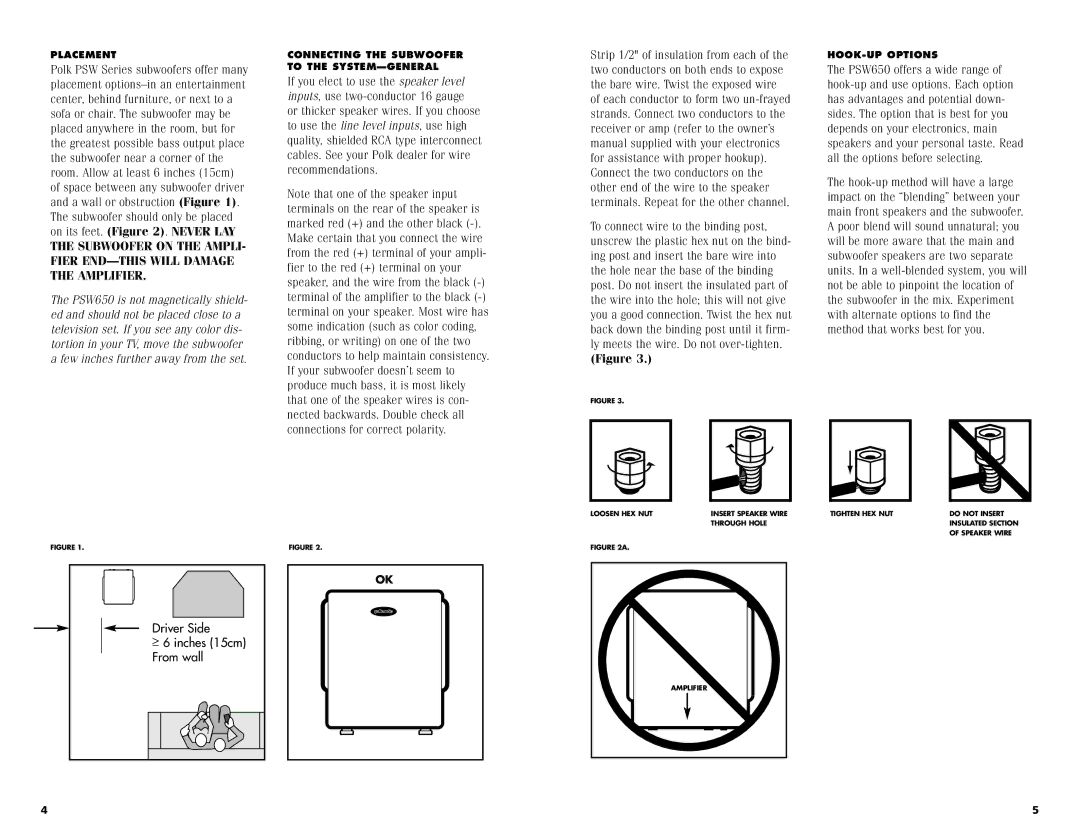
To connect wire to the binding post, unscrew the plastic hex nut on the bind- ing post and insert the bare wire into the hole near the base of the binding post. Do not insert the insulated part of the wire into the hole; this will not give you a good connection. Twist the hex nut back down the binding post until it firm- ly meets the wire. Do not over-tighten.
(Figure 3.)
FIGURE 3.
HOOK-UP OPTIONS
The PSW650 offers a wide range of hook-up and use options. Each option has advantages and potential down- sides. The option that is best for you depends on your electronics, main speakers and your personal taste. Read all the options before selecting.
The hook-up method will have a large impact on the “blending” between your main front speakers and the subwoofer. A poor blend will sound unnatural; you will be more aware that the main and subwoofer speakers are two separate units. In a well-blended system, you will not be able to pinpoint the location of the subwoofer in the mix. Experiment with alternate options to find the method that works best for you.