The R Series Bookshelf Loudspeakers feature a
•Make sure the material on which you plan to mount the speakers (plaster, drywall, paneling, stone, etc.) can support the weight of the speakers (R15=approx 9lbs/4kg ea; R20=approx 16lbs/7.25kg ea).
•Make sure the locations you select do not conceal electrical wiring or plumbing.
•Prior to installation, hold the speaker in the chosen location to make sure it safely
clears obstacles such as ceiling, adjacent walls, corners, beams, lighting fixtures and door/window frames.w
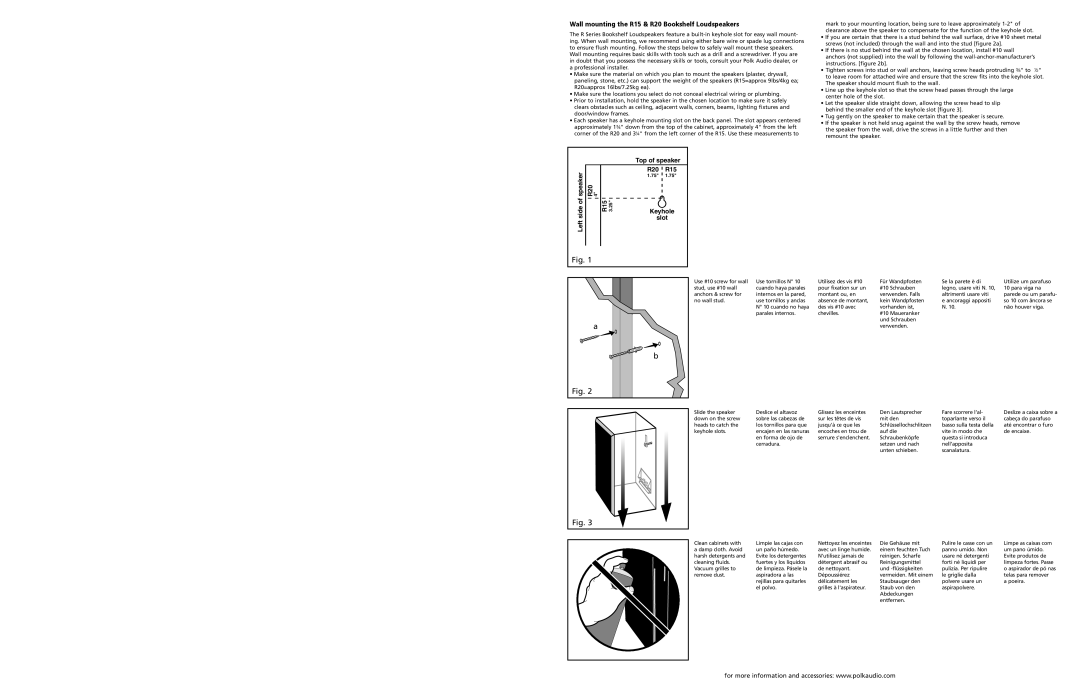
•Each speaker has a keyhole4 mounting slot on the back panel. The slot appears centered approximately 1 " down from the top of the cabinet, approximately 4" from the left corner of the R20 and 3 " from the left corner of the R15. Use these measurements to
mark to your mounting location, being sure to leave approximately
•If you are certain that there is a stud behind the wall surface, drive #10 sheet metal screws (not included) through the wall and into the stud [figure 2a].
•If there is no stud behind the wall at the chosen location, install #10 wall
anchors (not supplied) into the wall by following the
Tighten screws into stud or wall anchors, leaving screw heads protruding " to "•
to leave room for attached wire and ensure that the screw fits into the keyhole slot. The speaker should mount flush to the wall.
•Line up the keyhole slot so that the screw head passes through the large center hole of the slot.
•Let the speaker slide straight down, allowing the screw head to slip behind the smaller end of the keyhole slot [figure 3].
•Tug gently on the speaker to make certain that the speaker is secure.
•If the speaker is not held snug against the wall by the screw heads, remove the speaker from the wall, drive the screws in a little further and then remount the speaker.
|
|
|
| Top of speaker | |
speaker |
|
|
| R20 | R15 |
|
|
| 1.75" | 1.75" | |
R20 | 4" |
|
|
| |
side of |
| R15 | 3.25" | Keyhole | |
| slot | ||||
Left |
|
|
| ||
|
|
|
|
| |
Fig. 1 |
|
|
|
| |
a |
b |
Fig. 2 |
Use #10 screw for wall | Use tornillos N° 10 | Utilisez des vis #10 | Für Wandpfosten | Se la parete è di | Utilize um parafuso |
stud, use #10 wall | cuando haya parales | pour fixation sur un | #10 Schrauben | legno, usare viti N. 10, | 10 para viga na |
anchors & screw for | internos en la pared, | montant ou, en | verwenden. Falls | altrimenti usare viti | parede ou um parafu- |
no wall stud. | use tornillos y anclas | absence de montant, | kein Wandpfosten | e ancoraggi appositi | so 10 com âncora se |
| N° 10 cuando no haya | des vis #10 avec | vorhanden ist, | N. 10. | não houver viga. |
| parales internos. | chevilles. | #10 Maueranker |
|
|
|
|
| und Schrauben |
|
|
|
|
| verwenden. |
|
|
Fig. 3
Slide the speaker | Deslice el altavoz | Glissez les enceintes | Den Lautsprecher | Fare scorrere l’al- | Deslize a caixa sobre a |
down on the screw | sobre las cabezas de | sur les têtes de vis | mit den | toparlante verso il | cabeça do parafuso |
heads to catch the | los tornillos para que | jusqu'à ce que les | Schlüssellochschlitzen | basso sulla testa della | até encontrar o furo |
keyhole slots. | encajen en las ranuras | encoches en trou de | auf die | vite in modo che | de encaixe. |
| en forma de ojo de | serrure s'enclenchent. | Schraubenköpfe | questa si introduca |
|
| cerradura. |
| setzen und nach | nell’apposita |
|
|
|
| unten schieben. | scanalatura. |
|
Clean cabinets with | Limpie las cajas con | Nettoyez les enceintes | Die Gehäuse mit | Pulire le casse con un | Limpe as caixas com |
a damp cloth. Avoid | un paño húmedo. | avec un linge humide. | einem feuchten Tuch | panno umido. Non | um pano úmido. |
harsh detergents and | Evite los detergentes | N'utilisez jamais de | reinigen. Scharfe | usare né detergenti | Evite produtos de |
cleaning fluids. | fuertes y los líquidos | détergent abrasif ou | Reinigungsmittel | forti né liquidi per | limpeza fortes. Passe |
Vacuum grilles to | de limpieza. Pásele la | de nettoyant. | und | pulizia. Per ripulire | o aspirador de pó nas |
remove dust. | aspiradora a las | Dépoussiérez | vermeiden. Mit einem | le griglie dalla | telas para remover |
| rejillas para quitarles | délicatement les | Staubsauger den | polvere usare un | a poeira. |
| el polvo. | grilles à l'aspirateur. | Staub von den | aspirapolvere. |
|
|
|
| Abdeckungen |
|
|
|
|
| entfernen. |
|
|
for more information and accessories: www.polkaudio.com