Overview of the Set-Up Process
I. Connect the XM Reference Tuner to your home audio equipment.
II.Position the High-Gain Antenna for the best signal.
III. Activate your XM Satellite Radio subscription.
XM TUNER SET-UP
Set up your XM Reference Tuner as follows:
1. Connect your XM Reference Tuner’s audio output to your pre-amp/receiver using either the supplied 3-connector RCA Analog Stereo Audio/(Composite)Video Cable or a TOSLINK Digital Audio Cable connection. You may also use a Digital Coaxial RCA-type Cable (not included). See Figure 1.
2.Be sure to maintain consistency by matching red-to-red
and white-to-white when connecting the RCA cable.
3.Connect the XM High-Gain Home Antenna to the jack
labeled “ANTENNA” on the rear panel of the XM Reference Tuner.
4.You may wish to connect your XM Reference Tuner to your television via the Yellow Connector of the (supplied) 3-connector RCA Analog Stereo Audio/(Composite)Video Cable. This will allow you to view the XM Display on your television (if you are using Digital Audio, do not connect the Analog Audio output).
5.The Power Cord of the XM Reference Tuner must be plugged into a standard 120V home outlet. You may also plug the Power Cord of the XM Reference Tuner into the switched AC Outlets of your pre-amp/receiver, if available.
| After powering up, if the display reads “ANTENNA,” check that the antenna connection is | 2 |
| FIGURE |
| secure and completely pushed in. Next, change channels (from 0 to 1, or from 1 to 0 if the |
| |
| Tuner is not activated yet). If the “ANTENNA” message remains, power down the Tuner, unplug | |
| the antenna and look for any obvious damage. If no damage is detected, reconnect the antenna, | |
| turn the unit back on and change channels again. If the message still appears, contact your | |
| retailer or Polk Audio Customer Service at 1-800-377-7655. | |
| Using The Remote | |
| 1. The Remote Control included with your XM Reference Tuner does not control system | |
| volume. The pre-amp/receiver to which you have connected your XM Reference Tuner will | |
| control the system volume. (If the XM Reference Tuner signal is too high or too low, use the | |
| Line Level Out menu command on Pg. 9 to adjust the audio signal level of the | |
| XM Reference Tuner.) | |
| 2. Install the batteries (included) as shown in Figure 2. | |
| 3. If the remote control’s range begins to shorten, replace both batteries with new ones. | |
| 4. Direct sunlight or light from a high-frequency fluorescent lamp may cause the remote sensor | |
| on the XM Reference Tuner front panel to not function properly. If this happens, move the XM | |
| Reference Tuner out of this direct light. | |
| About the RS-232C Connection: | |
| The RS-232C Connection is provided to allow the XM Reference Tuner to be controlled by | |
| compatible 3rd party control systems. Polk Audio recommends that this connection only be | |
| used by experienced professional system installers. DO NOT connect the RS-232C Connection | |
| to a computer. This connection IS NOT compatible with personal computers. | |
XM HOME ANTENNA SET UP
Aiming your XM High-Gain Home Antenna | 3 |
If the XM Reference Tuner display says, “NO SIGNAL,” the antenna needs to be | FIGURE |
|
repositioned. In addition, even if you are receiving the XM signal, it is recommended that you optimize the position of your XM High-Gain Home Antenna as described in this section enabling you to receive the strongest possible signal and
consistent reception.
Your XM Reference Tuner display has two different signal-strength indicators which will help you optimize your antenna’s position.
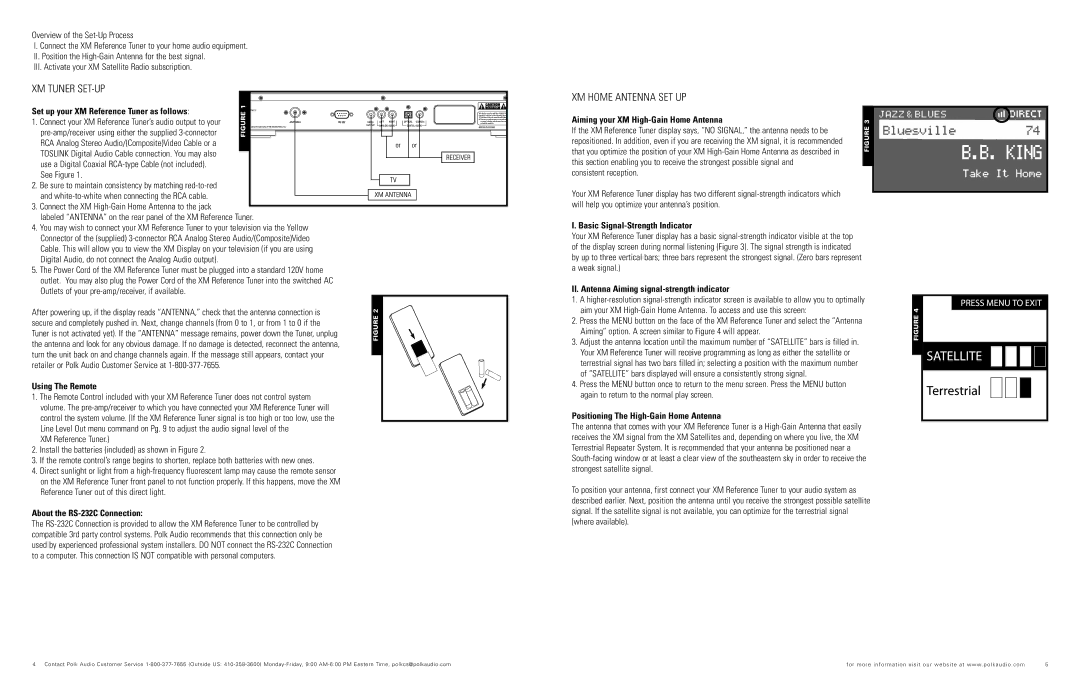
I. Basic Signal-Strength Indicator
Your XM Reference Tuner display has a basic signal-strength indicator visible at the top of the display screen during normal listening (Figure 3). The signal strength is indicated by up to three vertical bars; three bars represent the strongest signal. (Zero bars represent a weak signal.)
II. Antenna Aiming signal-strength indicator
1.A higher-resolution signal-strength indicator screen is available to allow you to optimally aim your XM High-Gain Home Antenna. To access and use this screen:
2.Press the MENU button on the face of the XM Reference Tuner and select the “Antenna Aiming” option. A screen similar to Figure 4 will appear.
3.Adjust the antenna location until the maximum number of “SATELLITE” bars is filled in. Your XM Reference Tuner will receive programming as long as either the satellite or terrestrial signal has two bars filled in; selecting a position with the maximum number of “SATELLITE” bars displayed will ensure a consistently strong signal.
4.Press the MENU button once to return to the menu screen. Press the MENU button again to return to the normal play screen.
Positioning The High-Gain Home Antenna
The antenna that comes with your XM Reference Tuner is a High-Gain Antenna that easily receives the XM signal from the XM Satellites and, depending on where you live, the XM Terrestrial Repeater System. It is recommended that your antenna be positioned near a South-facing window or at least a clear view of the southeastern sky in order to receive the strongest satellite signal.
To position your antenna, first connect your XM Reference Tuner to your audio system as described earlier. Next, position the antenna until you receive the strongest possible satellite signal. If the satellite signal is not available, you can optimize for the terrestrial signal (where available).