Indoor installation on a flat surface
1.To aim your antenna at the satellites:
2.Set the antenna flat against its base on a flat (horizontal) surface.
3.Turn the base of the antenna so that XM Logo is facing to the South/Southwest if you are in the Eastern half of the US, and to the South/Southeast if you are in the Western half of the US.
4.Use the “Antenna Aiming” screen, as described earlier, to optimize antenna tilt angle and position.
5.If necessary, experiment with different locations near South-facing windows.
Your High-Gain Home Antenna comes with 20 feet of cable. If that is not sufficient to locate the antenna where there is a strong XM signal, purchase a 50-foot cable extension (Polk Audio model number XAE-1) from Polk Audio (http://shop.polkaudio.com) or your retailer. Up to two extensions
POWER | | | | SELECT | CATEGORY |
| | | | select | category |
display | memory | menu | enter | | |
| | | | | XM Reference Tuner |
DISPLAY | MEMORY | MENU | ENTER | DISPLAY SCREEN |
can be used together for up to 120 total feet of cable.
Outdoor installation or Indoor Wall Mounting
The antenna can also be attached vertically to an external or internal wall if that is more convenient than placing it on a horizontal surface.
1.Holding your antenna up, find a wall location that ensures a strong signal. It is recommended that you use an extension cord to temporarily locate your High-Gain Home Antenna outdoors while optimizing the antenna location with the “Antenna Aiming” screen.
2.Attach four screws to the wall using the Screw-Locator Pattern in Figure 5. Use screws with head sizes small enough to fit in the center of each of the four holes but large enough not to pop out of the elongated sections. Leave 1/8-inch of the screw shanks behind the heads sticking out of the wall.
3.Tilt the antenna fully back on the base, place the antenna base on the four screw heads with the antenna pivot at the top and pull down approximately 1/4” inch until the base is firmly secured. Note that the XM Logo will be upside down when the antenna is properly installed.
4.Tilt the antenna away from the wall/base until the signal strength is optimized.
NOTE: Do not cut the antenna cable and attempt to splice it or attach alternative connectors or cable. The cable and connectors used in your XM Reference Tuner are specifically chosen and attached at the factory to ensure that they will work with XM’s unique frequency band. Use an XM-approved extension kit (Polk Audio model number XAE-1, available from
your retailer or http://shop.polkaudio.com) with your XM Reference Tuner System. Failure to do so could damage your unit.
ACTIVATING YOUR XM SYSTEM | FIGURE 5 |
|
Getting Started
1.To quickly begin enjoying XM Satellite Radio in your home, follow these simple steps:
2.Set up your XM Reference Tuner as described in the previous section.
3.Press the POWER button to turn your XM Reference Tuner ON and verify that it is playing on Channel 1, the XM Preview Channel.
4.Select Channel 0. The XM Reference Tuner’s eight character XM Satellite Radio ID Number will appear on the display. Write the Number HERE: _________________________
NOTE: Carefully check the XM Radio ID. The letters I, O, S, and F are not used.
5.Activate your XM Satellite Radio service. To subscribe, make sure you have a major credit card and your XM Satellite Radio ID Number handy and contact XM at http://activate.xmradio.com. You can also activate your service by calling 1-800-XM-RADIO (1-800-967-2346).
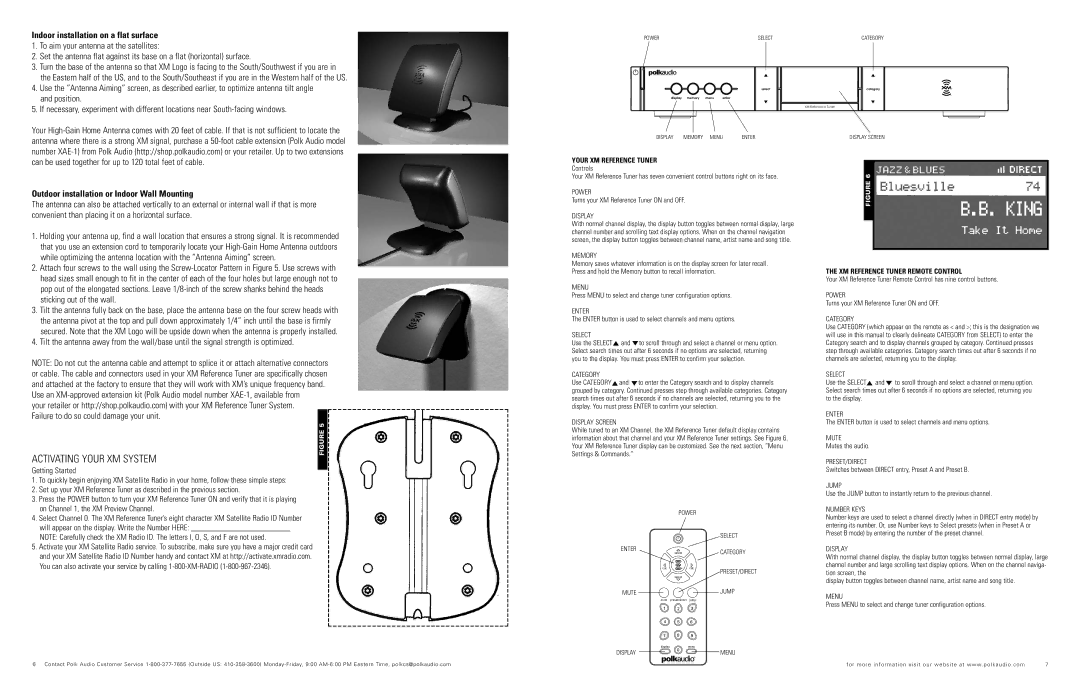
YOUR XM REFERENCE TUNER
Controls
Your XM Reference Tuner has seven convenient control buttons right on its face.
POWER
Turns your XM Reference Tuner ON and OFF.
DISPLAY
With normal channel display, the display button toggles between normal display, large channel number and scrolling text display options. When on the channel navigation screen, the display button toggles between channel name, artist name and song title.
MEMORY
Memory saves whatever information is on the display screen for later recall. Press and hold the Memory button to recall information.
MENU
Press MENU to select and change tuner configuration options.
ENTER
The ENTER button is used to select channels and menu options.
SELECT
Use the SELECT and
and  to scroll through and select a channel or menu option. Select search times out after 6 seconds if no options are selected, returning you to the display. You must press ENTER to confirm your selection.
CATEGORY
Use CATEGORY  and
and  to enter the Category search and to display channels grouped by category. Continued presses step through available categories. Category search times out after 6 seconds if no channels are selected, returning you to the display. You must press ENTER to confirm your selection.
DISPLAY SCREEN
While tuned to an XM Channel, the XM Reference Tuner default display contains information about that channel and your XM Reference Tuner settings. See Figure 6. Your XM Reference Tuner display can be customized. See the next section, “Menu Settings & Commands.”
| POWER | |
| | | SELECT |
ENTER | select | | CATEGORY |
| |
cat. | | cat. | PRESET/DIRECT |
| | |
| select | | |
MUTE | | | JUMP |
mute | preset/direct | jump | |
1 | 2 | 3 | |
4 | 5 | 6 | |
7 | 8 | 9 | |
display | 0 | menu | |
DISPLAY | | MENU |
| |
FIGURE 6
THE XM REFERENCE TUNER REMOTE CONTROL
Your XM Reference Tuner Remote Control has nine control buttons.
POWER
Turns your XM Reference Tuner ON and OFF.
CATEGORY
Use CATEGORY (which appear on the remote as < and >; this is the designation we will use in this manual to clearly delineate CATEGORY from SELECT) to enter the Category search and to display channels grouped by category. Continued presses step through available categories. Category search times out after 6 seconds if no channels are selected, returning you to the display.
SELECT
Use the SELECT and
and  to scroll through and select a channel or menu option. Select search times out after 6 seconds if no options are selected, returning you to the display.
ENTER
The ENTER button is used to select channels and menu options.
MUTE
Mutes the audio.
PRESET/DIRECT
Switches between DIRECT entry, Preset A and Preset B.
JUMP
Use the JUMP button to instantly return to the previous channel.
NUMBER KEYS
Number keys are used to select a channel directly (when in DIRECT entry mode) by entering its number. Or, use Number keys to Select presets (when in Preset A or Preset B mode) by entering the number of the preset channel.
DISPLAY
With normal channel display, the display button toggles between normal display, large channel number and large scrolling text display options. When on the channel naviga- tion screen, the
display button toggles between channel name, artist name and song title.
MENU
Press MENU to select and change tuner configuration options.