To reset the timer, simply hold the button for a couple of seconds and the timer will reset to zero.


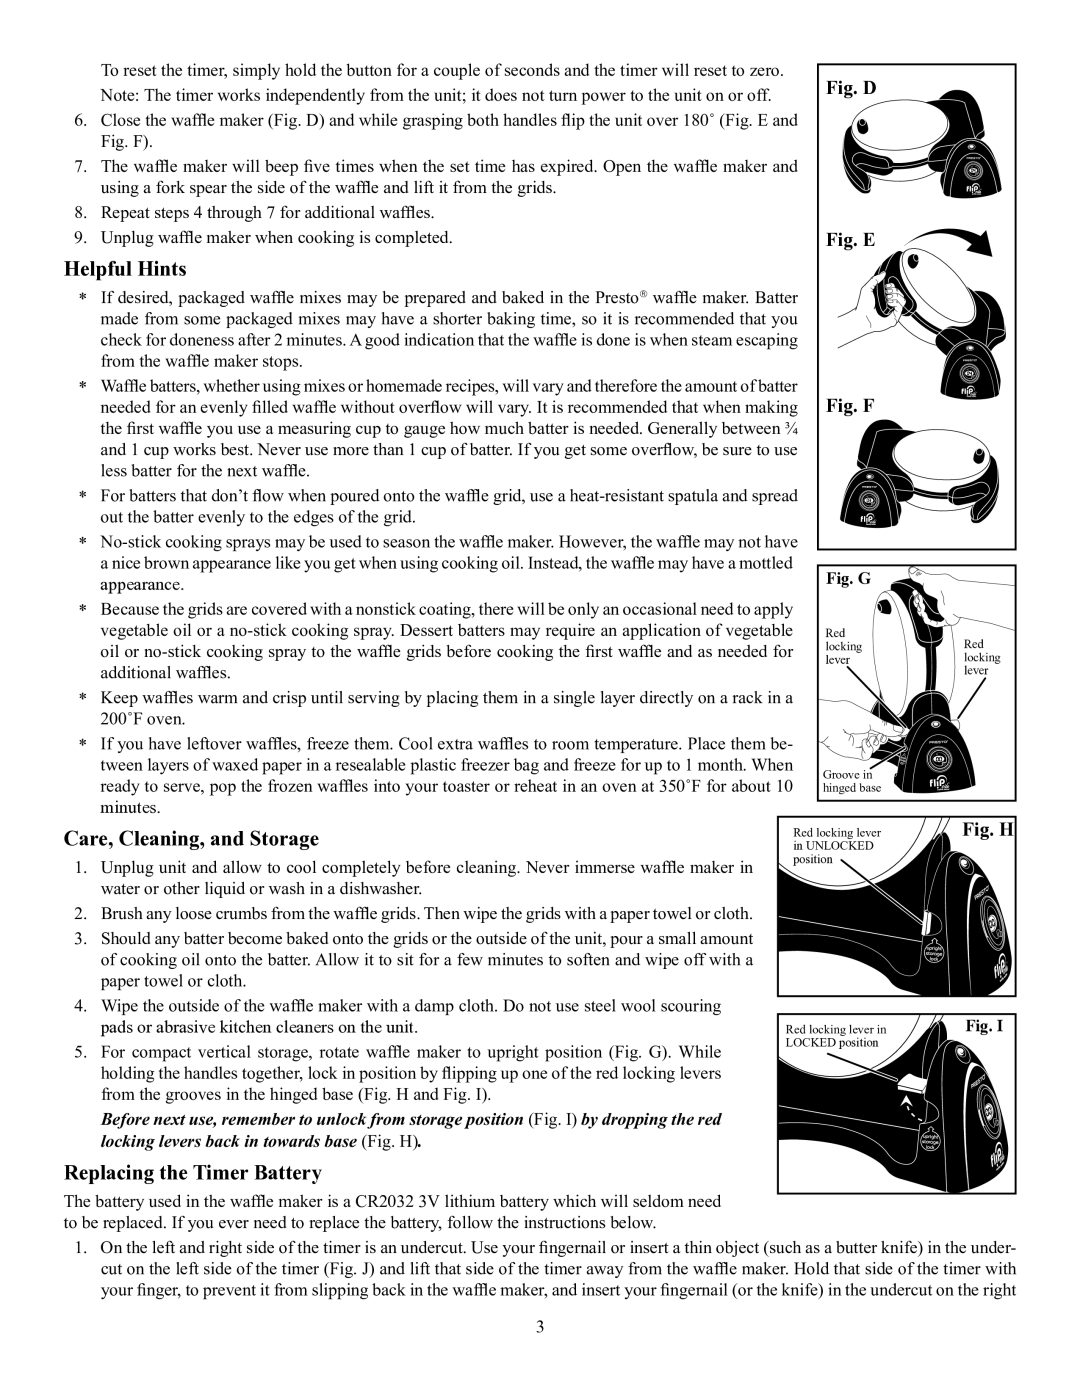
Fig. D


Note: The timer works independently from the unit; it does not turn power to the unit on or off.


6.

Close the waffle maker (Fig. D) and while grasping both handles flip the unit over 180˚ (Fig. E and


Fig. F).


7.

The waffle maker will beep five times when the set time has expired. Open the waffle maker and


using a fork spear the side of the waffle and lift it from the grids.


8.

Repeat steps 4 through 7 for additional waffles.


9.

Unplug waffle maker when cooking is completed.

Fig. E

Helpful Hints

*If desired, packaged waffle mixes may be prepared and baked in the Prestowaffle maker. Batter

made from some packaged mixes may have a shorter baking time, so it is recommended that you check for doneness after 2 minutes. A good indication that the waffle is done is when steam escaping from the waffle maker stops.

*

Waffle batters, whether using mixes or homemade recipes, will vary and therefore the amount of batter

Fig. F


needed for an evenly filled waffle without overflow will vary. It is recommended that when making


the first waffle you use a measuring cup to gauge how much batter is needed. Generally between ¾


and 1 cup works best. Never use more than 1 cup of batter. If you get some overflow, be sure to use


less batter for the next waffle.


*

For batters that don’t flow when poured onto the waffle grid, use a heat-resistant spatula and spread


out the batter evenly to the edges of the grid.


*

No-stick cooking sprays may be used to season the waffle maker. However, the waffle may not have


a nice brown appearance like you get when using cooking oil. Instead, the waffle may have a mottled


Fig. G


appearance.


*

Because the grids are covered with a nonstick coating, there will be only an occasional need to apply


vegetable oil or a no-stick cooking spray. Dessert batters may require an application of vegetable

Red

Red


oil or no-stick cooking spray to the waffle grids before cooking the first waffle and as needed for

locking


lever

locking


additional waffles.


lever

*Keep waffles warm and crisp until serving by placing them in a single layer directly on a rack in a

200˚F oven.

* If you have leftover waffles, freeze them. Cool extra waffles to room temperature. Place them be-


tween layers of waxed paper in a resealable plastic freezer bag and freeze for up to 1 month. When

Groove in

ready to serve, pop the frozen waffles into your toaster or reheat in an oven at 350˚F for about 10

hinged base

minutes.


Care, Cleaning, and Storage

in unlocked

Fig. H


Red locking lever

1. Unplug unit and allow to cool completely before cleaning. Never immerse waffle maker in

position


water or other liquid or wash in a dishwasher.


2. Brush any loose crumbs from the waffle grids. Then wipe the grids with a paper towel or cloth.

3. Should any batter become baked onto the grids or the outside of the unit, pour a small amount of cooking oil onto the batter. Allow it to sit for a few minutes to soften and wipe off with a paper towel or cloth.

4.

Wipe the outside of the waffle maker with a damp cloth. Do not use steel wool scouring


pads or abrasive kitchen cleaners on the unit.

Red locking lever in

Fig. I

5.

For compact vertical storage, rotate waffle maker to upright position (Fig. G). While

locked position


holding the handles together, lock in position by flipping up one of the red locking levers


from the grooves in the hinged base (Fig. H and Fig. I).


Before next use, remember to unlock from storage position (Fig. I) by dropping the red locking levers back in towards base (Fig. H).

Replacing the Timer Battery

The battery used in the waffle maker is a CR2032 3V lithium battery which will seldom need to be replaced. If you ever need to replace the battery, follow the instructions below.

1.On the left and right side of the timer is an undercut. Use your fingernail or insert a thin object (such as a butter knife) in the under- cut on the left side of the timer (Fig. J) and lift that side of the timer away from the waffle maker. Hold that side of the timer with your finger, to prevent it from slipping back in the waffle maker, and insert your fingernail (or the knife) in the undercut on the right

3

Page 3
Image 3
Presto P3510 manual Helpful Hints, Care, Cleaning, and Storage, Replacing the Timer Battery

P3510 specifications

The Presto P3510 is a highly versatile and efficient pressure cooker that has revolutionized the way users approach meal preparation. Designed with both novice and experienced cooks in mind, this kitchen appliance offers an array of features that enhance safety, convenience, and cooking performance.

One of the standout qualities of the Presto P3510 is its capacity. With a generous 8-quart size, it accommodates large batches of food, making it ideal for families and meal preppers. Whether you're cooking hearty soups, stews, or preparing large cuts of meat, the spacious interior ensures that you can cook more in less time.

Equipped with a powerful 1000-watt heating element, the P3510 excels at reducing cooking times. The pressure cooking technology traps steam inside the pot, increasing the internal pressure and raising the boiling point of water. This results in faster cooking, while also locking in flavors and nutrients, making your meals not only quicker but also healthier.

Safety is a primary concern in pressure cooking, and the Presto P3510 incorporates several mechanisms to ensure peace of mind while cooking. It features a secure lock lid that prevents the lid from being opened while under pressure, alongside a pressure release valve that allows for controlled steam release. An automatic pressure regulator maintains the desired cooking pressure without requiring constant monitoring.

The P3510 also boasts a durable stainless-steel construction, which not only enhances its longevity but also provides excellent heat conduction for even cooking. The pot is compatible with all stovetops, including induction, broadening its usability across different cooking environments.

Another notable feature of the Presto P3510 is its user-friendly design. It comes with a clear instruction manual, along with recipes to inspire culinary creativity. The intuitive design ensures that even beginners can quickly adapt to using the pressure cooker.

In terms of maintenance, the removable pot is easy to clean and is dishwasher safe, making post-cooking cleanup a breeze. Additionally, it features a non-stick interior that further reduces the effort required to maintain the cooker.

In summary, the Presto P3510 pressure cooker combines capacity, efficiency, and safety to deliver a reliable kitchen companion. With its user-centric features and solid construction, it stands out as an excellent choice for anyone looking to enhance their culinary skills while saving time and energy in the kitchen.