KNOCK-DOWN (KD) LIFT CHAIR HEAT AND MASSAGE OUT-OF-BOX SETUP
Congratulations, you have received a KD Lift Chair developed by Pride for your convenience. Please follow the setup instructions below. Your lift chair will arrive packaged in the KD position. See figure 1.
NOTE: The illustrations shown may not reflect the model of lift chair that you own.
To Attach the Back Portion of the Lift Chair:
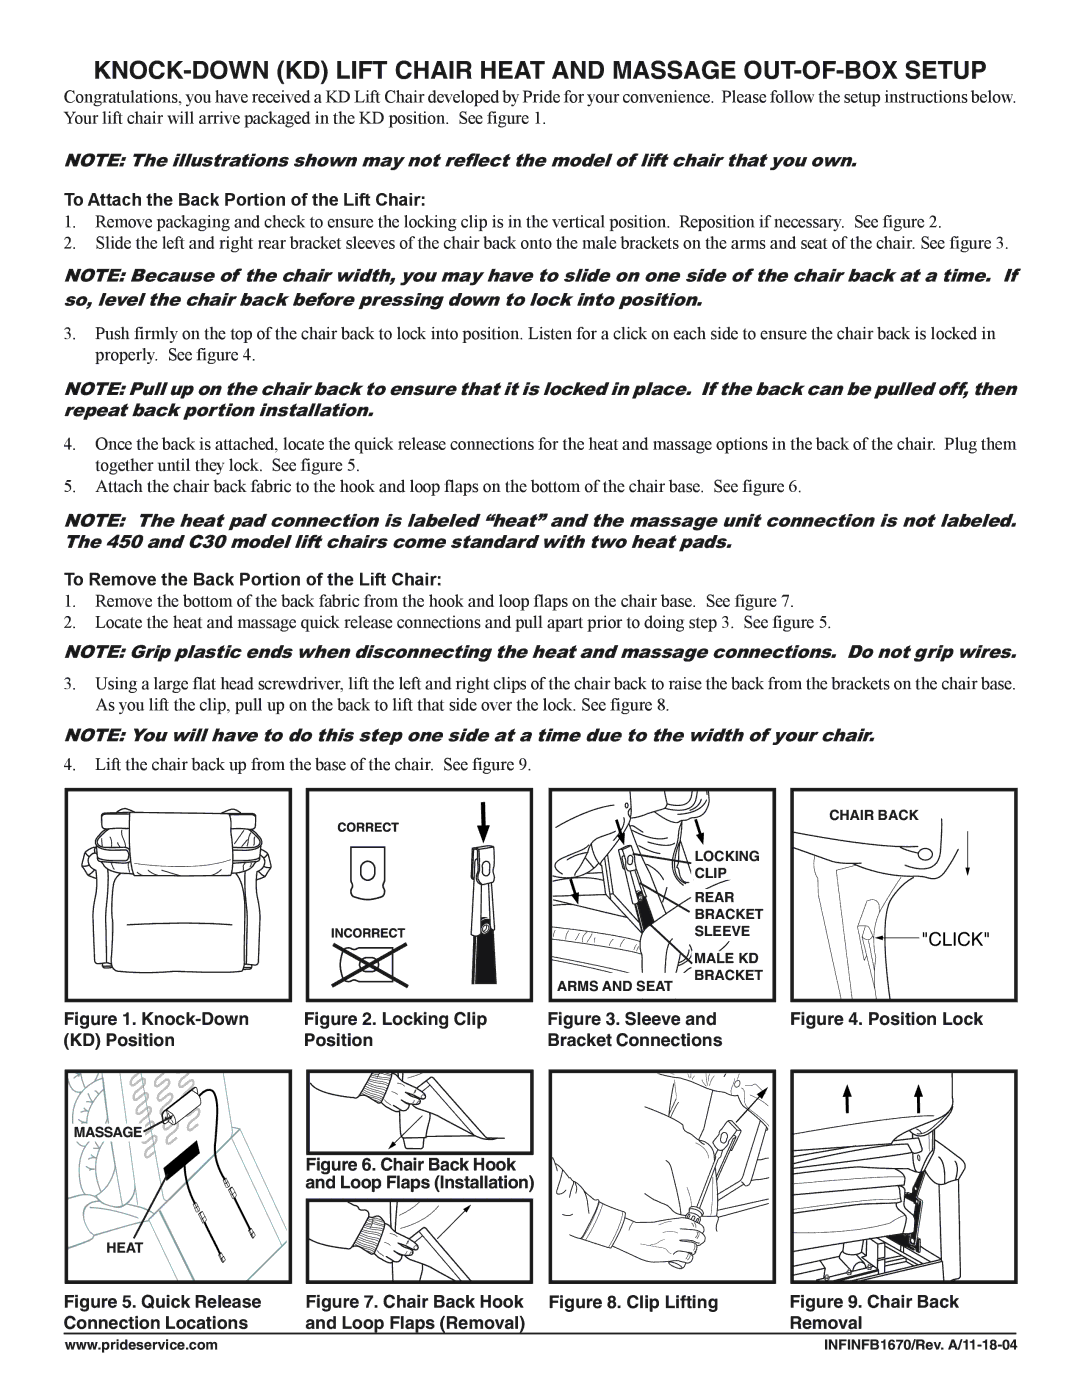
1.Remove packaging and check to ensure the locking clip is in the vertical position. Reposition if necessary. See figure 2.
2.Slide the left and right rear bracket sleeves of the chair back onto the male brackets on the arms and seat of the chair. See figure 3.
NOTE: Because of the chair width, you may have to slide on one side of the chair back at a time. If so, level the chair back before pressing down to lock into position.
3.Push firmly on the top of the chair back to lock into position. Listen for a click on each side to ensure the chair back is locked in properly. See figure 4.
NOTE: Pull up on the chair back to ensure that it is locked in place. If the back can be pulled off, then repeat back portion installation.
4.Once the back is attached, locate the quick release connections for the heat and massage options in the back of the chair. Plug them together until they lock. See figure 5.
5.Attach the chair back fabric to the hook and loop flaps on the bottom of the chair base. See figure 6.
NOTE: The heat pad connection is labeled “heat” and the massage unit connection is not labeled. The 450 and C30 model lift chairs come standard with two heat pads.
To Remove the Back Portion of the Lift Chair:
1.Remove the bottom of the back fabric from the hook and loop flaps on the chair base. See figure 7.
2.Locate the heat and massage quick release connections and pull apart prior to doing step 3. See figure 5.
NOTE: Grip plastic ends when disconnecting the heat and massage connections. Do not grip wires.
3.Using a large flat head screwdriver, lift the left and right clips of the chair back to raise the back from the brackets on the chair base. As you lift the clip, pull up on the back to lift that side over the lock. See figure 8.
NOTE: You will have to do this step one side at a time due to the width of your chair.
4.Lift the chair back up from the base of the chair. See figure 9.
![]() LOCKING
LOCKING
CLIP
REAR
BRACKET
SLEEVE
MALE KD
BRACKET
ARMS AND SEAT
CHAIR BACK
![]() "CLICK"
"CLICK"
Figure 1. | Figure 2. Locking Clip | Figure 3. Sleeve and | Figure 4. Position Lock |
(KD) Position | Position | Bracket Connections |
|
MASSAGE |
HEAT |
Figure 5. Quick Release Connection Locations
Figure 6. Chair Back Hook
and Loop Flaps (Installation)
Figure 7. Chair Back Hook Figure 8. Clip Lifting | Figure 9. Chair Back |
and Loop Flaps (Removal) | Removal |
www.prideservice.com | INFINFB1670/Rev. |