V I I I . B A S I C T R O U B L E S H O O T I N G
Any electromechanical device occasionally requires some troubleshooting. However, most of the problems that may arise can usually be solved with a bit of thought and common sense. Many of these problems occur because the batteries are not fully charged or because the batteries are worn down and can no longer hold a charge.
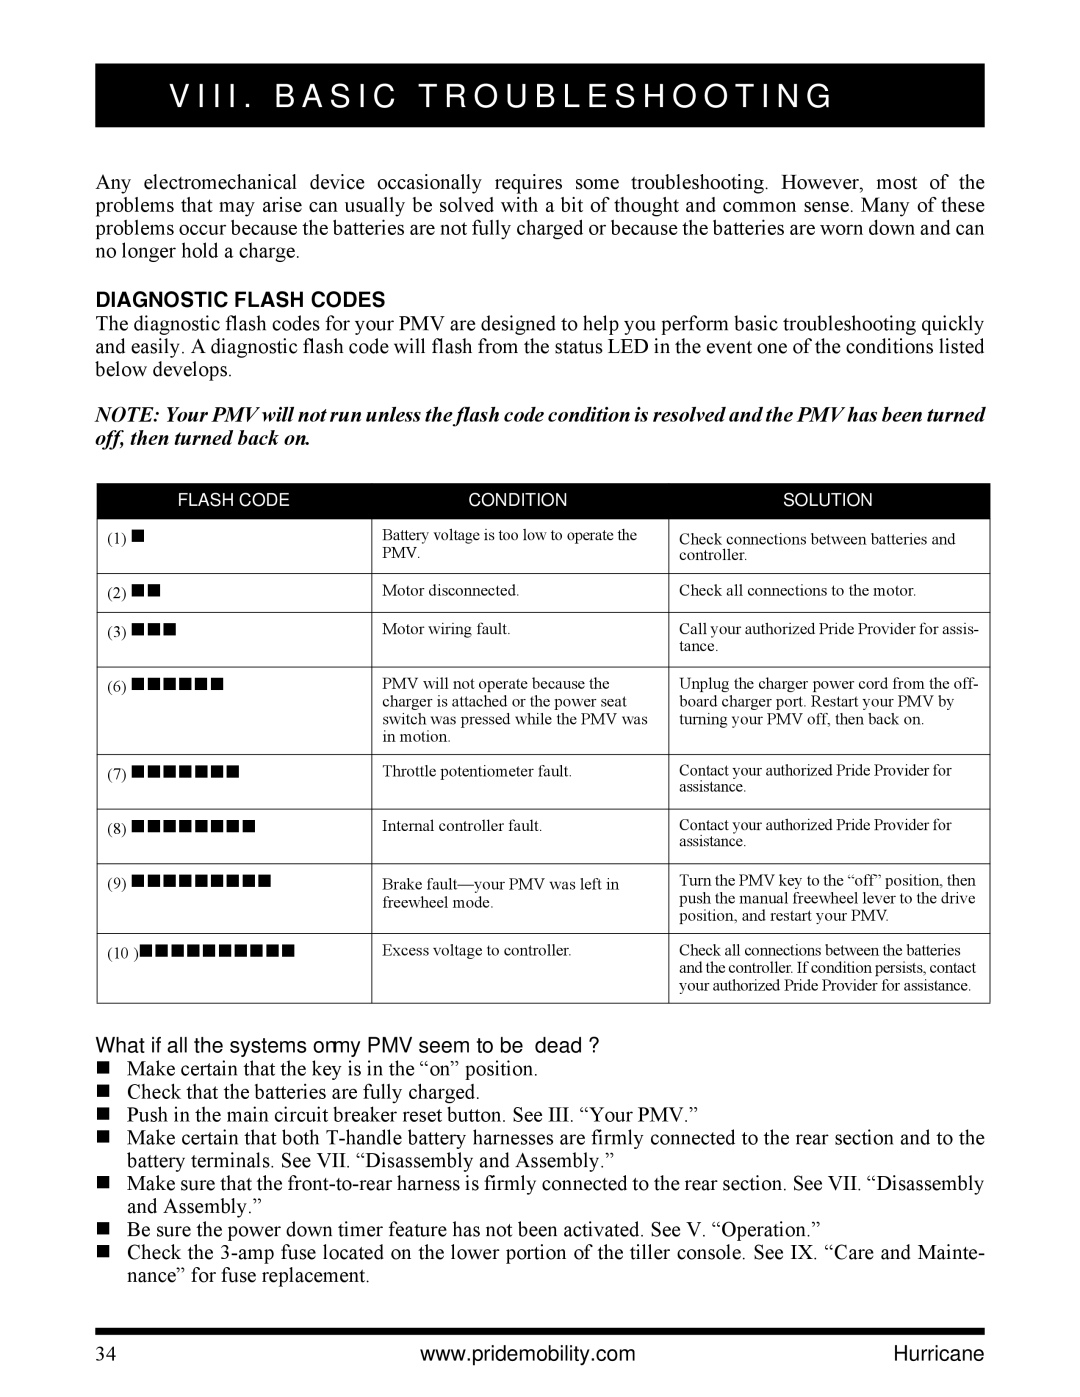
DIAGNOSTIC FLASH CODES
The diagnostic flash codes for your PMV are designed to help you perform basic troubleshooting quickly and easily. A diagnostic flash code will flash from the status LED in the event one of the conditions listed below develops.
NOTE: Your PMV will not run unless the flash code condition is resolved and the PMV has been turned off, then turned back on.
FLASH CODE | CONDITION | SOLUTION |
|
|
|
(1) | Battery voltage is too low to operate the | Check connections between batteries and |
| PMV. | controller. |
|
|
|
(2) | Motor disconnected. | Check all connections to the motor. |
|
|
|
(3) | Motor wiring fault. | Call your authorized Pride Provider for assis- |
|
| tance. |
|
|
|
(6) | PMV will not operate because the | Unplug the charger power cord from the off- |
| charger is attached or the power seat | board charger port. Restart your PMV by |
| switch was pressed while the PMV was | turning your PMV off, then back on. |
| in motion. |
|
|
|
|
(7) | Throttle potentiometer fault. | Contact your authorized Pride Provider for |
|
| assistance. |
|
|
|
(8) | Internal controller fault. | Contact your authorized Pride Provider for |
|
| assistance. |
|
|
|
(9) | Brake | Turn the PMV key to the “off” position, then |
| freewheel mode. | push the manual freewheel lever to the drive |
|
| position, and restart your PMV. |
|
|
|
(10 ) | Excess voltage to controller. | Check all connections between the batteries |
|
| and the controller. If condition persists, contact |
|
| your authorized Pride Provider for assistance. |
|
|
|
What if all the systems on my PMV seem to be “dead”? Make certain that the key is in the “on” position. Check that the batteries are fully charged.
Push in the main circuit breaker reset button. See III. “Your PMV.”
Make certain that both
Make sure that the
Be sure the power down timer feature has not been activated. See V. “Operation.”
Check the
34 | www.pridemobility.com | Hurricane |