ASSEMBLY
Assembly requires two people. Set the treadmill in a cleared area and remove the packing materials. Do not dispose of the packing materials until assembly is completed.
Assembly requires the included allen wrench | , and your own adjustable wrench | , phillips | |
screwdriver | , and scissors | . |
|
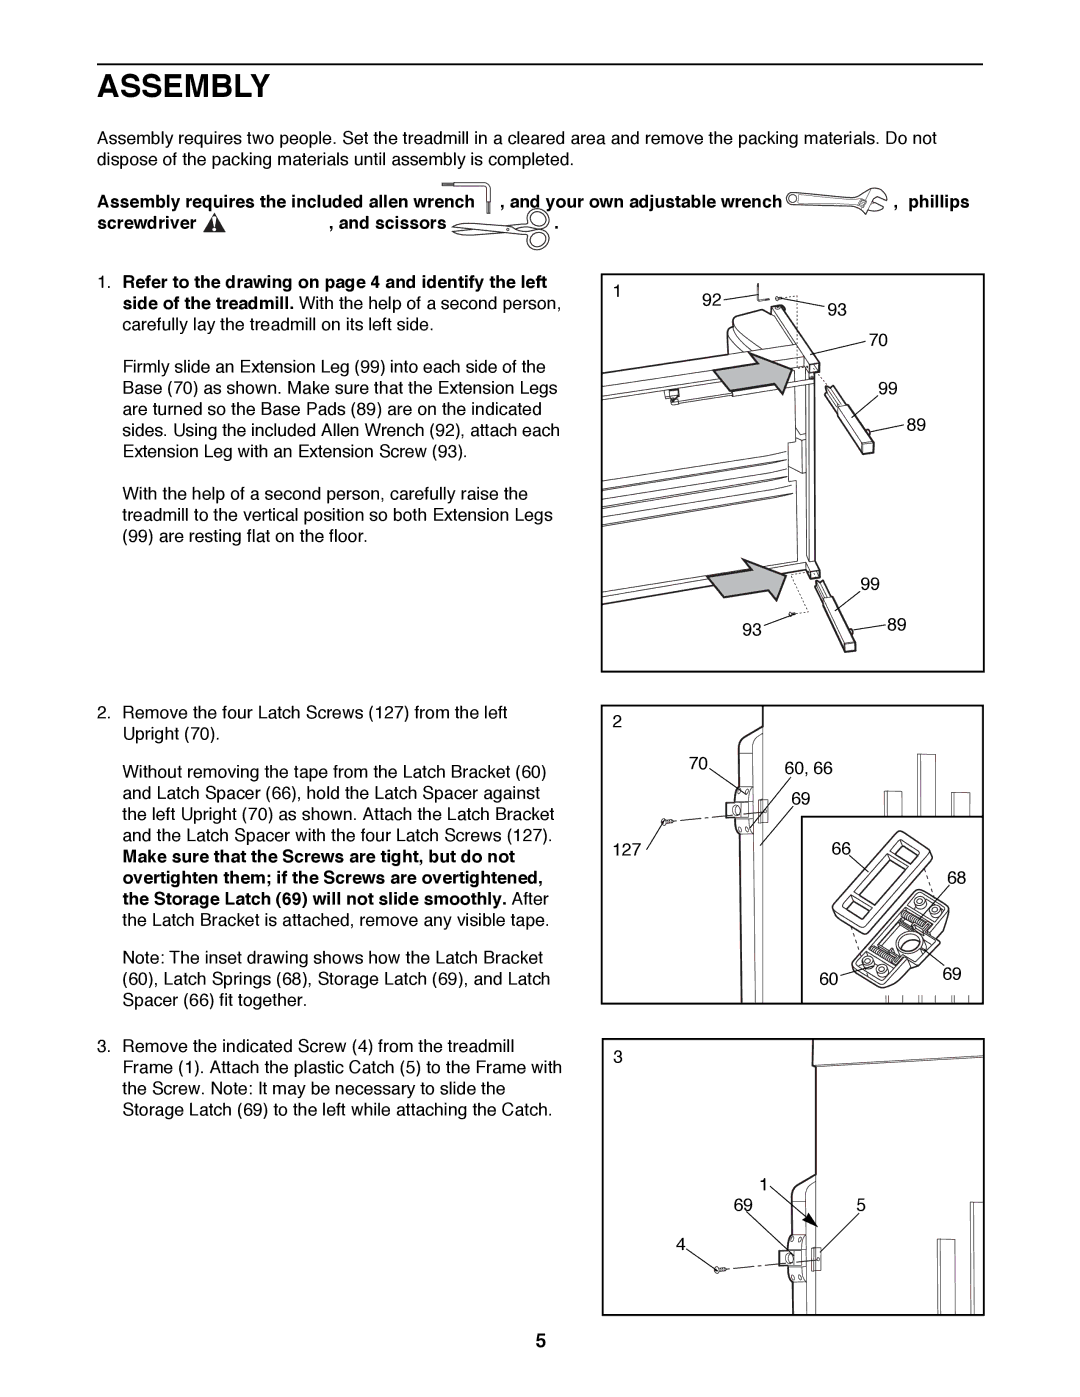
1. Refer to the drawing on page 4 and identify the left | 1 | 92 |
|
|
side of the treadmill. With the help of a second person, | 93 |
| ||
|
| |||
carefully lay the treadmill on its left side. |
|
|
| |
|
|
| 70 | |
|
|
|
| |
Firmly slide an Extension Leg (99) into each side of the |
|
|
|
|
Base (70) as shown. Make sure that the Extension Legs |
|
|
| 99 |
are turned so the Base Pads (89) are on the indicated |
|
|
| 89 |
sides. Using the included Allen Wrench (92), attach each |
|
|
| |
|
|
|
| |
Extension Leg with an Extension Screw (93). |
|
|
|
|
With the help of a second person, carefully raise the |
|
|
|
|
treadmill to the vertical position so both Extension Legs |
|
|
|
|
(99) are resting flat on the floor. |
|
|
|
|
|
|
|
| 99 |
|
| 93 |
| 89 |
|
|
|
| |
2. Remove the four Latch Screws (127) from the left | 2 |
|
|
|
Upright (70). |
|
|
| |
|
|
|
| |
Without removing the tape from the Latch Bracket (60) |
| 70 | 60, 66 |
|
and Latch Spacer (66), hold the Latch Spacer against |
|
| 69 |
|
the left Upright (70) as shown. Attach the Latch Bracket |
|
|
| |
|
|
|
| |
and the Latch Spacer with the four Latch Screws (127). | 127 |
| 66 |
|
Make sure that the Screws are tight, but do not |
|
| ||
|
|
|
| |
overtighten them; if the Screws are overtightened, |
|
|
| 68 |
the Storage Latch (69) will not slide smoothly. After |
|
|
|
|
the Latch Bracket is attached, remove any visible tape. |
|
|
|
|
Note: The inset drawing shows how the Latch Bracket |
|
|
| 69 |
(60), Latch Springs (68), Storage Latch (69), and Latch |
|
| 60 | |
Spacer (66) fit together. |
|
|
|
|
3. Remove the indicated Screw (4) from the treadmill | 3 |
|
|
|
Frame (1). Attach the plastic Catch (5) to the Frame with |
|
|
| |
|
|
|
| |
the Screw. Note: It may be necessary to slide the |
|
|
|
|
Storage Latch (69) to the left while attaching the Catch. |
|
|
|
|
|
| 1 |
|
|
|
| 69 |
| 5 |
|
| 4 |
|
|
5