ASSEMBLY
Assembly requires two people. | Set the treadmill in a cleared area and remove all packing materials. Do not |
| ||||
dispose of the packing materials until assembly is completed. Refer to the drawings below to identify the small |
| |||||
parts used in assembly. |
| Assembly requires the included allen wrench | and your own phillips screw- |
| ||
driver | , adjustable wrench | , open end wrench | and scissors | . | ||
| Extension Leg Screw | 3/4" Screw |
Handrail Washer |
| |
|
| |
Flange Nut | Handrail Bolt |
|
|
|
| 3 1/2" Handrail Bolt |
|
| |
5/16" Washer |
|
|
|
|
|
|
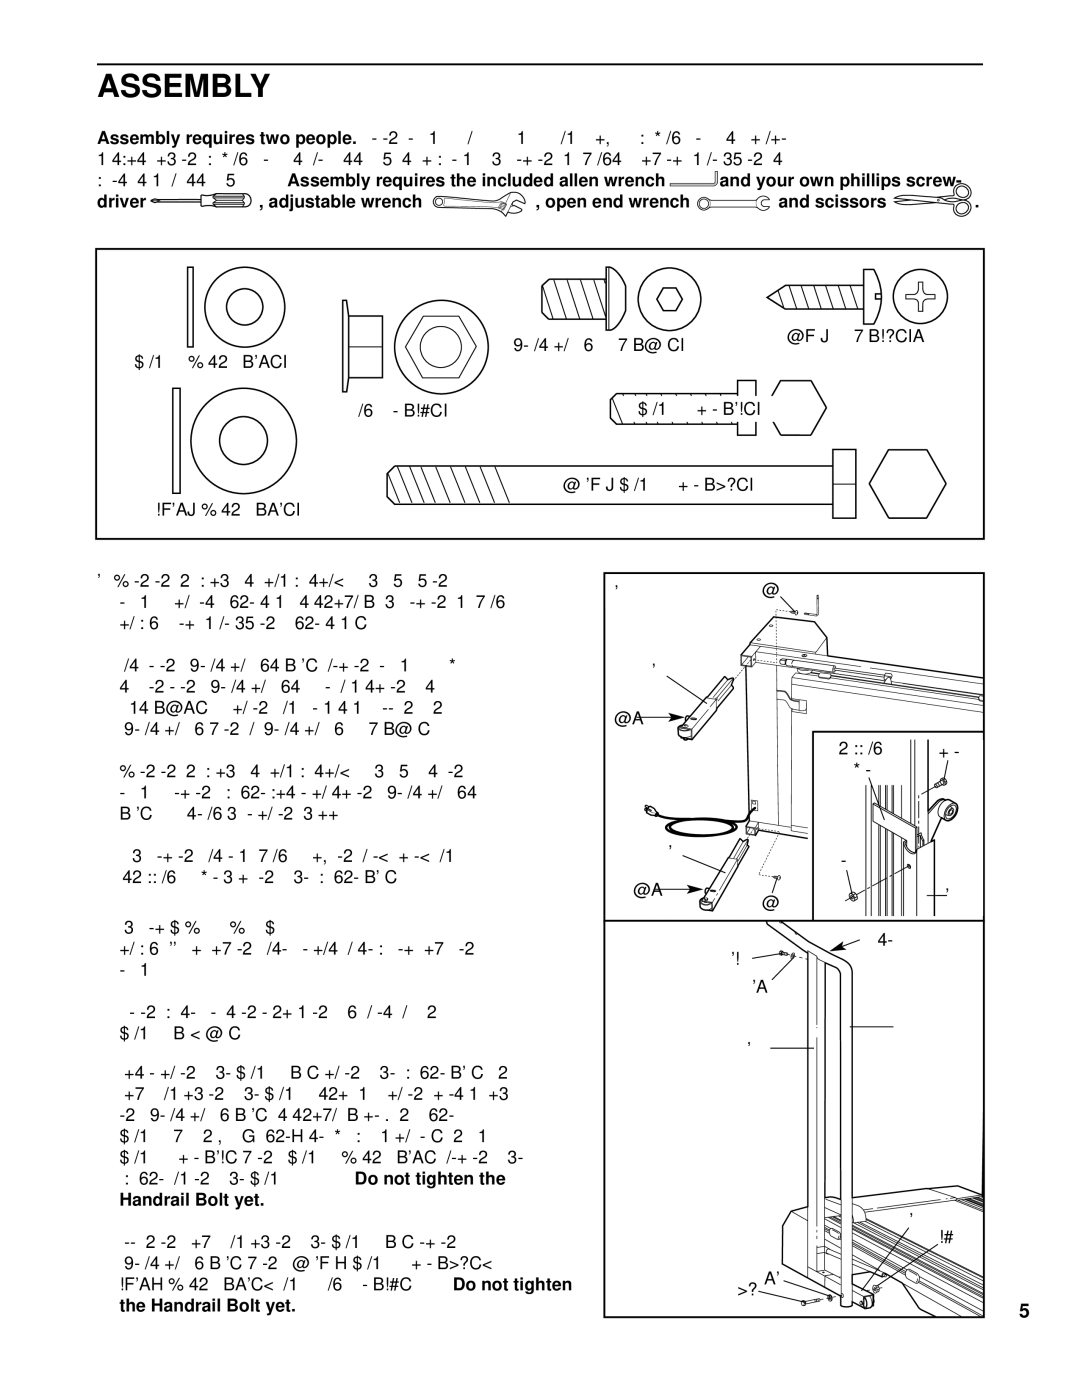
1. With the help of a second person, carefully lay the |
| 1 | 34 |
|
| |
treadmill on its right side as shown (refer to the drawing |
|
| ||||
|
|
|
| |||
on page 4 to identify the right side). |
|
|
|
|
| |
Insert the Extension Legs (41) into the treadmill. Make |
| 41 |
|
| ||
sure that the Extension Legs are turned so the Base |
|
|
|
|
| |
Pads (36) are on the indicated side. Attach each |
| 36 |
|
| ||
Extension Leg with an Extension Leg Screw (34). |
|
|
| |||
|
|
| Shipping |
| ||
|
|
|
|
| Bolt | |
With the help of a second person, carefully raise the |
|
| Bracket |
| ||
treadmill to the upright position so the Extension Legs |
|
|
|
| ||
(41) are resting flat on the floor. |
|
|
|
|
|
|
Refer to the inset drawing. Remove the nut, bolt, and |
| 41 | Nut |
| ||
shipping bracket from the left Upright (14). |
|
| 36 |
| 14 | |
|
|
|
|
| ||
|
|
|
| 34 |
| |
|
|
|
|
|
| |
2. Refer to HOW TO LOWER THE TREADMILL FOR USE |
| 2 |
| Plastic Tie |
| |
on page 11. Follow the instructions in step 2 to lower the | 15 |
| ||||
|
|
| ||||
treadmill. |
|
|
|
|
| |
|
|
| 16 |
|
| |
|
|
|
|
|
| |
Cut the plastic ties that hold the cage nuts in each |
|
|
| 2 |
| |
Handrail (2, 32) |
|
|
|
|
| |
|
|
| 14 |
|
| |
|
|
|
|
|
| |
Position the Left Handrail (2) on the left Upright (14). The |
|
|
|
| ||
lower end of the Left Handrail should be on the outside of |
|
|
|
| ||
the Extension Leg (41) as shown. (Note: The Right |
|
|
|
| ||
Handrail will have a “Right” sticker placed on it.) Thread a |
|
|
|
| ||
Handrail Bolt (15) with a Handrail Washer (16) into the left |
|
|
|
| ||
Upright and the Left Handrail. | Do not tighten the |
|
|
|
| |
Handrail Bolt yet. |
|
|
|
| 41 |
|
|
|
|
|
| 57 | |
Attach the lower end of the Left Handrail (2) to the |
|
|
| |||
|
|
|
| |||
Extension Leg (41) with a 3 1/2” Handrail Bolt (89), a |
| 89 61 |
|
| ||
5/16” Washer (61), and a Flange Nut (57). | Do not tighten |
|
|
| ||
the Handrail Bolt yet. |
|
|
|
|
| 5 |