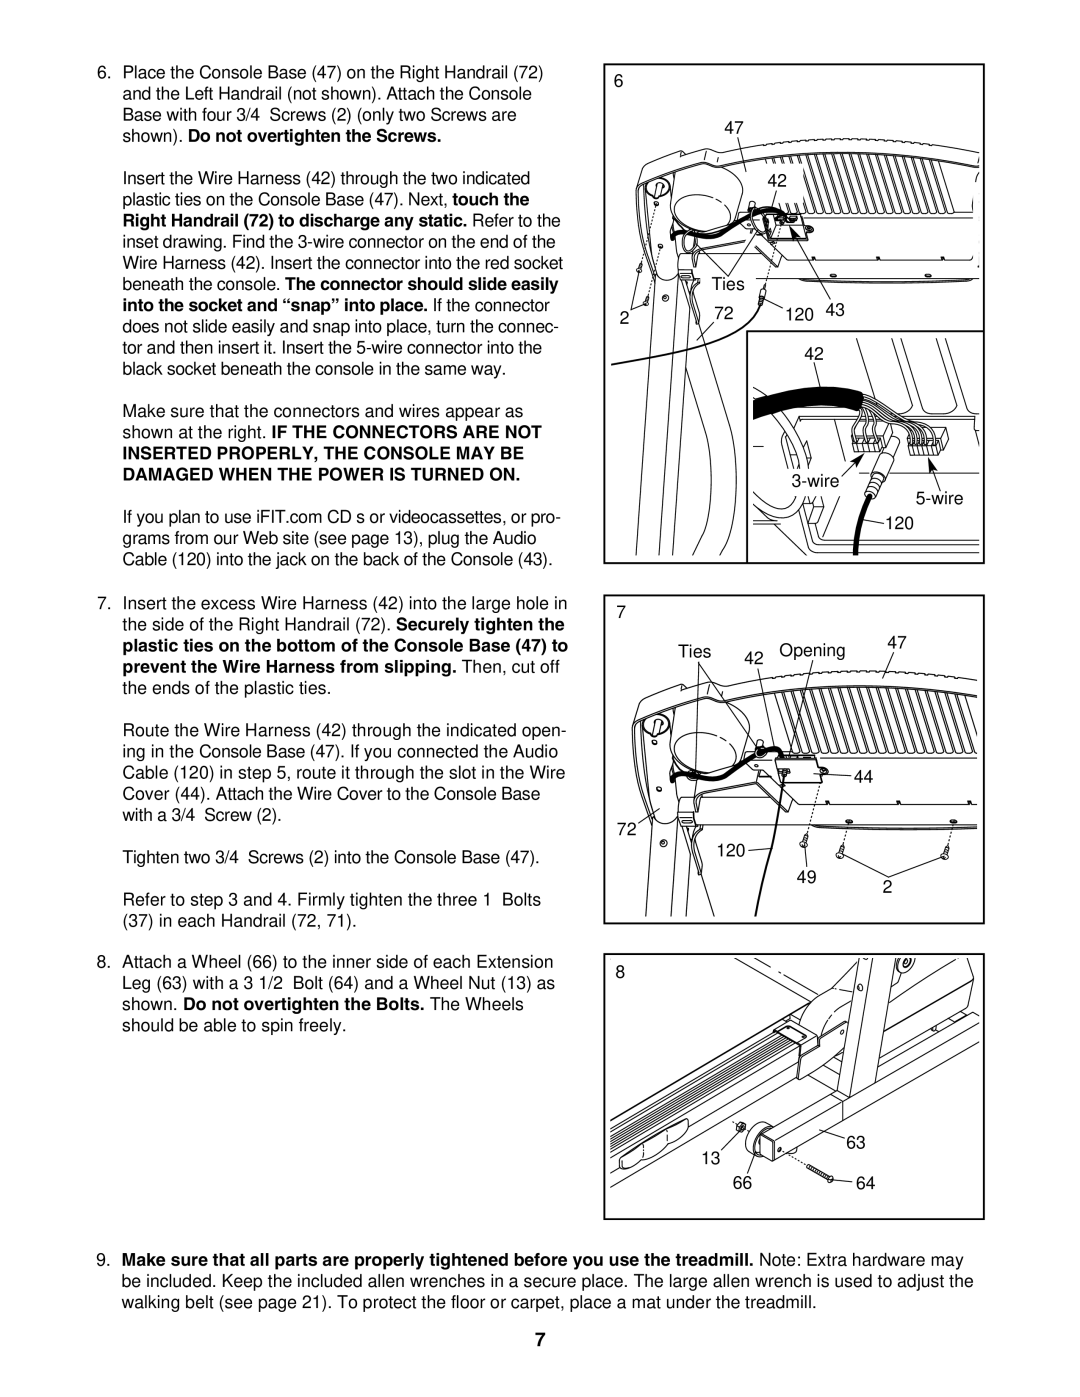
6.Place the Console Base (47) on the Right Handrail (72) and the Left Handrail (not shown). Attach the Console Base with four 3/4” Screws (2) (only two Screws are shown). Do not overtighten the Screws.

Insert the Wire Harness (42) through the two indicated plastic ties on the Console Base (47). Next, touch the Right Handrail (72) to discharge any static. Refer to the inset drawing. Find the 3-wire connector on the end of the Wire Harness (42). Insert the connector into the red socket beneath the console. The connector should slide easily into the socket and “snap” into place. If the connector does not slide easily and snap into place, turn the connec- tor and then insert it. Insert the 5-wire connector into the black socket beneath the console in the same way.

Make sure that the connectors and wires appear as shown at the right. IF THE CONNECTORS ARE NOT

INSERTED PROPERLY, THE CONSOLE MAY BE DAMAGED WHEN THE POWER IS TURNED ON.

If you plan to use iFIT.com CD’s or videocassettes, or pro- grams from our Web site (see page 13), plug the Audio Cable (120) into the jack on the back of the Console (43).

7.Insert the excess Wire Harness (42) into the large hole in the side of the Right Handrail (72). Securely tighten the plastic ties on the bottom of the Console Base (47) to prevent the Wire Harness from slipping. Then, cut off the ends of the plastic ties.

Route the Wire Harness (42) through the indicated open- ing in the Console Base (47). If you connected the Audio Cable (120) in step 5, route it through the slot in the Wire Cover (44). Attach the Wire Cover to the Console Base with a 3/4” Screw (2).

Tighten two 3/4” Screws (2) into the Console Base (47).

Refer to step 3 and 4. Firmly tighten the three 1” Bolts (37) in each Handrail (72, 71).

8.Attach a Wheel (66) to the inner side of each Extension Leg (63) with a 3 1/2” Bolt (64) and a Wheel Nut (13) as shown. Do not overtighten the Bolts. The Wheels should be able to spin freely.

6


47


42


Ties


2

72

120

43


42


3-wire

5-wire


120

7


Ties

42

Opening

47


44

72


120


49


2


8


13


63


66


64

9.Make sure that all parts are properly tightened before you use the treadmill. Note: Extra hardware may be included. Keep the included allen wrenches in a secure place. The large allen wrench is used to adjust the walking belt (see page 21). To protect the floor or carpet, place a mat under the treadmill.

7

Page 7
Image 7
ProForm PCTL93040 user manual

PCTL93040 specifications

The ProForm PCTL93040 is a state-of-the-art treadmill designed to cater to fitness enthusiasts of all levels. One of its standout features is the powerful 3.0 CHP motor, making it suitable for both walking and high-intensity running. This ensures consistent performance, regardless of the user's workout intensity or duration.

One of the most appealing aspects of the PCTL93040 is its SpaceSaver design. This feature allows the treadmill to be easily folded up when not in use, making it a great option for those with limited living space. The innovative design ensures that you can enjoy a robust fitness machine without sacrificing valuable floor space in your home.

The ProForm PCTL93040 also includes a generous running surface of 20 x 60 inches, providing ample space for users to move comfortably. This extra space is particularly advantageous for taller individuals or those who prefer a more expansive running experience.

For motivation and engagement, the ProForm PCTL93040 is equipped with a 7-inch touchscreen display that offers access to a variety of workout programs and fitness tracking features. Users can choose from a selection of built-in workouts tailored to different fitness goals, including weight loss, endurance training, and interval workouts. Additionally, it comes with iFit technology, allowing users to experience interactive training sessions led by professional trainers. With iFit, users can also explore scenic routes through global destinations while tracking their performance metrics in real time.

The ProForm PCTL93040 treadmill also boasts advanced cushioning technology. Its ProShox cushioning system helps to reduce impact on joints, making workouts more comfortable and potentially reducing the risk of injury. This technology provides a springy feel to each step, mimicking the experience of running on outdoor surfaces.

Safety features are integrated into the design, ensuring a reliable workout experience. A safety key is included to immediately stop the treadmill in case of an emergency, providing peace of mind for users while they focus on their workouts.

Overall, the ProForm PCTL93040 is an exceptional treadmill that combines advanced technology, user-friendly features, and a compact design. Whether you are a beginner starting your fitness journey or an experienced athlete looking to enhance your training regimen, the ProForm PCTL93040 offers the necessary tools and capabilities to achieve your fitness goals.