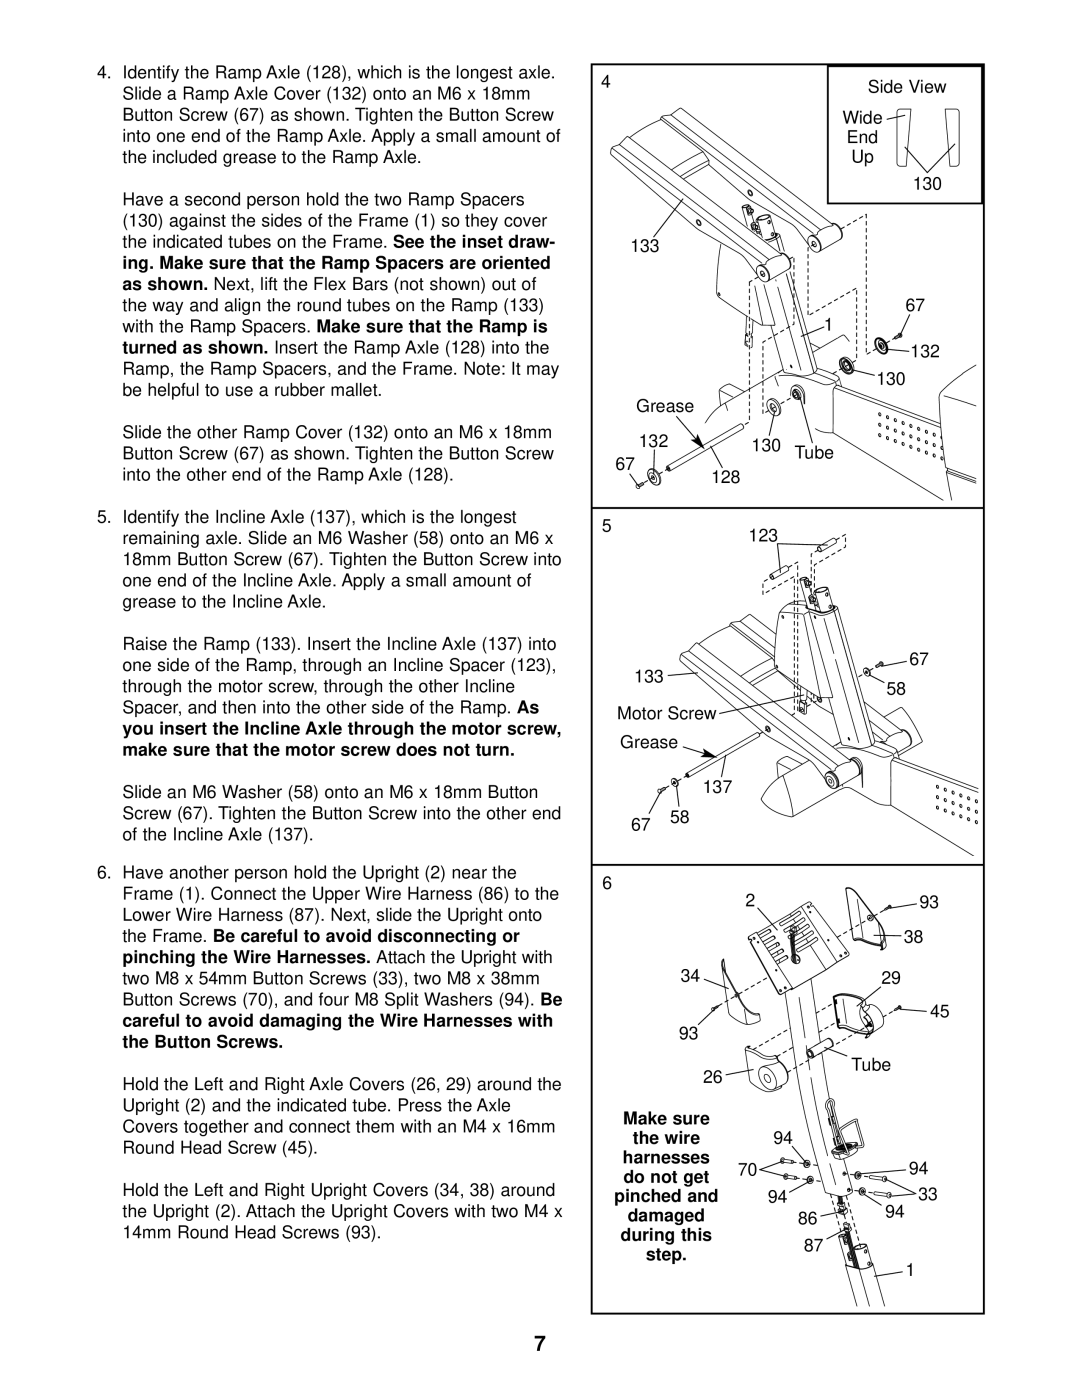
4.Identify the Ramp Axle (128), which is the longest axle. Slide a Ramp Axle Cover (132) onto an M6 x 18mm Button Screw (67) as shown. Tighten the Button Screw into one end of the Ramp Axle. Apply a small amount of the included grease to the Ramp Axle.

Have a second person hold the two Ramp Spacers (130) against the sides of the Frame (1) so they cover the indicated tubes on the Frame. See the inset draw- ing. Make sure that the Ramp Spacers are oriented as shown. Next, lift the Flex Bars (not shown) out of the way and align the round tubes on the Ramp (133) with the Ramp Spacers. Make sure that the Ramp is turned as shown. Insert the Ramp Axle (128) into the Ramp, the Ramp Spacers, and the Frame. Note: It may be helpful to use a rubber mallet.

Slide the other Ramp Cover (132) onto an M6 x 18mm Button Screw (67) as shown. Tighten the Button Screw into the other end of the Ramp Axle (128).

5.Identify the Incline Axle (137), which is the longest remaining axle. Slide an M6 Washer (58) onto an M6 x 18mm Button Screw (67). Tighten the Button Screw into one end of the Incline Axle. Apply a small amount of grease to the Incline Axle.

Raise the Ramp (133). Insert the Incline Axle (137) into one side of the Ramp, through an Incline Spacer (123), through the motor screw, through the other Incline Spacer, and then into the other side of the Ramp. As you insert the Incline Axle through the motor screw, make sure that the motor screw does not turn.

Slide an M6 Washer (58) onto an M6 x 18mm Button Screw (67). Tighten the Button Screw into the other end of the Incline Axle (137).

6.Have another person hold the Upright (2) near the Frame (1). Connect the Upper Wire Harness (86) to the Lower Wire Harness (87). Next, slide the Upright onto the Frame. Be careful to avoid disconnecting or pinching the Wire Harnesses. Attach the Upright with two M8 x 54mm Button Screws (33), two M8 x 38mm Button Screws (70), and four M8 Split Washers (94). Be careful to avoid damaging the Wire Harnesses with the Button Screws.

Hold the Left and Right Axle Covers (26, 29) around the Upright (2) and the indicated tube. Press the Axle Covers together and connect them with an M4 x 16mm Round Head Screw (45).

Hold the Left and Right Upright Covers (34, 38) around the Upright (2). Attach the Upright Covers with two M4 x 14mm Round Head Screws (93).

7

4


Side View


Wide


End


Up


130

133


1

67


132


130

Grease


132


130

Tube


67


128


5


123


133


67


58


Motor Screw


Grease


137


67

58


6


2


93


38


34


29


45


93


26


Tube


Make sure


the wire

94


harnesses

70


94

do not get


33

pinched and

94


damaged


86

94

during this


87


step.


1


Page 7
Image 7
ProForm PFEL1303.3 user manual Make sure, Harnesses Do not get Pinched, During this Step

PFEL1303.3 specifications

The ProForm PFEL1303.3 is a high-quality elliptical machine designed for both gym enthusiasts and those seeking to improve their fitness levels at home. This versatile piece of equipment combines durability, technology, and comfort, making it a popular choice for cardiovascular training.

One of the standout features of the PFEL1303.3 is its adjustable incline, allowing users to customize their workout intensity. The incline feature engages different muscle groups and enhances calorie burning potential, which is ideal for those looking to maximize their workouts. Additionally, the machine boasts a large stride length, ensuring a smooth and natural elliptical motion that mimics running without the impact on joints.

The ProForm PFEL1303.3 is equipped with a high-definition touchscreen display that provides essential workout metrics such as time, distance, calories burned, and heart rate. This real-time feedback helps users monitor their progress and set achievable goals. The machine also includes integrated Bluetooth technology, enabling users to connect their devices for personalized workout experiences and access to streaming fitness classes.

Another notable aspect of the PFEL1303.3 is its built-in workout programs. The machine offers multiple pre-set workouts designed by certified personal trainers, catering to different fitness levels and goals. These programs automatically adjust the machine's resistance and incline, keeping users engaged and challenged throughout their sessions.

Comfort is a key consideration with the PFEL1303.3, as evidenced by its ergonomic design. The oversized pedals and adjustable handles accommodate users of varying heights and sizes, promoting a comfortable workout experience. The machine also features a fan to keep users cool during intense sessions, enhancing overall comfort.

In terms of build quality, the ProForm PFEL1303.3 is constructed with a solid steel frame that ensures stability during workouts. The machine also contains a variety of resistance levels, providing the flexibility to increase intensity as fitness levels improve. With its space-saving design, the PFEL1303.3 is easy to store, making it an excellent choice for home gyms.

In summary, the ProForm PFEL1303.3 combines advanced technology with user-friendly features. Its adjustable incline, integrated workouts, and comfort-driven design make it an effective choice for individuals at any fitness level. Whether you're looking to tone your body or engage in high-intensity training, this elliptical machine offers the tools and features necessary to help you achieve your fitness goals.