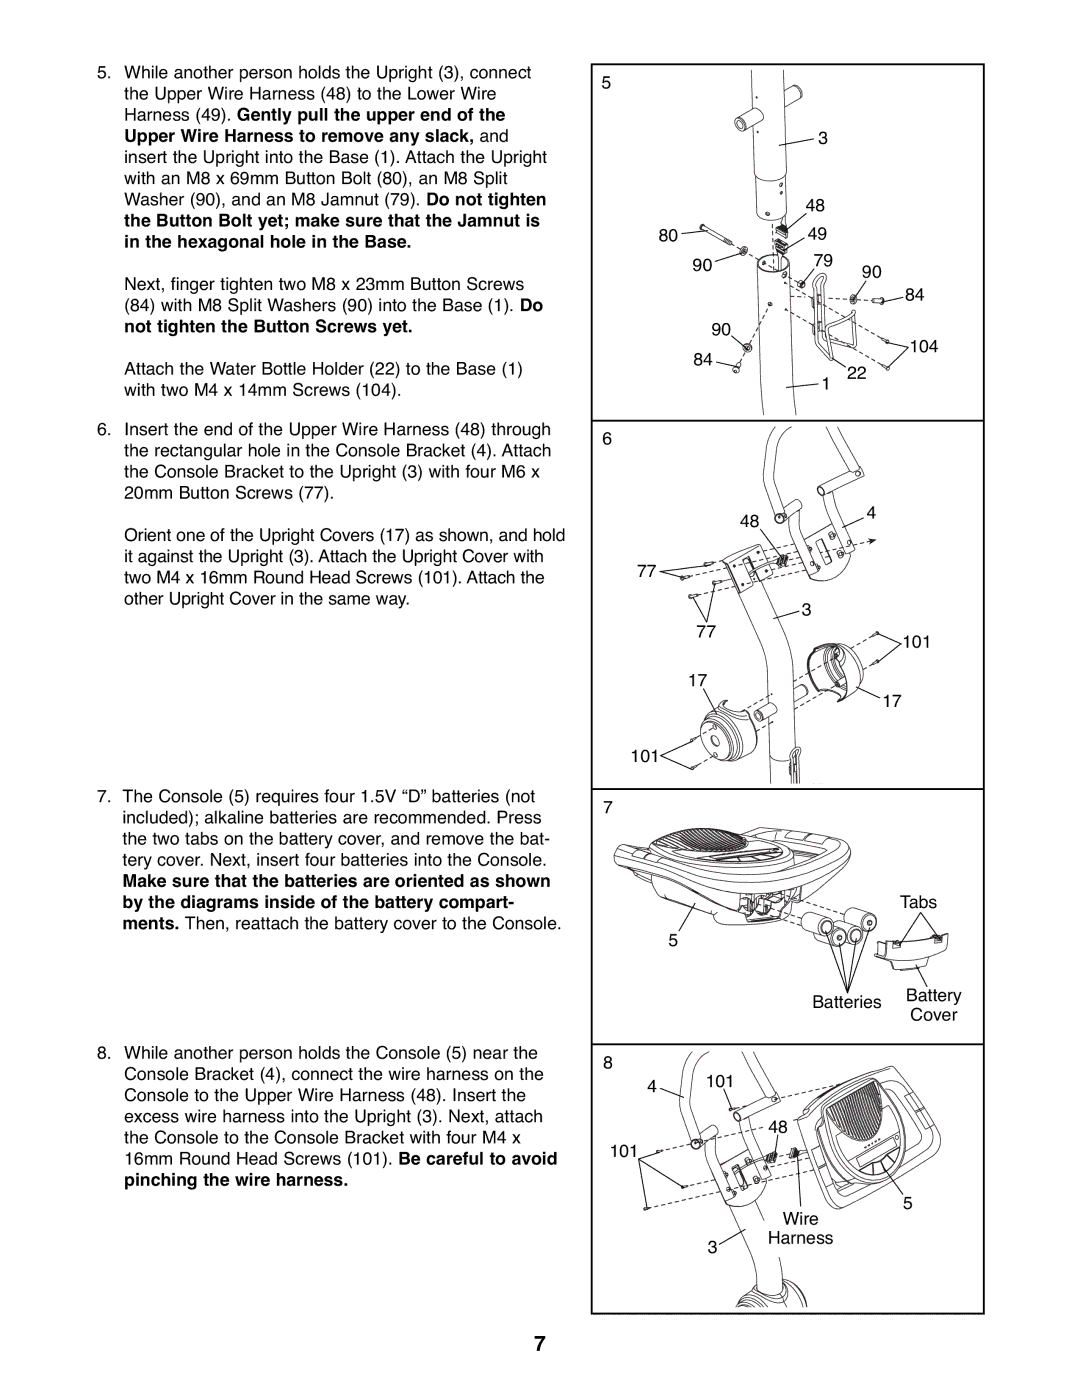
5.While another person holds the Upright (3), connect the Upper Wire Harness (48) to the Lower Wire Harness (49). Gently pull the upper end of the Upper Wire Harness to remove any slack, and insert the Upright into the Base (1). Attach the Upright with an M8 x 69mm Button Bolt (80), an M8 Split Washer (90), and an M8 Jamnut (79). Do not tighten the Button Bolt yet; make sure that the Jamnut is in the hexagonal hole in the Base.
Next, finger tighten two M8 x 23mm Button Screws
(84)with M8 Split Washers (90) into the Base (1). Do not tighten the Button Screws yet.
Attach the Water Bottle Holder (22) to the Base (1) with two M4 x 14mm Screws (104).
6.Insert the end of the Upper Wire Harness (48) through the rectangular hole in the Console Bracket (4). Attach the Console Bracket to the Upright (3) with four M6 x 20mm Button Screws (77).
Orient one of the Upright Covers (17) as shown, and hold it against the Upright (3). Attach the Upright Cover with two M4 x 16mm Round Head Screws (101). Attach the other Upright Cover in the same way.
7.The Console (5) requires four 1.5V “D” batteries (not included); alkaline batteries are recommended. Press the two tabs on the battery cover, and remove the bat- tery cover. Next, insert four batteries into the Console.
Make sure that the batteries are oriented as shown by the diagrams inside of the battery compart- ments. Then, reattach the battery cover to the Console.
8.While another person holds the Console (5) near the Console Bracket (4), connect the wire harness on the Console to the Upper Wire Harness (48). Insert the excess wire harness into the Upright (3). Next, attach the Console to the Console Bracket with four M4 x 16mm Round Head Screws (101). Be careful to avoid pinching the wire harness.
7
5 |
|
|
|
|
|
| 3 |
|
|
|
| 48 |
|
|
80 |
| 49 |
|
|
| 90 | 79 | 90 |
|
|
|
|
| |
|
|
|
| 84 |
| 90 |
|
| 104 |
| 84 |
|
| |
|
| 22 |
| |
|
| 1 |
| |
6 |
|
|
|
|
|
| 48 | 4 |
|
|
|
|
| |
77 |
|
|
|
|
|
| 3 |
|
|
| 77 |
|
| 101 |
|
|
|
| |
| 17 |
|
|
|
|
|
|
| 17 |
101 |
|
|
|
|
7 |
|
|
|
|
|
|
|
| Tabs |
5 |
|
|
|
|
|
| Batteries | Battery | |
|
| Cover | ||
|
|
|
| |
8 | 101 |
|
|
|
4 |
|
|
| |
|
| 48 |
|
|
101 |
|
|
|
|
|
| Wire |
| 5 |
|
|
|
| |
| 3 | Harness |
|
|
|
|
|
| |
