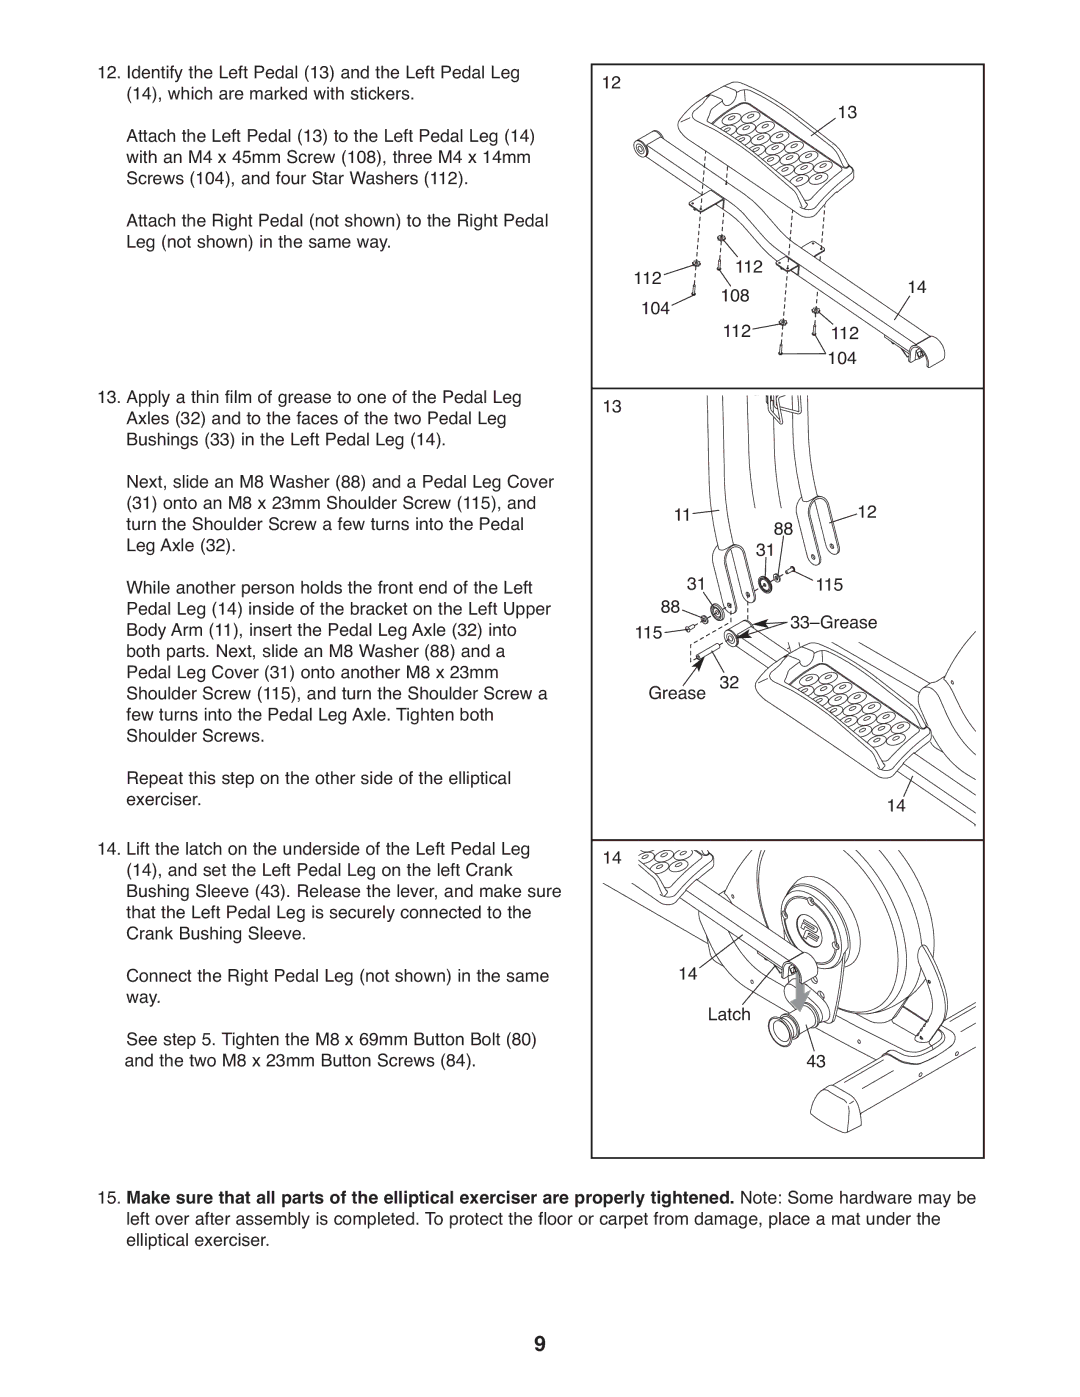
12. Identify the Left Pedal (13) and the Left Pedal Leg | 12 |
|
|
|
|
|
(14), which are marked with stickers. |
|
|
| 13 |
| |
Attach the Left Pedal (13) to the Left Pedal Leg (14) |
|
|
|
|
| |
with an M4 x 45mm Screw (108), three M4 x 14mm |
|
|
|
|
|
|
Screws (104), and four Star Washers (112). |
|
|
|
|
|
|
Attach the Right Pedal (not shown) to the Right Pedal |
|
|
|
|
|
|
Leg (not shown) in the same way. | 112 |
| 112 |
| 14 | |
|
|
| ||||
| 104 |
| 108 |
| 112 | |
|
|
| 112 |
|
| |
13. Apply a thin film of grease to one of the Pedal Leg | 13 |
|
|
| 104 |
|
|
|
|
|
| ||
Axles (32) and to the faces of the two Pedal Leg |
|
|
|
|
| |
Bushings (33) in the Left Pedal Leg (14). |
|
|
|
|
|
|
Next, slide an M8 Washer (88) and a Pedal Leg Cover |
|
|
|
|
|
|
(31) onto an M8 x 23mm Shoulder Screw (115), and | 11 |
|
| 12 |
| |
turn the Shoulder Screw a few turns into the Pedal |
| 3188 |
| |||
Leg Axle (32). |
| 31 |
| 115 |
| |
While another person holds the front end of the Left | 88 |
|
|
| ||
Pedal Leg (14) inside of the bracket on the Left Upper |
|
|
| |||
Body Arm (11), insert the Pedal Leg Axle (32) into | 115 |
|
|
| ||
both parts. Next, slide an M8 Washer (88) and a |
|
|
|
|
| |
Pedal Leg Cover (31) onto another M8 x 23mm | Grease | 32 |
|
|
| |
Shoulder Screw (115), and turn the Shoulder Screw a |
|
|
| |||
few turns into the Pedal Leg Axle. Tighten both |
|
|
|
|
|
|
Shoulder Screws. |
|
|
|
|
|
|
Repeat this step on the other side of the elliptical |
|
|
|
|
| 14 |
exerciser. |
|
|
|
|
| |
14. Lift the latch on the underside of the Left Pedal Leg | 14 |
|
|
|
|
|
(14), and set the Left Pedal Leg on the left Crank |
|
|
|
|
| |
Bushing Sleeve (43). Release the lever, and make sure |
|
|
|
|
|
|
that the Left Pedal Leg is securely connected to the |
|
|
|
|
|
|
Crank Bushing Sleeve. | 14 |
|
|
|
| |
Connect the Right Pedal Leg (not shown) in the same |
|
|
|
| ||
way. |
|
| Latch |
|
|
|
See step 5. Tighten the M8 x 69mm Button Bolt (80) |
|
|
| 43 |
| |
and the two M8 x 23mm Button Screws (84). |
|
|
|
|
| |
15.Make sure that all parts of the elliptical exerciser are properly tightened. Note: Some hardware may be left over after assembly is completed. To protect the floor or carpet from damage, place a mat under the elliptical exerciser.
9