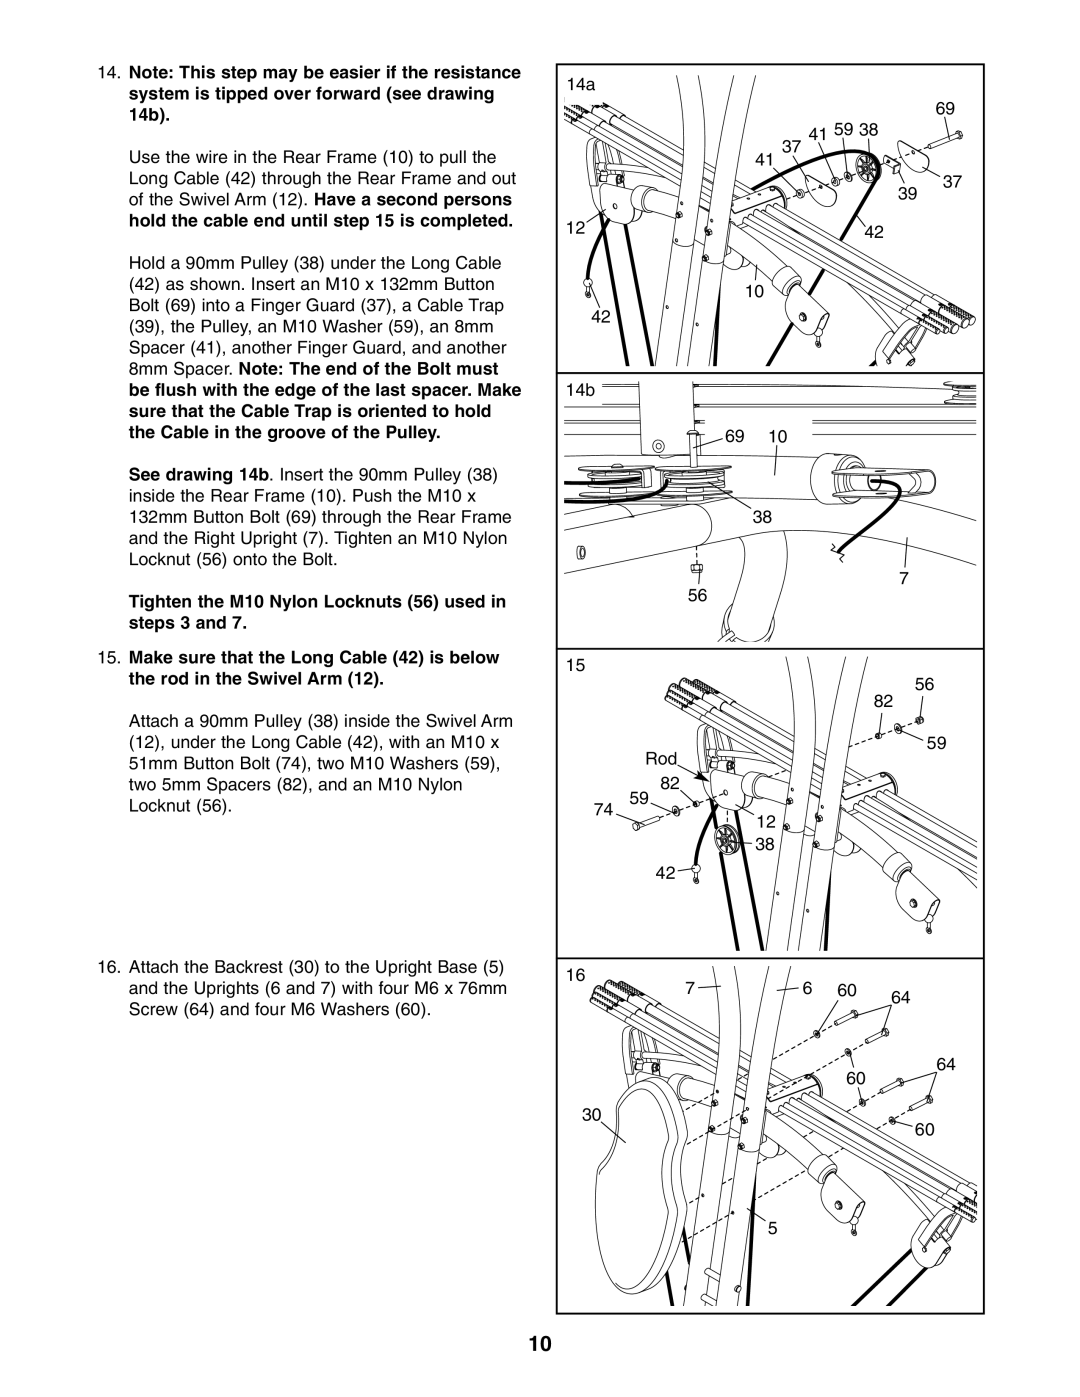
14. Note: This step may be easier if the resistance | 14a |
|
|
|
|
system is tipped over forward (see drawing |
|
|
|
| |
|
|
|
| 69 | |
14b). |
|
|
|
| |
|
| 41 59 38 |
| ||
|
|
|
| ||
Use the wire in the Rear Frame (10) to pull the |
|
| 37 |
|
|
|
| 41 |
|
| |
Long Cable (42) through the Rear Frame and out |
|
|
|
| 37 |
of the Swivel Arm (12). Have a second persons |
|
|
|
| 39 |
|
|
|
|
| |
hold the cable end until step 15 is completed. | 12 |
|
| 42 |
|
|
|
|
| ||
Hold a 90mm Pulley (38) under the Long Cable |
|
|
|
|
|
(42) as shown. Insert an M10 x 132mm Button |
| 10 |
|
| |
Bolt (69) into a Finger Guard (37), a Cable Trap |
|
|
| ||
42 |
|
|
|
| |
(39), the Pulley, an M10 Washer (59), an 8mm |
|
|
|
| |
|
|
|
|
| |
Spacer (41), another Finger Guard, and another |
|
|
|
|
|
8mm Spacer. Note: The end of the Bolt must |
|
|
|
|
|
be flush with the edge of the last spacer. Make | 14b |
|
|
|
|
sure that the Cable Trap is oriented to hold |
|
|
|
|
|
the Cable in the groove of the Pulley. |
| 69 | 10 |
|
|
See drawing 14b. Insert the 90mm Pulley (38) |
|
|
|
|
|
inside the Rear Frame (10). Push the M10 x |
|
|
|
|
|
132mm Button Bolt (69) through the Rear Frame |
|
| 38 |
|
|
and the Right Upright (7). Tighten an M10 Nylon |
|
|
|
|
|
Locknut (56) onto the Bolt. |
|
|
|
| 7 |
|
| 56 |
|
| |
Tighten the M10 Nylon Locknuts (56) used in |
|
|
|
| |
|
|
|
|
| |
steps 3 and 7. |
|
|
|
|
|
15. Make sure that the Long Cable (42) is below | 15 |
|
|
|
|
the rod in the Swivel Arm (12). |
|
|
| 56 | |
|
|
|
| ||
|
|
|
|
| |
Attach a 90mm Pulley (38) inside the Swivel Arm |
|
|
| 82 | |
|
|
|
|
| |
(12), under the Long Cable (42), with an M10 x |
| Rod |
|
| 59 |
51mm Button Bolt (74), two M10 Washers (59), |
|
|
|
| |
two 5mm Spacers (82), and an M10 Nylon |
| 82 |
|
|
|
Locknut (56). | 74 | 59 | 12 |
|
|
|
|
|
|
| |
|
|
| 38 |
|
|
|
| 42 |
|
|
|
16. Attach the Backrest (30) to the Upright Base (5) | 16 |
|
|
|
|
and the Uprights (6 and 7) with four M6 x 76mm | 7 | 6 | 60 |
| |
| 64 | ||||
Screw (64) and four M6 Washers (60). |
|
|
|
| |
|
|
|
|
| |
|
|
|
| 60 | 64 |
|
|
|
|
| |
| 30 |
|
|
| 60 |
|
|
|
|
| |
|
|
| 5 |
|
|
| 10 |
|
|
|
|
