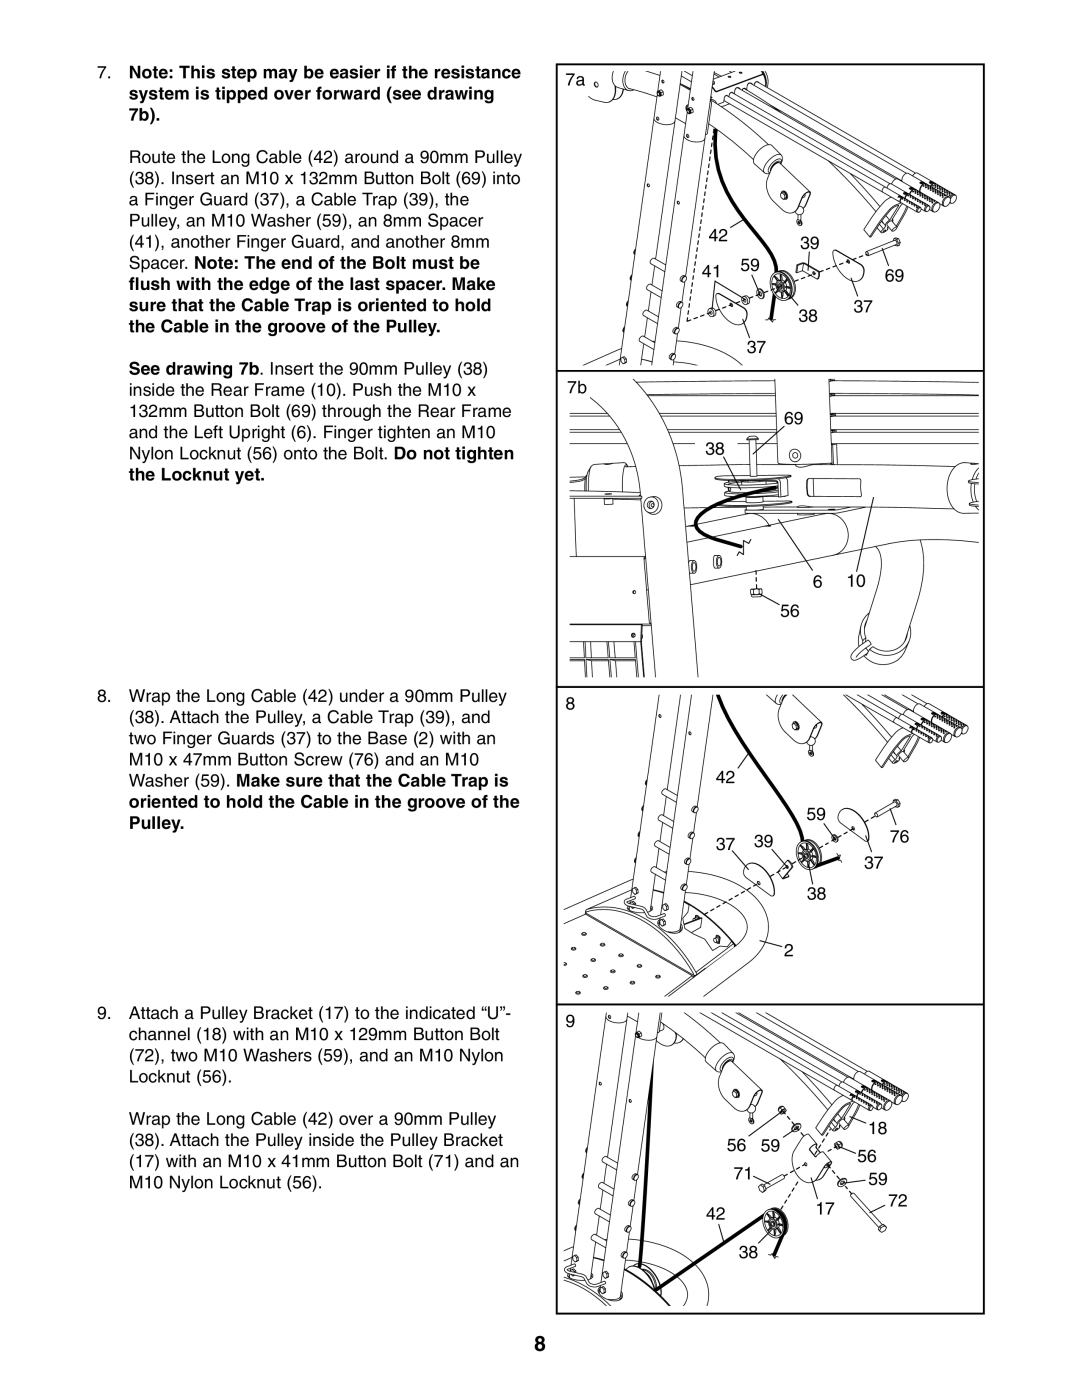
7.Note: This step may be easier if the resistance system is tipped over forward (see drawing 7b).
Route the Long Cable (42) around a 90mm Pulley (38). Insert an M10 x 132mm Button Bolt (69) into a Finger Guard (37), a Cable Trap (39), the Pulley, an M10 Washer (59), an 8mm Spacer (41), another Finger Guard, and another 8mm Spacer. Note: The end of the Bolt must be flush with the edge of the last spacer. Make sure that the Cable Trap is oriented to hold the Cable in the groove of the Pulley.
See drawing 7b. Insert the 90mm Pulley (38) inside the Rear Frame (10). Push the M10 x 132mm Button Bolt (69) through the Rear Frame and the Left Upright (6). Finger tighten an M10 Nylon Locknut (56) onto the Bolt. Do not tighten the Locknut yet.
8.Wrap the Long Cable (42) under a 90mm Pulley (38). Attach the Pulley, a Cable Trap (39), and two Finger Guards (37) to the Base (2) with an M10 x 47mm Button Screw (76) and an M10 Washer (59). Make sure that the Cable Trap is oriented to hold the Cable in the groove of the Pulley.
9.Attach a Pulley Bracket (17) to the indicated “U”- channel (18) with an M10 x 129mm Button Bolt (72), two M10 Washers (59), and an M10 Nylon Locknut (56).
Wrap the Long Cable (42) over a 90mm Pulley
(38).Attach the Pulley inside the Pulley Bracket
(17)with an M10 x 41mm Button Bolt (71) and an
M10 Nylon Locknut (56).
7a |
|
|
| |
42 |
| 39 |
| |
|
|
| ||
41 | 59 | 69 | ||
|
| |||
|
| 38 | 37 | |
|
|
| ||
|
| 37 |
| |
7b |
|
|
| |
|
| 69 |
| |
38 |
|
|
| |
|
| 6 | 10 | |
|
| 56 |
| |
8 |
|
|
| |
42 |
|
|
| |
|
| 59 |
| |
37 |
| 39 | 76 | |
|
|
| 37 | |
|
| 38 |
| |
|
| 2 |
| |
9 |
|
|
| |
56 | 59 | 18 | ||
56 | ||||
71 | ||||
59 | ||||
|
|
| ||
42 |
| 17 | 72 | |
|
| |||
|
|
| ||
| 38 |
| ||
8
