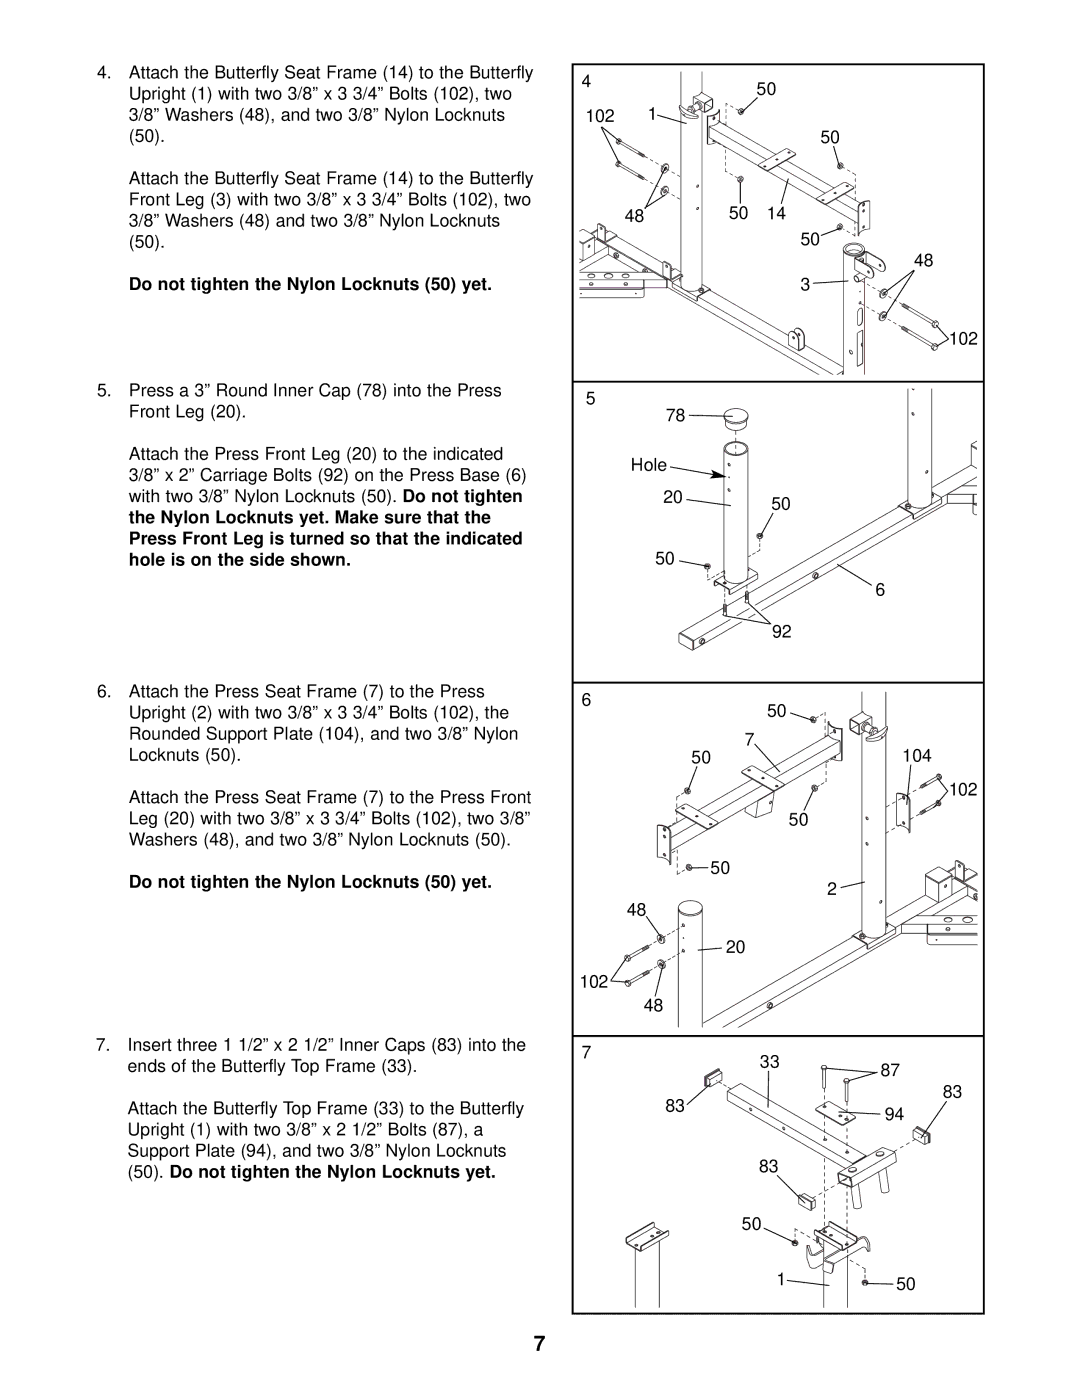
4.Attach the Butterfly Seat Frame (14) to the Butterfly Upright (1) with two 3/8” x 3 3/4” Bolts (102), two 3/8” Washers (48), and two 3/8” Nylon Locknuts (50).
Attach the Butterfly Seat Frame (14) to the Butterfly Front Leg (3) with two 3/8” x 3 3/4” Bolts (102), two 3/8” Washers (48) and two 3/8” Nylon Locknuts (50).
Do not tighten the Nylon Locknuts (50) yet.
5.Press a 3” Round Inner Cap (78) into the Press Front Leg (20).
Attach the Press Front Leg (20) to the indicated 3/8” x 2” Carriage Bolts (92) on the Press Base (6) with two 3/8” Nylon Locknuts (50).Do not tighten the Nylon Locknuts yet. Make sure that the Press Front Leg is turned so that the indicated hole is on the side shown.
6.Attach the Press Seat Frame (7) to the Press Upright (2) with two 3/8” x 3 3/4” Bolts (102), the Rounded Support Plate (104), and two 3/8” Nylon Locknuts (50).
Attach the Press Seat Frame (7) to the Press Front Leg (20) with two 3/8” x 3 3/4” Bolts (102), two 3/8” Washers (48), and two 3/8” Nylon Locknuts (50).
Do not tighten the Nylon Locknuts (50) yet.
7.Insert three 1 1/2” x 2 1/2” Inner Caps (83) into the ends of the Butterfly Top Frame (33).
Attach the Butterfly Top Frame (33) to the Butterfly Upright (1) with two 3/8” x 2 1/2” Bolts (87), a Support Plate (94), and two 3/8” Nylon Locknuts (50). Do not tighten the Nylon Locknuts yet.
7
4 |
| 50 |
|
|
|
| |
102 | 1 |
|
|
|
|
| 50 |
48 | 50 | 14 |
|
|
| 50 |
|
|
|
| 48 |
|
| 3 |
|
|
|
| 102 |
5 | 78 |
|
|
|
|
| |
Hole |
|
| |
| 20 | 50 |
|
|
|
| |
| 50 |
|
|
|
|
| 6 |
|
| 92 |
|
6 |
| 50 |
|
|
|
| |
| 7 |
| 104 |
| 50 |
| |
|
|
| 102 |
|
| 50 |
|
| 50 |
|
|
|
|
| 2 |
48 |
|
|
|
| 20 |
|
|
102 |
|
|
|
48 |
|
| |
7 |
| 33 | 87 |
|
| ||
|
|
| |
| 83 |
| 83 |
|
| 94 | |
|
|
| |
|
| 83 |
|
| 50 |
| |
|
| 1 | 50 |