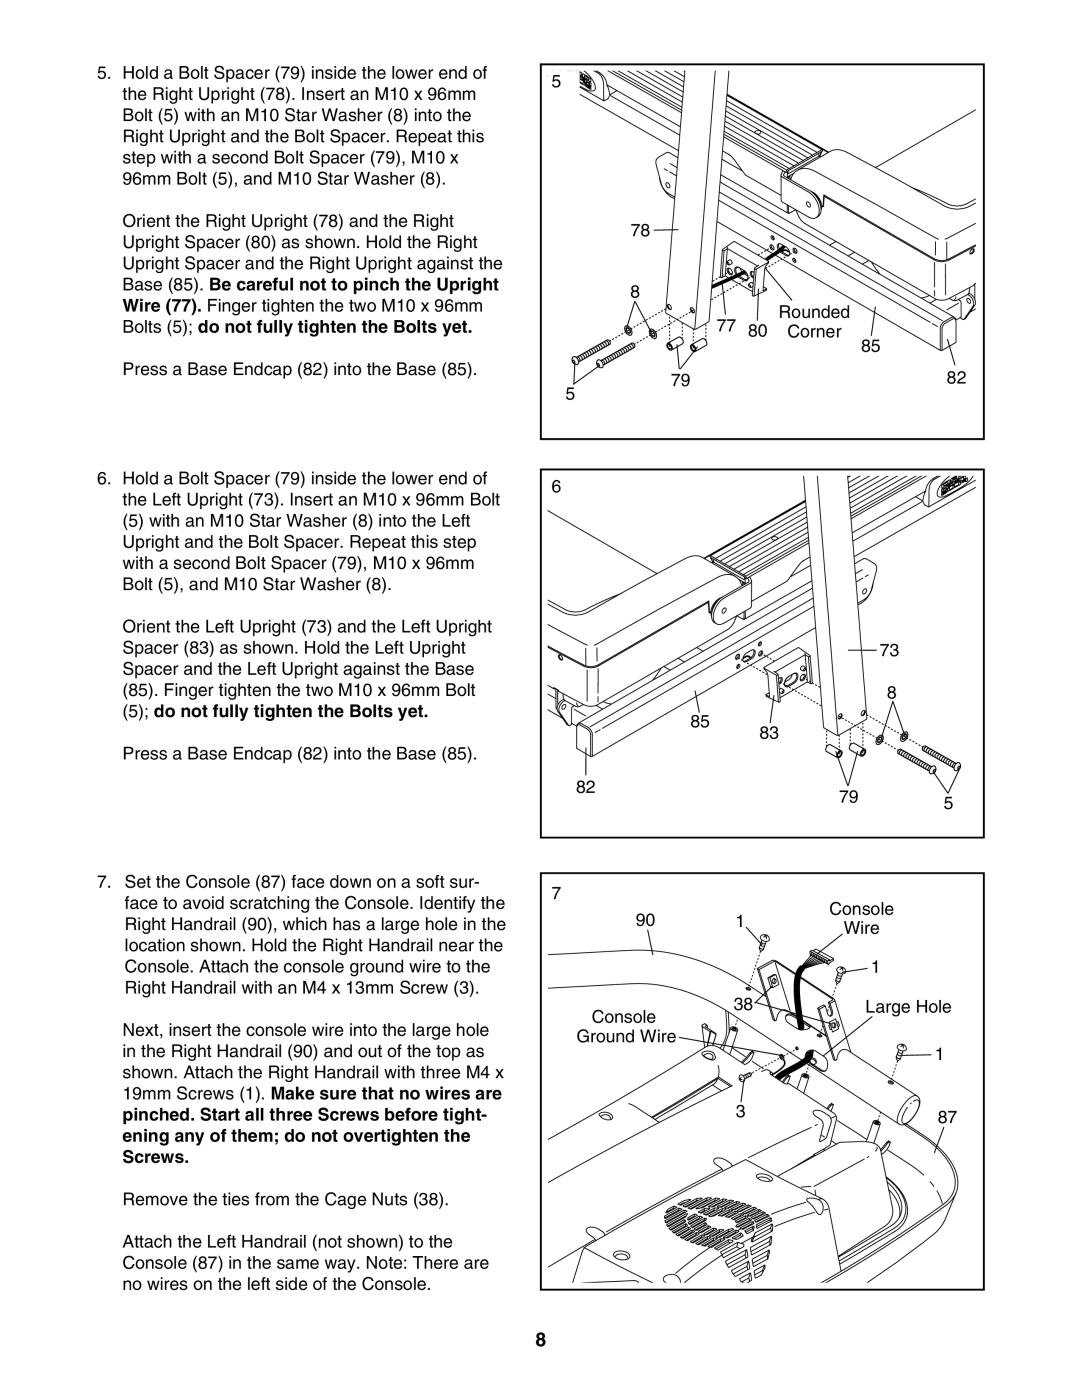
5. Hold a Bolt Spacer (79) inside the lower end of

5


the Right Upright (78). Insert an M10 x 96mm


Bolt (5) with an M10 Star Washer (8) into the


Right Upright and the Bolt Spacer. Repeat this


step with a second Bolt Spacer (79), M10 x


96mm Bolt (5), and M10 Star Washer (8).


Orient the Right Upright (78) and the Right

78


Upright Spacer (80) as shown. Hold the Right


Upright Spacer and the Right Upright against the


Base (85). Be careful not to pinch the Upright

8


Wire (77). Finger tighten the two M10 x 96mm


Rounded


77


Bolts (5); do not fully tighten the Bolts yet.


80


Corner


85


Press a Base Endcap (82) into the Base (85).

79


82


5


6.

Hold a Bolt Spacer (79) inside the lower end of

6


the Left Upright (73). Insert an M10 x 96mm Bolt


(5) with an M10 Star Washer (8) into the Left


Upright and the Bolt Spacer. Repeat this step


with a second Bolt Spacer (79), M10 x 96mm


Bolt (5), and M10 Star Washer (8).


Orient the Left Upright (73) and the Left Upright


Spacer (83) as shown. Hold the Left Upright


73


Spacer and the Left Upright against the Base


(85). Finger tighten the two M10 x 96mm Bolt


8


(5); do not fully tighten the Bolts yet.


85


83


Press a Base Endcap (82) into the Base (85).


82


79

5


7. Set the Console (87) face down on a soft sur-

7


face to avoid scratching the Console. Identify the


Console


90

1


Right Handrail (90), which has a large hole in the


Wire


location shown. Hold the Right Handrail near the


Console. Attach the console ground wire to the


1


Right Handrail with an M4 x 13mm Screw (3).


38

Large Hole


Console

Next, insert the console wire into the large hole


Ground Wire


in the Right Handrail (90) and out of the top as


1


shown. Attach the Right Handrail with three M4 x


19mm Screws (1). Make sure that no wires are


3


pinched. Start all three Screws before tight-


87

ening any of them; do not overtighten the


Screws.


Remove the ties from the Cage Nuts (38).


Attach the Left Handrail (not shown) to the


Console (87) in the same way. Note: There are


no wires on the left side of the Console.


8


Page 8
Image 8
ProForm PFTL39507.1 user manual Base 85. Be careful not to pinch the Upright, Bolts 5 do not fully tighten the Bolts yet

PFTL39507.1 specifications

The ProForm PFTL39507.1 is a versatile treadmill designed to meet the needs of both beginner and experienced fitness enthusiasts. Built to provide an effective cardiovascular workout in the comfort of your home, this treadmill boasts an array of features that enhance user experience and performance.

One of the standout characteristics of the PFTL39507.1 is its powerful motor. With a 2.0 CHP motor, this treadmill delivers smooth and consistent performance across various settings, effortlessly accommodating different workout intensities. Users can easily adjust the speed, ranging from 0 to 10 mph, allowing for everything from light jogging to high-intensity interval training.

Another notable feature is the 20” x 55” tread belt. This spacious design provides ample room for a natural stride, contributing to a more comfortable and effective workout. The cushioning system is also a highlight, with ProForm's patented FlexSelect technology, which allows users to adjust the firmness of the deck. This feature minimizes impact on joints, making it a great choice for those worried about injuries or discomfort during their workout sessions.

The treadmill includes an impressive 15% incline capability, enabling users to simulate uphill running and thus increase their calorie burn efficiently. The incline can be adjusted with one-touch controls, allowing for seamless transitions without interrupting the workout flow.

For tech-savvy fitness enthusiasts, the ProForm PFTL39507.1 integrates with iFit, a subscription-based fitness program that offers a library of guided workouts and global courses. This interactive platform allows users to explore new routes while virtually joining trainers for an immersive experience. The built-in Bluetooth speakers also make it easy to connect devices, ensuring users can listen to music or workout podcasts easily.

Additionally, the treadmill comes equipped with a backlit display that provides essential workout metrics such as speed, distance, time, calories burned, and heart rate, which can be monitored with the included pulse sensors.

Overall, the ProForm PFTL39507.1 treadmill combines functionality, comfort, and technology to create a workout experience that caters to various fitness goals. Whether you're aiming for weight loss, muscle toning, or improving cardiovascular health, this treadmill is a valuable addition to any home gym. With its robust features and user-centric design, it promises to enhance both workout efficiency and enjoyment.