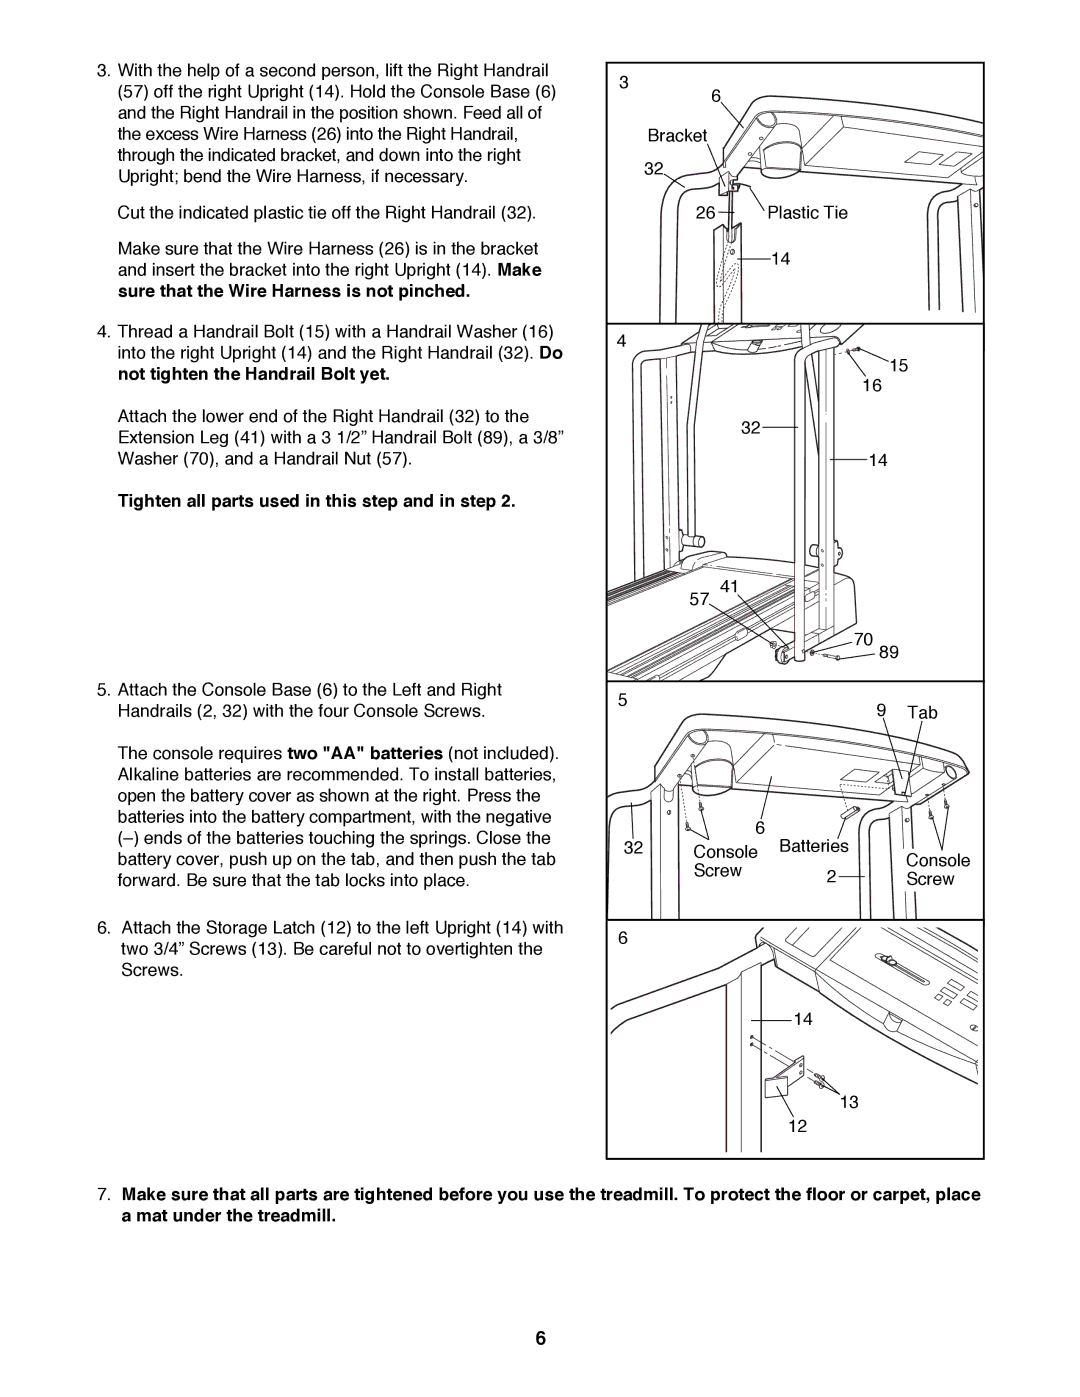
3.With the help of a second person, lift the Right Handrail (57) off the right Upright (14). Hold the Console Base (6) and the Right Handrail in the position shown. Feed all of the excess Wire Harness (26) into the Right Handrail, through the indicated bracket, and down into the right Upright; bend the Wire Harness, if necessary.
Cut the indicated plastic tie off the Right Handrail (32).
Make sure that the Wire Harness (26) is in the bracket and insert the bracket into the right Upright (14). Make sure that the Wire Harness is not pinched.
4.Thread a Handrail Bolt (15) with a Handrail Washer (16) into the right Upright (14) and the Right Handrail (32). Do not tighten the Handrail Bolt yet.
Attach the lower end of the Right Handrail (32) to the Extension Leg (41) with a 3 1/2Ó Handrail Bolt (89), a 3/8Ó Washer (70), and a Handrail Nut (57).
Tighten all parts used in this step and in step 2.
5.Attach the Console Base (6) to the Left and Right Handrails (2, 32) with the four Console Screws.
The console requires two "AA" batteries (not included). Alkaline batteries are recommended. To install batteries, open the battery cover as shown at the right. Press the batteries into the battery compartment, with the negative
(Ð)ends of the batteries touching the springs. Close the battery cover, push up on the tab, and then push the tab forward. Be sure that the tab locks into place.
6.Attach the Storage Latch (12) to the left Upright (14) with two 3/4Ó Screws (13). Be careful not to overtighten the Screws.
3 | 6 |
|
|
|
|
| |
| Bracket |
|
|
| 32 |
|
|
| 26 | Plastic Tie |
|
|
| 14 |
|
4 |
|
|
|
|
| 16 | 15 |
|
|
| |
| 32 |
|
|
|
| 14 |
|
| 41 |
|
|
| 57 |
|
|
|
| 70 |
|
|
| 89 | |
5 |
| 9 | Tab |
|
| ||
32 | 6 | Batteries |
|
Console | Console | ||
| Screw | 2 | |
| Screw | ||
|
| ||
6 |
|
|
|
|
| 14 |
|
|
| 13 |
|
|
| 12 |
|
7.Make sure that all parts are tightened before you use the treadmill. To protect the floor or carpet, place a mat under the treadmill.
6
