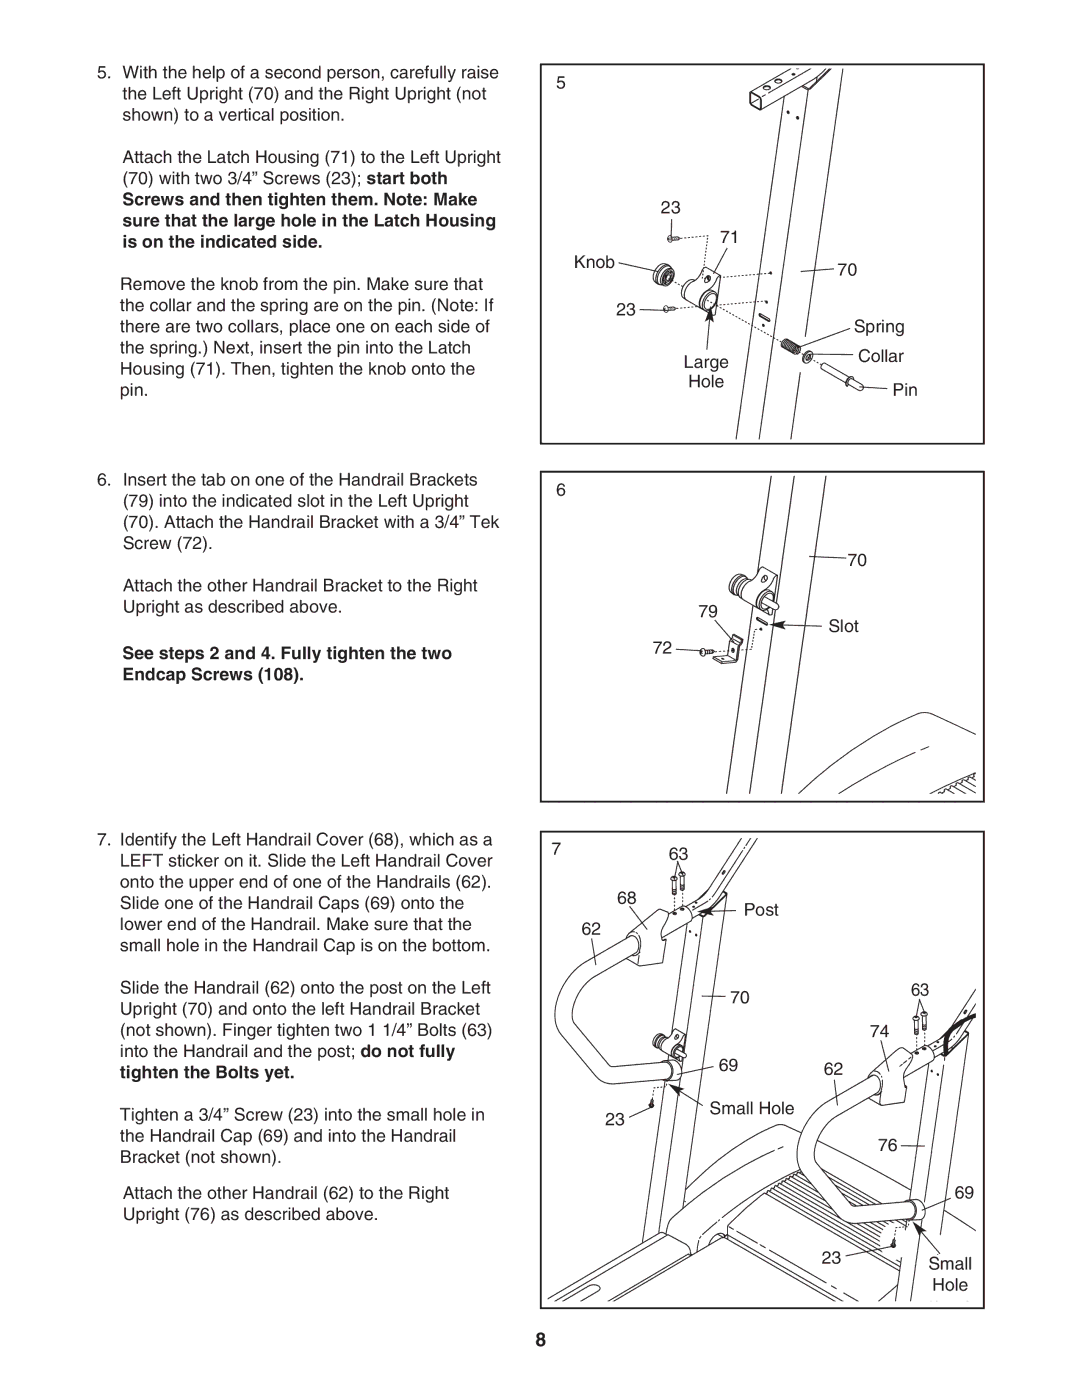
5.With the help of a second person, carefully raise the Left Upright (70) and the Right Upright (not shown) to a vertical position.
Attach the Latch Housing (71) to the Left Upright (70) with two 3/4” Screws (23); start both
Screws and then tighten them. Note: Make sure that the large hole in the Latch Housing is on the indicated side.
Remove the knob from the pin. Make sure that the collar and the spring are on the pin. (Note: If there are two collars, place one on each side of the spring.) Next, insert the pin into the Latch Housing (71). Then, tighten the knob onto the pin.
6.Insert the tab on one of the Handrail Brackets
(79)into the indicated slot in the Left Upright
(70).Attach the Handrail Bracket with a 3/4” Tek Screw (72).
Attach the other Handrail Bracket to the Right Upright as described above.
See steps 2 and 4. Fully tighten the two Endcap Screws (108).
5
| 23 |
|
| 71 |
|
Knob |
| 70 |
|
| |
| 23 | Spring |
|
| |
| Large | Collar |
|
| |
| Hole | Pin |
|
|
6
70
79
![]()
![]() Slot
Slot
72 ![]()
7. Identify the Left Handrail Cover (68), which as a | 7 |
| 63 |
|
|
LEFT sticker on it. Slide the Left Handrail Cover |
|
|
| ||
|
|
|
|
| |
onto the upper end of one of the Handrails (62). |
| 68 |
|
|
|
Slide one of the Handrail Caps (69) onto the |
| Post |
|
| |
|
|
|
| ||
lower end of the Handrail. Make sure that the |
| 62 |
|
| |
|
|
|
| ||
small hole in the Handrail Cap is on the bottom. |
|
|
|
|
|
Slide the Handrail (62) onto the post on the Left |
|
| 70 |
| 63 |
Upright (70) and onto the left Handrail Bracket |
|
|
|
| |
|
|
|
|
| |
(not shown). Finger tighten two 1 1/4” Bolts (63) |
|
|
|
| 74 |
into the Handrail and the post; do not fully |
|
| 69 | 62 |
|
tighten the Bolts yet. |
|
|
| ||
Tighten a 3/4” Screw (23) into the small hole in |
| 23 | Small Hole |
|
|
|
|
|
| ||
the Handrail Cap (69) and into the Handrail |
|
|
|
| 76 |
Bracket (not shown). |
|
|
|
| |
|
|
|
|
| |
Attach the other Handrail (62) to the Right |
|
|
|
| 69 |
Upright (76) as described above. |
|
|
|
|
|
|
|
|
| 23 | Small |
|
|
|
|
| |
|
|
|
|
| Hole |
| 8 |
|
|
|
|
