T V SETUP
Setup
SETUP MENU
The SETUP menu includes adjustments for activating the Closed Caption feature for display on the television and customizing CC display types and font styles.
How to Navigate:
|
| 12 |
|
|
| 6 |
|
Pict ure | Audio | Time | Setup |
Menu Language | English |
Transparency | Off |
Zoom Mode | Normal |
Noise Reduction | Off |
Advance |
|
Close Caption |
|
XVS | On |
Restore Default |
|
Lo ck
Ch an ne l
|
| 12 |
|
| 6 |
Pict ure | Audio | Time |
CC Mo de
Ba sic Sel ec tion
Ad vanc ed Se lection Op tion
Se tup |
On
CC 1
Se rvice 1
Mo ve | NSelectxt | MENU ReturnExit | Mo ve | Se lect |
MENU Return
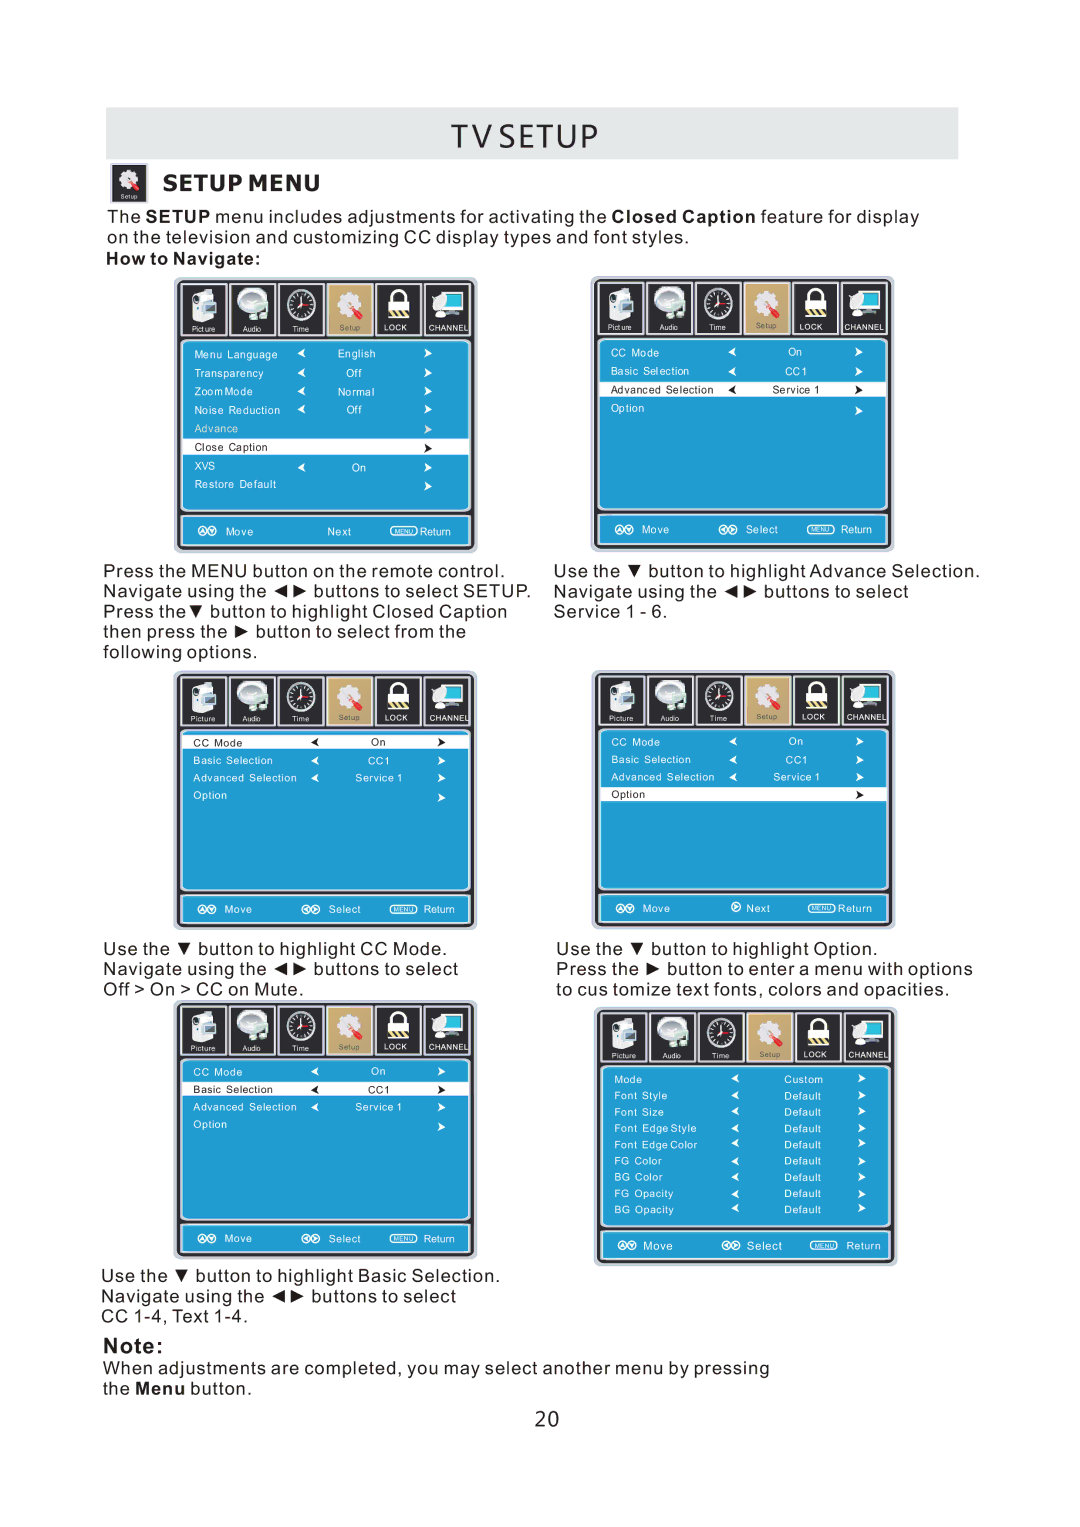
Press the MENU button on the remote control. Navigate using the ◄► buttons to select SETUP. Press the▼ button to highlight Closed Caption then press the ► button to select from the following options.
|
| 12 |
|
|
| 6 |
|
Picture | Audio | Time | Setup |
CC Mode | On |
Basic Selection | CC1 |
Advanced Selection | Service 1 |
Option |
|
Use the ▼ button to highlight Advance Selection. Navigate using the ◄► buttons to select Service 1 - 6.
|
| 12 |
|
|
| 6 |
|
Picture | Audio | Time | Setup |
CC Mode | On |
Basic Selection | CC1 |
Advanced Selection | Service 1 |
Option |
|
Move | Select | MENU Return |
Use the ▼ button to highlight CC Mode. Navigate using the ◄► buttons to select Off > On > CC on Mute.
Move | Next | MENU Return |
Use the ▼ button to highlight Option.
Press the ► button to enter a menu with options to cus tomize text fonts, colors and opacities.
|
| 12 |
|
|
| 6 |
|
Picture | Audio | Time | Setup |
CC Mode | On |
Basic Selection | CC1 |
Advanced Selection | Service 1 |
Option |
|
Picture | Audio |
Mode
Font Style
Font Size
Font Edge Style
Font Edge Color
FG Color
BG Color
FG Opacity
BG Opacity
12 ![]()
6
Time
Setup |
Custom
Default
Default
Default
Default
Default
Default
Default
Default
Move | Select | MENU Return |
Use the ▼ button to highlight Basic Selection. Navigate using the ◄► buttons to select
CC
Move | Select | MENU Return |
Note:
When adjustments are completed, you may select another menu by pressing the Menu button.
20
