Connecting High Level Output Audio Sources
Connect up to 8 such sources (tuner, cassette deck, CD Player, camcorder or VCR) to the input jacks for Line 1 (if not being used as Phono 1 input), Line 2, Line 3 (if not being used as Phono 2 input), Line 4, Line 5 and Line 6. Please note that Phono 1 and Line 1 (as well as Phono 2 and Line 3) use the same jacks. The selector switch(e)s below the jacks should be set to Line position if the jacks are used for the High Level input sources described here.
Using the Channel Input Gain Controls
Adjusting the Gain controls for each channel permits you to fine tune the level of each of the audio inputs, since input levels usually vary. Rotate the Gain controls clockwise to increase levels. After you preset the gain levels for each input, it is recommended that you do not adjust them further, as you can cause sound level imbalances during a mix.
Connecting the Mixer Outputs
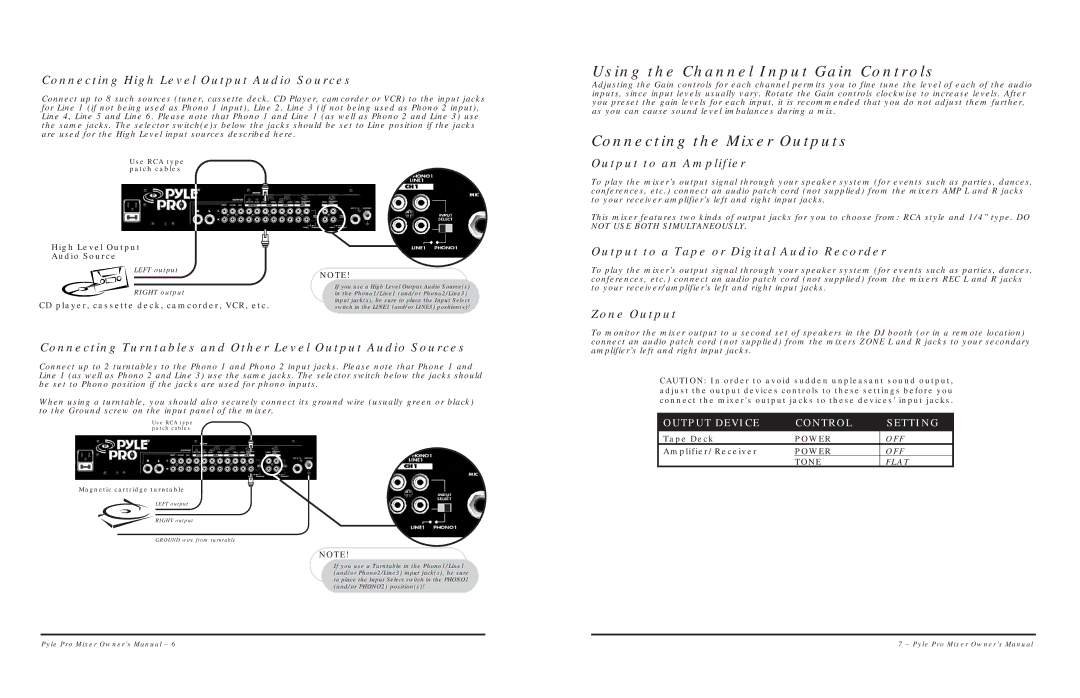
Use RCA type patch cables
High Level Output
Audio Source
LEFT output
RIGHT output
CD player, cassette deck, camcorder, VCR, etc.
NOTE!
If you use a High Level Output Audio Source(s) in the Phono1/Line1 (and/or Phono2/Line3) input jack(s), be sure to place the Input Select switch in the LINE1 (and/or LINE3) position(s)!
Output to an Amplifier
To play the mixer’s output signal through your speaker system (for events such as parties, dances, conferences, etc.) connect an audio patch cord (not supplied) from the mixers AMP L and R jacks to your receiver amplifier’s left and right input jacks.
This mixer features two kinds of output jacks for you to choose from: RCA style and 1/4” type. DO NOT USE BOTH SIMULTANEOUSLY.
Output to a Tape or Digital Audio Recorder
To play the mixer’s output signal through your speaker system (for events such as parties, dances, conferences, etc.) connect an audio patch cord (not supplied) from the mixers REC L and R jacks to your receiver/amplifier’s left and right input jacks.
Zone Output
Connecting Turntables and Other Level Output Audio Sources
Connect up to 2 turntables to the Phono 1 and Phono 2 input jacks. Please note that Phone 1 and Line 1 (as well as Phono 2 and Line 3) use the same jacks. The selector switch below the jacks should be set to Phono position if the jacks are used for phono inputs.
When using a turntable, you should also securely connect its ground wire (usually green or black) to the Ground screw on the input panel of the mixer.
Use RCA type patch cables
Magnetic cartridge turntable
LEFT output
![]()
![]() RIGHT output
RIGHT output
GROUND wire from turntable
NOTE!
If you use a Turntable in the Phono1/Line1 (and/or Phono2/Line3) input jack(s), be sure to place the Input Select switch in the PHONO1 (and/or PHONO2) position(s)!
To monitor the mixer output to a second set of speakers in the DJ booth (or in a remote location) connect an audio patch cord (not supplied) from the mixers ZONE L and R jacks to your secondary amplifier’s left and right input jacks.
CAUTION: In order to avoid sudden unpleasant sound output, adjust the output devices controls to these settings before you connect the mixer’s output jacks to these devices’ input jacks.
OUTPUT DEVICE | CONTROL |
| SETTING |
| |||
Tape Deck | POWER |
| OFF |
Amplifier/Receiver | POWER |
| OFF |
| TONE |
| FLAT |
Pyle Pro Mixer Owner’s Manual – 6 | 7 – Pyle Pro Mixer Owner’s Manual |