For Standing Pilot Model with Robertshaw Gas Valve, On/Off Operation

1.STOP! Read the safety information.

2.Set the tankstat on the lowest setting.

3.Turn OFF all electric power to the heater.

4.Remove heater door panel.

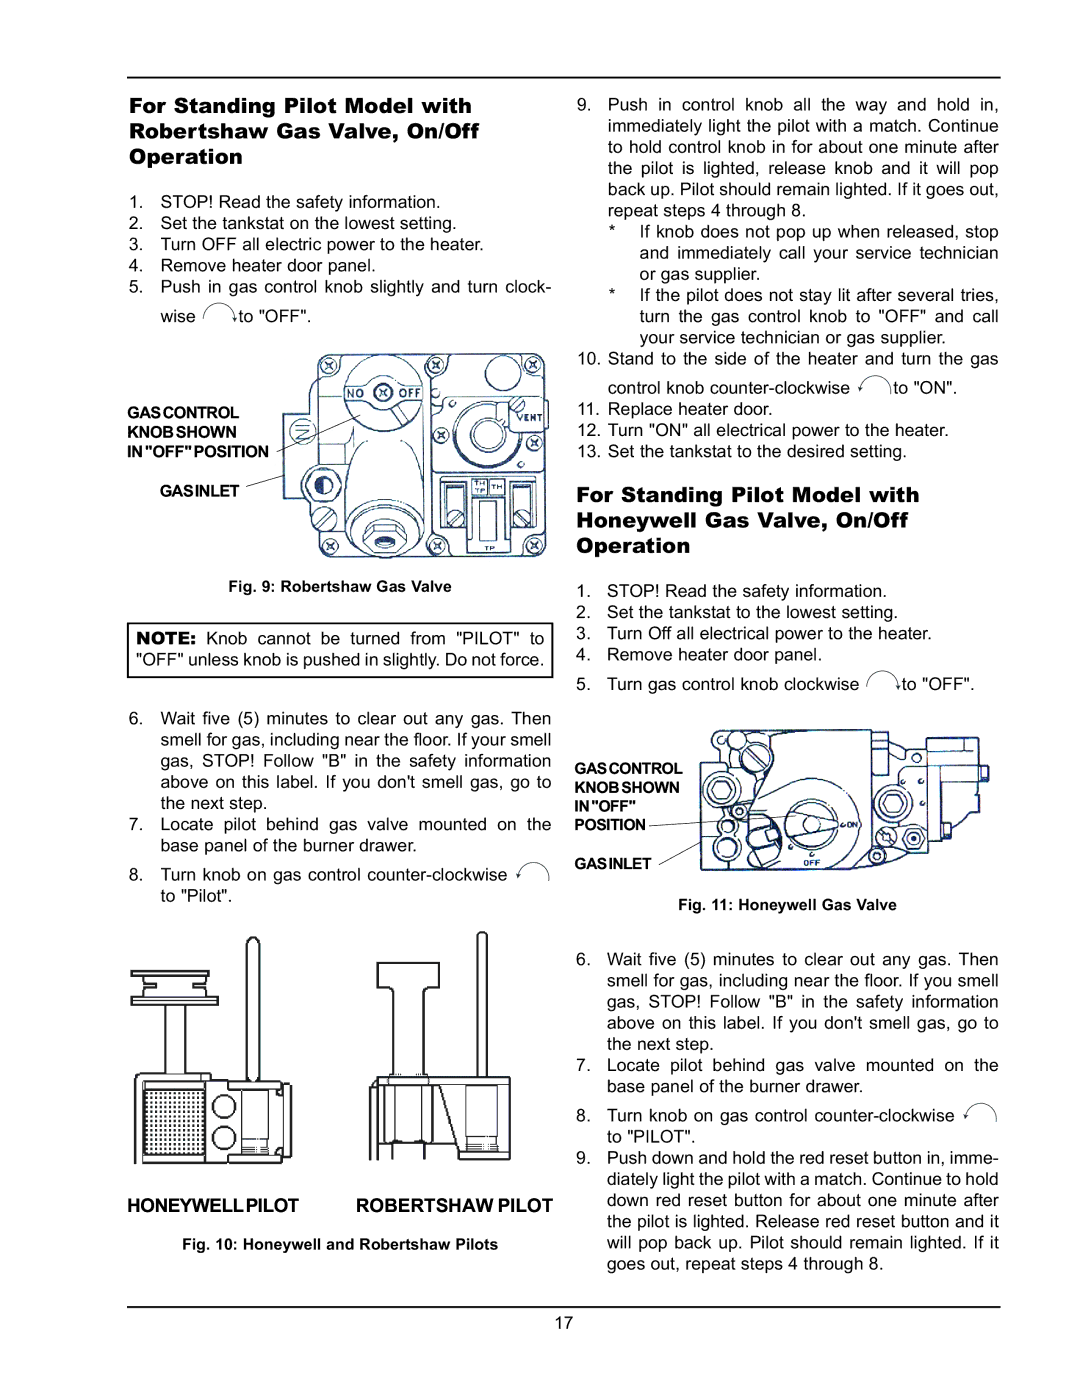
5.Push in gas control knob slightly and turn clock- wise to "OFF".

GASCONTROL

KNOBSHOWN

IN"OFF"POSITION

GASINLET

Fig. 9: Robertshaw Gas Valve

NOTE: Knob cannot be turned from "PILOT" to "OFF" unless knob is pushed in slightly. Do not force.

6.Wait five (5) minutes to clear out any gas. Then smell for gas, including near the floor. If your smell gas, STOP! Follow "B" in the safety information above on this label. If you don't smell gas, go to the next step.

7.Locate pilot behind gas valve mounted on the base panel of the burner drawer.

8.Turn knob on gas control counter-clockwise to "Pilot".

9.Push in control knob all the way and hold in, immediately light the pilot with a match. Continue to hold control knob in for about one minute after the pilot is lighted, release knob and it will pop back up. Pilot should remain lighted. If it goes out, repeat steps 4 through 8.

* If knob does not pop up when released, stop and immediately call your service technician or gas supplier.

*If the pilot does not stay lit after several tries, turn the gas control knob to "OFF" and call your service technician or gas supplier.

10.Stand to the side of the heater and turn the gas control knob counter-clockwise to "ON".

11.Replace heater door.

12.Turn "ON" all electrical power to the heater.

13.Set the tankstat to the desired setting.

For Standing Pilot Model with Honeywell Gas Valve, On/Off Operation

1.STOP! Read the safety information.

2.Set the tankstat to the lowest setting.

3.Turn Off all electrical power to the heater.

4.Remove heater door panel.

5.Turn gas control knob clockwise to "OFF".

GASCONTROL

KNOBSHOWN

IN"OFF"

POSITION

GASINLET

Fig. 11: Honeywell Gas Valve

HONEYWELLPILOT

ROBERTSHAW PILOT


Fig. 10: Honeywell and Robertshaw Pilots

6.Wait five (5) minutes to clear out any gas. Then smell for gas, including near the floor. If you smell gas, STOP! Follow "B" in the safety information above on this label. If you don't smell gas, go to the next step.

7.Locate pilot behind gas valve mounted on the base panel of the burner drawer.

8.Turn knob on gas control counter-clockwise to "PILOT".

9.Push down and hold the red reset button in, imme- diately light the pilot with a match. Continue to hold down red reset button for about one minute after the pilot is lighted. Release red reset button and it will pop back up. Pilot should remain lighted. If it goes out, repeat steps 4 through 8.

17

Page 17
Image 17
Raypak 0090A, 0195A, 0135A operating instructions Honeywellpilot Robertshaw Pilot

0090A, 0135A, 0195A specifications

Raypak is a leading manufacturer in the pool and spa industry, known for its reliable and innovative heating solutions. Among its product line, the Raypak 0090A, 0135A, and 0195A are notable models that stand out for their efficiency, durability, and advanced technology.

The Raypak 0090A is ideal for residential pools, offering a heat output of 90,000 BTU per hour. It utilizes a copper heat exchanger, which provides efficient heat transfer and is resistant to corrosion, making it perfect for chlorinated pools. This model features a digital thermostat that enhances user control, allowing for precise temperature settings. Additionally, the 0090A is compatible with both natural gas and propane, providing flexibility depending on user preference.

The Raypak 0135A, with its 135,000 BTU output, is designed for larger residential pools or smaller commercial applications. This model employs advanced energy-efficient technology, helping to reduce operational costs while maintaining optimal heating performance. One of the key features of the 0135A is its built-in electronic ignition system, which improves reliability and eliminates the need for a standing pilot, enhancing safety and efficiency. The unit's compact design allows it to fit in tight spaces while still providing robust heating capabilities.

The Raypak 0195A is the most powerful of the trio, delivering 195,000 BTU, making it suitable for larger pool setups and high-demand environments. It also uses a copper heat exchanger, ensuring excellent heat retention and durability against corrosion. The 0195A is equipped with an easy-to-use digital display, offering intuitive controls for temperature adjustments and operational monitoring. This model also incorporates a high-tech air intake design, which maximizes airflow and reduces energy consumption.

All three models are designed for outdoor installation and possess weather-resistant features, ensuring longevity and reliability through various environmental conditions. Additionally, they are equipped with easy access service panels for maintenance, ensuring that servicing is efficient and straightforward.

In summary, Raypak's 0090A, 0135A, and 0195A models are designed to meet diverse heating needs with advanced technology, energy efficiency, and robust construction, making them excellent choices for anyone looking to enhance their pool experience.