DV2011
BASIC OPERATION
7 | 1 | 6 | 4 | 10 |
|
|
|
|
| 24 |
|
|
| 23 | 2 | 20 |
|
|
|
|
|
|
|
|
|
|
|
|
| DV2011 |
|
|
|
|
|
|
|
|
|
|
|
|
|
|
|
|
| MP3 |
|
|
| MUTE |
|
|
|
|
|
|
|
|
|
|
| WMA |
| ||
|
|
|
| LOUD |
|
|
|
|
|
|
|
|
|
|
|
|
| MODE |
| LOC |
|
|
|
|
|
|
|
|
|
|
|
| |
|
|
|
| EQ |
|
|
|
|
|
|
|
|
|
|
|
|
| BAND |
|
|
|
| INT | RPT | RDM |
|
|
|
|
|
|
| |
|
|
|
|
|
| 1 | 2 | 3 | 4 | 5 | 6 | A/PS | DISP |
| AV IN |
|
5 | 3 | 19 |
| 8 | 9 | 12 | 13 | 14 | 15 | 16 | 17 | 11 | 18 | 22 |
| 21 |
Control Panel Release (REL)
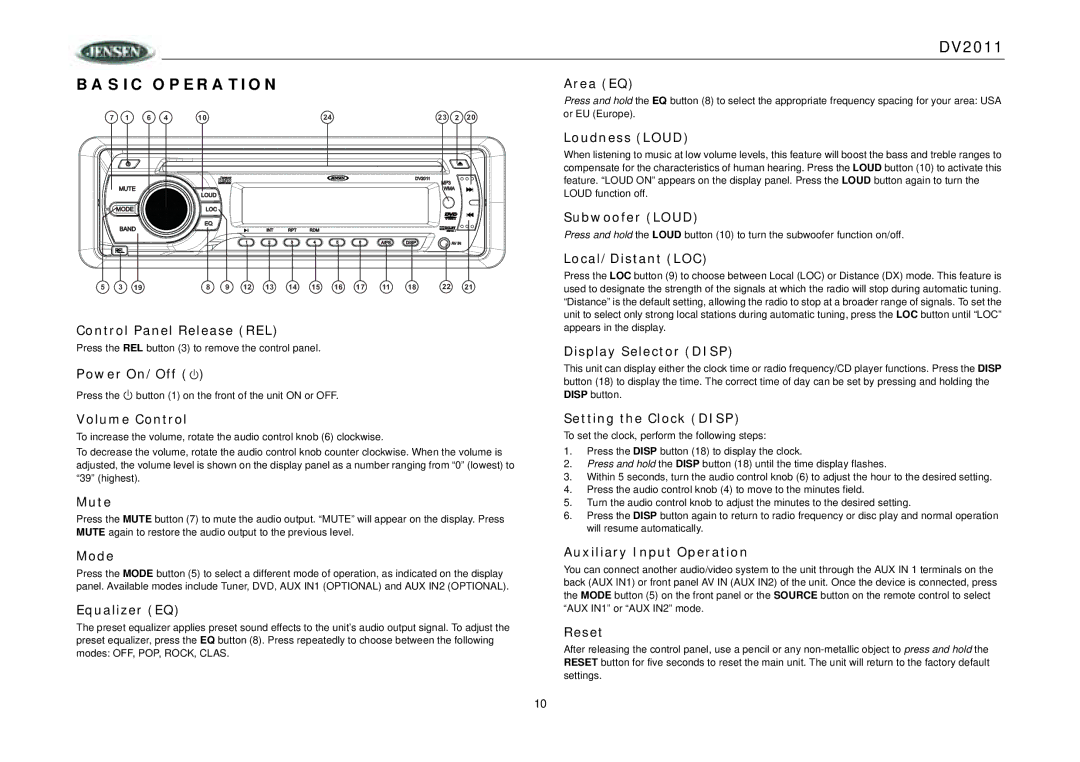
Press the REL button (3) to remove the control panel.
Power On/Off (![]() )
)
Press the ![]() button (1) on the front of the unit ON or OFF.
button (1) on the front of the unit ON or OFF.
Area (EQ)
Press and hold the EQ button (8) to select the appropriate frequency spacing for your area: USA or EU (Europe).
Loudness (LOUD)
When listening to music at low volume levels, this feature will boost the bass and treble ranges to compensate for the characteristics of human hearing. Press the LOUD button (10) to activate this feature. “LOUD ON” appears on the display panel. Press the LOUD button again to turn the LOUD function off.
Subwoofer (LOUD)
Press and hold the LOUD button (10) to turn the subwoofer function on/off.
Local/Distant (LOC)
Press the LOC button (9) to choose between Local (LOC) or Distance (DX) mode. This feature is used to designate the strength of the signals at which the radio will stop during automatic tuning. “Distance” is the default setting, allowing the radio to stop at a broader range of signals. To set the unit to select only strong local stations during automatic tuning, press the LOC button until “LOC” appears in the display.
Display Selector (DISP)
This unit can display either the clock time or radio frequency/CD player functions. Press the DISP button (18) to display the time. The correct time of day can be set by pressing and holding the DISP button.
Volume Control
To increase the volume, rotate the audio control knob (6) clockwise.
To decrease the volume, rotate the audio control knob counter clockwise. When the volume is adjusted, the volume level is shown on the display panel as a number ranging from “0” (lowest) to “39” (highest).
Mute
Press the MUTE button (7) to mute the audio output. “MUTE” will appear on the display. Press MUTE again to restore the audio output to the previous level.
Mode
Press the MODE button (5) to select a different mode of operation, as indicated on the display panel. Available modes include Tuner, DVD, AUX IN1 (OPTIONAL) and AUX IN2 (OPTIONAL).
Equalizer (EQ)
The preset equalizer applies preset sound effects to the unit’s audio output signal. To adjust the preset equalizer, press the EQ button (8). Press repeatedly to choose between the following modes: OFF, POP, ROCK, CLAS.
Setting the Clock (DISP)
To set the clock, perform the following steps:
1.Press the DISP button (18) to display the clock.
2.Press and hold the DISP button (18) until the time display flashes.
3.Within 5 seconds, turn the audio control knob (6) to adjust the hour to the desired setting.
4.Press the audio control knob (4) to move to the minutes field.
5.Turn the audio control knob to adjust the minutes to the desired setting.
6.Press the DISP button again to return to radio frequency or disc play and normal operation will resume automatically.
Auxiliary Input Operation
You can connect another audio/video system to the unit through the AUX IN 1 terminals on the back (AUX IN1) or front panel AV IN (AUX IN2) of the unit. Once the device is connected, press the MODE button (5) on the front panel or the SOURCE button on the remote control to select “AUX IN1” or “AUX IN2” mode.
Reset
After releasing the control panel, use a pencil or any
10
