HDTV with DLP technology
User’s Guide
High-Definition Television
Product Registration
Important Information
Product Information
Introduction
Lamp Replacement
Part 2 Why RCA Scenium DLP is better
Part 3 Other Key Features of owning an RCA Scenium HDTV
Aspect Ratio
Part 2 Why RCA Scenium DLP is better
Resolution it’s math...that works for you
Feature
Integrated HDTV Tuner with Digital Cable Ready QAM
Part 3 Other Key Features of owning an RCA Scenium HDTV
Digital Signal and Sound
User-friendly Features Help You Personalize Your TV
Audio/Video Output Jacks
FireWire with Two-Way DTVLink
NetConnect
Audio System
Chapter 3 Using the TV’s Features
Table of Contents
Chapter 1 Connections & Setup
Chapter 2 Using the Remote Control
Chapter 5 Reference
Chapter 4 Using the TV’s Menu System
Complete the Assisted Setup
Connections & Setup
Explanation of Jacks and Cables The Front of Your TV How To Connect
Use the Remote Control to Complete the Assisted Setup
Things to Consider Before You Connect
Connections & Setup
Protect Against Power Surges
Using a Stand
Connection Title
Choose Your Connection
Components
Cables Needed
FIXED/VARIABLE AUDIO OUTPUTS
Explanation of Jacks and Cables
SPEAKERS
AUDIO/VIDEO OUTPUTS
S-VIDEO
AUDIO/VIDEO INPUTS
PIP can only be displayed from component inputs in 480i format
Notes Audio and video information is carried on a single wire
Front Input Jacks
The Front of Your TV
Front Panel
Viewing the Components
How to Connect TV + VCR + DVD Player
2A 2B
Go to page
Satellite Receiver
How to Connect TV + Satellite Receiver + VCR
2. Connect your VCR to your TV
3. Connect your Satellite Receiver to your TV
Digital VCR
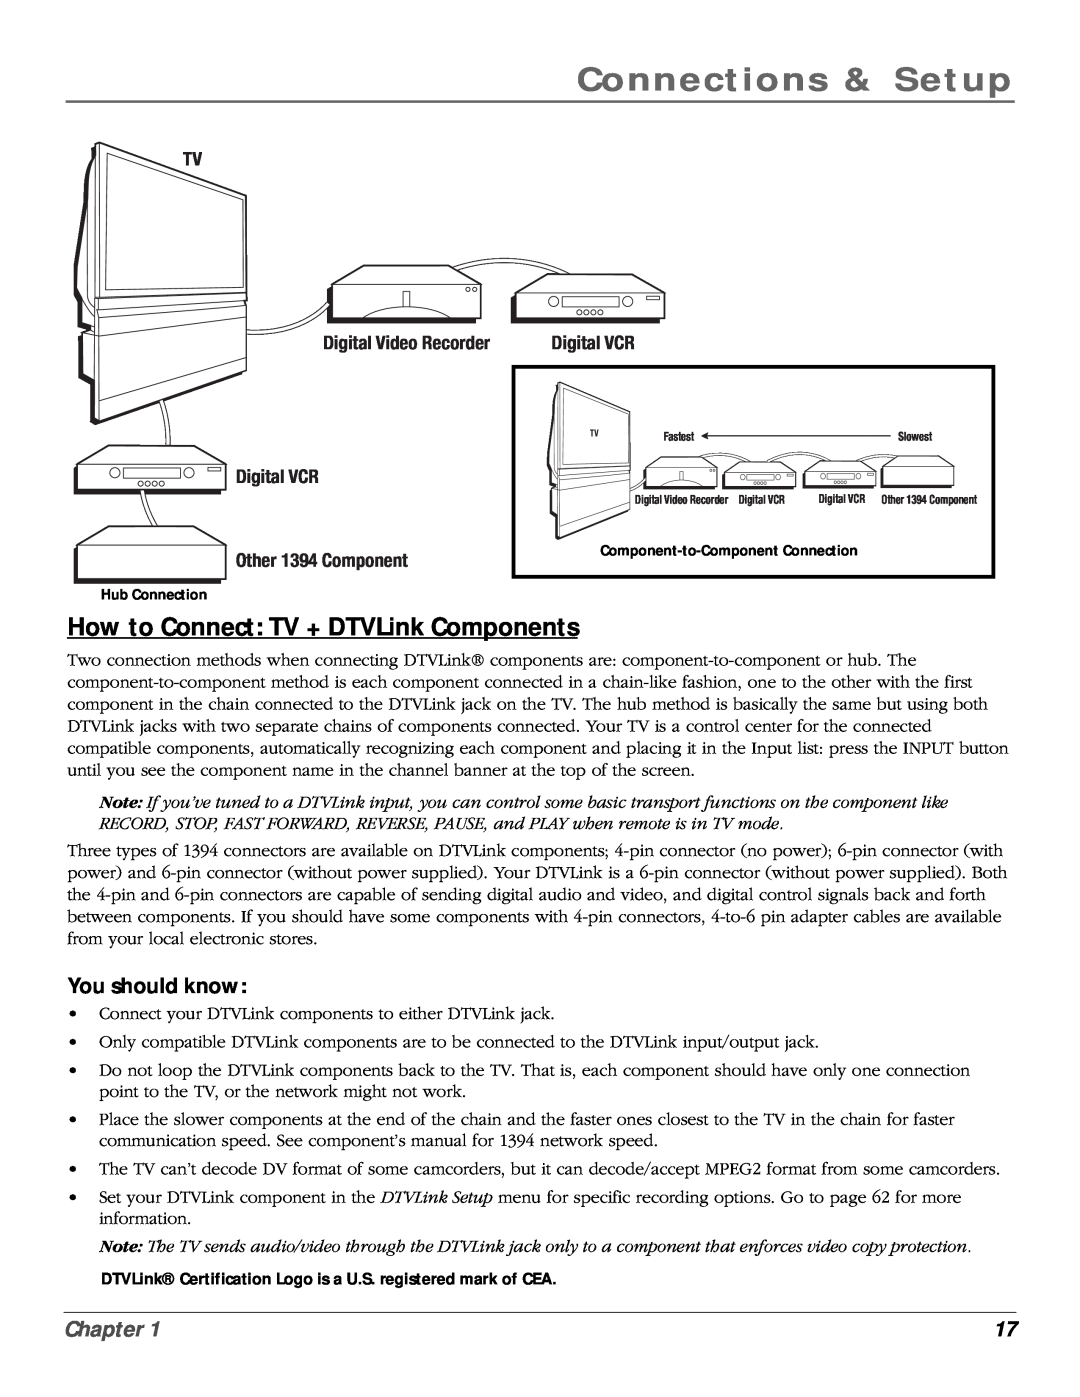
How to Connect TV + DTVLink Components
You should know
Digital Video Recorder Digital VCR Other 1394 Component
Viewing the Component
How to Connect TV + Component with DVI or HDMI
Setting Up Digital Cable Television Service
How to Connect TV + CableCARD
OR How to Connect TV + Receiver with Dolby Digital +Speakers
How to Connect TV + A/V Receiver + Speakers
Audio Connections
A/V AMPLIFIER
Back of Right Front Speaker
Back of Left Front Speaker
Back of Right Rear Speaker
Cable Modem/DSL
How to Connect TV + Router via the HDTV’s ETHERNET Jack
You should know
Router
Turn on the TV
Use the Remote Control to Complete the Assisted Setup
Plug in the TV
Put Batteries in the Remote
Set the Menu Language
Complete the Assisted Setup
Complete Channel Search
Volume Punchthrough Feature Using the INPUT Button Remote Code List
Using the Remote Control
The Buttons on the Remote Control
How To Use the Remote After You’ve Programmed It The Learning Feature
The Buttons on the Remote Control
Using the Remote Control
Chapter
MENU Makes Main Menu appear and disappear
Tips
Programming the Remote
Using Automatic Code Search
Programming the Remote to Operate Other Components
Find Out If You Need to Program the Remote
Using Direct Entry
How to Use the Remote After You’ve Programmed It
Adding a Learned Function
The Learning Feature
Deleting ALL Learned Functions
Clearing a Learned Function
Deleting ALL Volume Punchthrough Commands
Volume Punchthrough Feature
Acquiring
Using the INPUT Button
Remote Code List
Input source
Programmable for the VCR and AUX buttons
Programmable for AUX button
Programmable for DVD, VCR, SAT/CAB, AUX, and AUDIO buttons
Programmable for DVD and AUX buttons
About the Channel Banner Digital or Analog TV Channels
Using the TV’s Features
Auto Tuning Feature PIP Picture-In-Picture Operation
Using the Web Browser DTVLink Recording Emergency Alert System EAS
1239 PM 8-1 WLPJ
Using the TV’s Features
About the Channel Banner
Program Title/Acquiring Channel
Subchannel
Direct Tuning to a Channel
Digital or Analog TV Channels
Primary
Lock/Unlock TV
Parental Controls
Channel Lists Video Input List, Cable Channel List, Antenna Ch. List
USA V-Chip TV Ratings
How V-Chip Works for the USA and Canada
Editing Channels in the Channel Lists
Rating
USA Description and Content Themes for Age-Based Ratings
USA V-Chip Rating Limit Screen
Age-Based
Blocking Age-Based Ratings
Blocking Specific Content Themes
Viewing Age-Based Ratings
Blocking Movie Ratings
Viewing Specific Content Themes
Content Themes
V-Chip Movie Rating Limit
Canada V-Chip English Rating System
Canada V-Chip
Canada V-Chip
Canada V-Chip French Rating System
V-Chip Unrated Program Block
Front Button Block
Auto Tuning Feature
Web Browser Block
Arrow
PIP Picture-in-Picture Operation
PIP Buttons
buttons
indicator
Using the PIP Feature
PIP Problems?
PIP channel number
Saving Your Favorite Web Address
Using the Web Browser
Tips
Controlling the Web Browser
DTVLink Recording
Web Browser Button Interaction
Emergency Alert System EAS
Set up DTVLink Recording Preferences
Menus, On-Screen Help, and Control Panels Picture Quality Menu
Using the TV’s Menu System
Audio Menu Recordings Menu Connections Menu Preferences Menu
On-Screen Help
Using the TV’s Menu System
Menus, On-screen Help, and Control Panels
Navigating the Menu System
On-screen Menu Items
Sliders
Choice Lists
Numeric Entries
Picture Presets
Picture Settings
Picture Quality Menu
Green Stretch
Auto Color
Color Warmth
Noise Reduction
Contrast Expand
Advanced Settings
Audio Menu
Equalizer Presets
Audio Processor
Balance
Sound Logic
Audio Mode
SAP Second Audio Program
Main Menu Audio
0 Go Back 1 Equalizer Presets 2 Audio Processor 3 Sound Logic
Fixed/Variable Out Choose output type set up subwoofer
4 Audio Mode 5 SAP 6 Balance
Recordings Menu
Signal Strength
Connections Menu
Channel Search
Software Upgrade
Signal Source
Video Input Setup
DTVLink Setup
Auto Tuning
Special Features
1 TextInitialhereChannel
Ethernet Setup
5 Remote Setup
4 CableCARD Tools
Analog Captions
Preferences Menu
Closed Captioning
Caption Display
Caption Priority
Digital Captions
Caption Style
Time Menu
Screen Format
Translucency
Power Indicator
Lamp Power
Color Scheme
This page intentionally left blank
FCC Information Index
Troubleshooting Lamp Replacement Instructions Specifications
Accessory Information Limited Warranty Care and Cleaning
Reference
References
Troubleshooting
TV Problems
Power indicator is blinking or flashing
Unusual sound quality
TV turns on unexpectedly
Video and audio are out of sync
Blank screen
Noisy stereo reception
No sound, picture okay
Channel search finds few channels
Can’t select certain channel
I don’t remember my password and I want to unlock the TV
The Remote Control Doesn’t Work
Problems with V-Chip/Parental Controls
Problems with DTVLink Recording/Playback
What to do
Lamp Replacement Instructions
When to replace the lamp
Replacing the Lamp Unit
Steps 7 and
Step
place the old unit out of the way where it won’t get broken or dropped
HDTV Specifications
Tuning Capability Video Sound
Front Panel
Convenience
Replacement Lamp
Accessory Information
Custom DLP HDTV Accessories
How to Order
Price not available at time of print
2-way Signal Splitter
4-way Signal Splitter* helps you connect to other components
RG-6 Coaxial Burial
What your warranty does not cover
Limited Warranty
What your warranty covers
How you get service
FCC Information
How State Law relates to warranty
If you purchased your unit outside the United States
Care and Cleaning
Index
Symbols
Chapter
Index
Chapter
Index
This page intentionally left blank
This page intentionally left blank
This page intentionally left blank
This page intentionally left blank
This page intentionally left blank
This page intentionally left blank
This page intentionally left blank
This page intentionally left blank
TOCOM 1633649A
TTE Technology, Inc