Hooking Up the VCR
Connecting Two VCRs for Copying Tapes
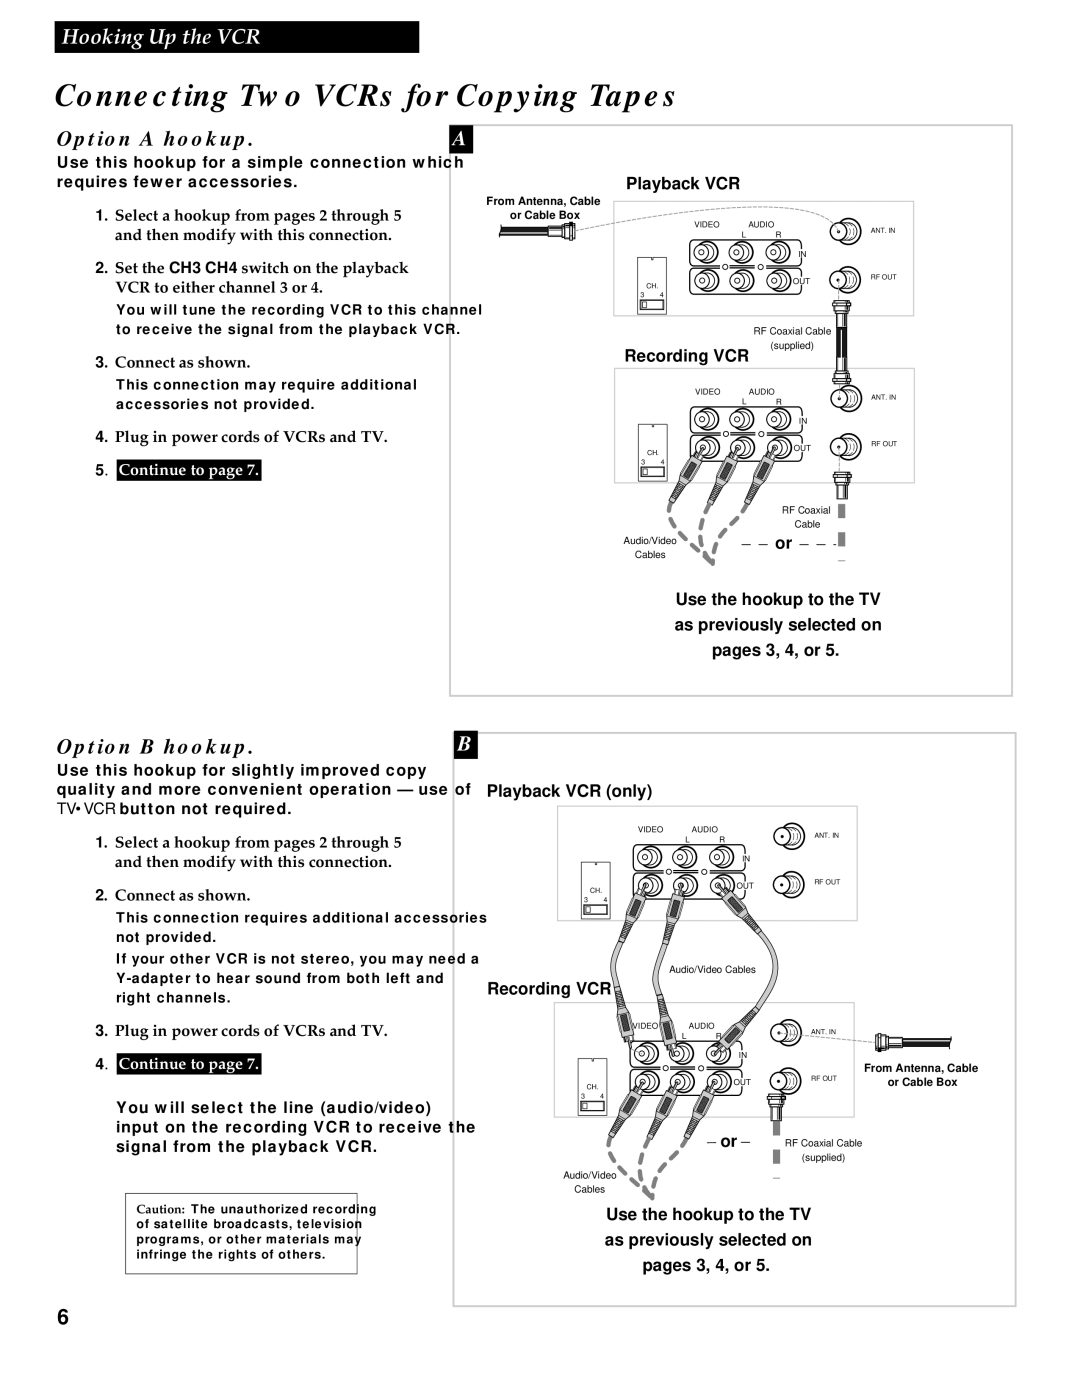
Option A hookup.
Use this hookup for a simple connection which requires fewer accessories.
1. Select a hookup from pages 2 through 5 and then modify with this connection.
A
From Antenna, Cable or Cable Box
Playback VCR
VIDEO AUDIO
L R
ANT. IN
2. Set the CH3 CH4 switch on the playback VCR to either channel 3 or 4.
CH.
IN
OUT
RF OUT
You will tune the recording VCR to this channel to receive the signal from the playback VCR.
3 4
RF Coaxial Cable
(supplied)
3. Connect as shown.
This connection may require additional accessories not provided.
Recording VCR
VIDEO AUDIO
L R
ANT. IN
4. Plug in power cords of VCRs and TV.
CH.
IN
OUT
RF OUT
5. Continue to page 7.
Option B hookup.
Use this hookup for slightly improved copy quality and more convenient operation — use of TV•VCR button not required.
1. Select a hookup from pages 2 through 5 and then modify with this connection.
2. Connect as shown.
This connection requires additional accessories not provided.
If your other VCR is not stereo, you may need a
3. Plug in power cords of VCRs and TV. 4. Continue to page 7.
You will select the line (audio/video) input on the recording VCR to receive the signal from the playback VCR.
Caution: The unauthorized recording of satellite broadcasts, television programs, or other materials may infringe the rights of others.
3 4
RF Coaxial
Cable
Audio/Videoor
Cables
Use the hookup to the TV as previously selected on pages 3, 4, or 5.
B
Playback VCR (only) |
|
|
|
| |
| VIDEO |
| AUDIO | ANT. IN |
|
| L | R |
| ||
|
|
| |||
|
|
| IN |
|
|
|
|
| OUT | RF OUT |
|
| CH. |
|
|
| |
|
|
|
|
| |
3 | 4 |
|
|
|
|
| Audio/Video Cables |
|
| ||
Recording VCR |
|
|
|
| |
| VIDEO | AUDIO | ANT. IN |
| |
| L |
| R |
| |
|
|
|
| ||
|
|
| IN |
|
|
|
|
|
| RF OUT | From Antenna, Cable |
|
|
| OUT | or Cable Box | |
CH. |
|
| |||
|
|
|
| ||
3 | 4 |
|
|
|
|
|
|
| or | RF Coaxial Cable |
|
|
|
|
| (supplied) |
|
Audio/Video |
|
|
|
| |
Cables |
|
|
|
| |
Use the hookup to the TV as previously selected on pages 3, 4, or 5.
6