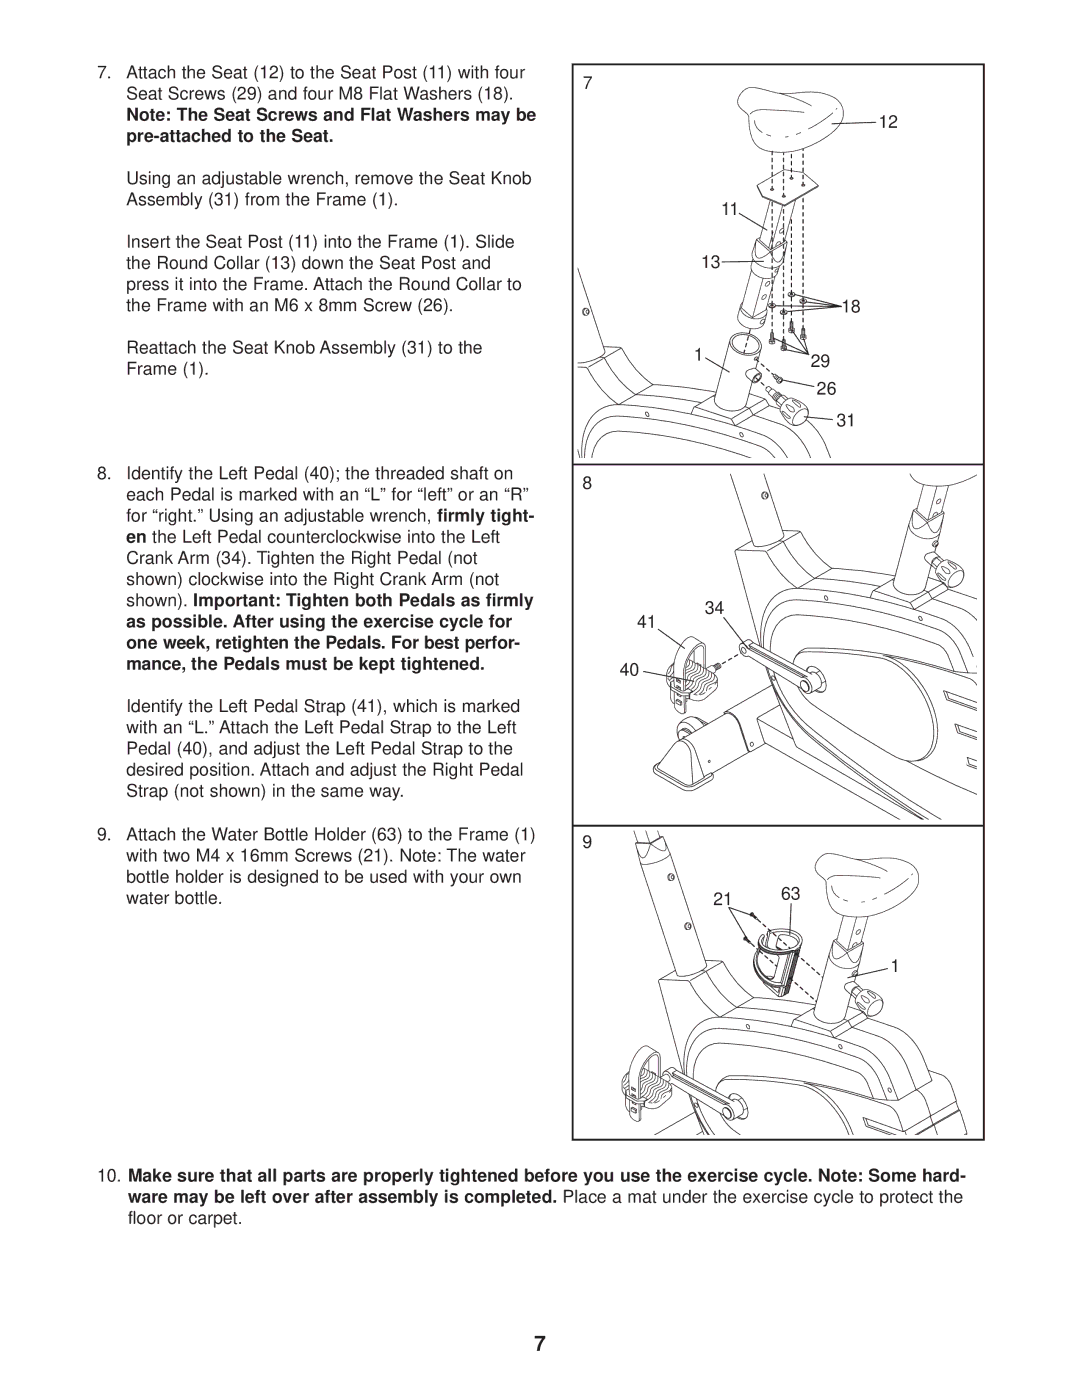
7. Attach the Seat (12) to the Seat Post (11) with four | 7 |
| |
Seat Screws (29) and four M8 Flat Washers (18). |
| ||
|
| ||
Note: The Seat Screws and Flat Washers may be |
| 12 | |
|
| ||
|
| ||
Using an adjustable wrench, remove the Seat Knob |
|
| |
Assembly (31) from the Frame (1). | 11 |
| |
|
| ||
Insert the Seat Post (11) into the Frame (1). Slide |
|
| |
the Round Collar (13) down the Seat Post and | 13 |
| |
press it into the Frame. Attach the Round Collar to |
|
| |
the Frame with an M6 x 8mm Screw (26). |
| 18 | |
Reattach the Seat Knob Assembly (31) to the | 1 | 29 | |
Frame (1). | |||
| |||
| 26 | ||
|
| ||
|
| 31 | |
8. Identify the Left Pedal (40); the threaded shaft on | 8 |
| |
each Pedal is marked with an “L” for “left” or an “R” |
| ||
|
| ||
for “right.” Using an adjustable wrench, firmly tight- |
|
| |
en the Left Pedal counterclockwise into the Left |
|
| |
Crank Arm (34). Tighten the Right Pedal (not |
|
| |
shown) clockwise into the Right Crank Arm (not |
|
| |
shown). Important: Tighten both Pedals as firmly | 34 |
| |
as possible. After using the exercise cycle for |
| ||
41 |
| ||
one week, retighten the Pedals. For best perfor- |
|
| |
mance, the Pedals must be kept tightened. | 40 |
| |
|
| ||
Identify the Left Pedal Strap (41), which is marked |
|
| |
with an “L.” Attach the Left Pedal Strap to the Left |
|
| |
Pedal (40), and adjust the Left Pedal Strap to the |
|
| |
desired position. Attach and adjust the Right Pedal |
|
| |
Strap (not shown) in the same way. |
|
| |
9. Attach the Water Bottle Holder (63) to the Frame (1) | 9 |
| |
with two M4 x 16mm Screws (21). Note: The water |
| ||
|
| ||
bottle holder is designed to be used with your own |
| 63 | |
water bottle. | 21 | ||
|
| 1 |
10.Make sure that all parts are properly tightened before you use the exercise cycle. Note: Some hard- ware may be left over after assembly is completed. Place a mat under the exercise cycle to protect the floor or carpet.
7
