INSTALLATION 
BLOWER/FAN INSTALLATION
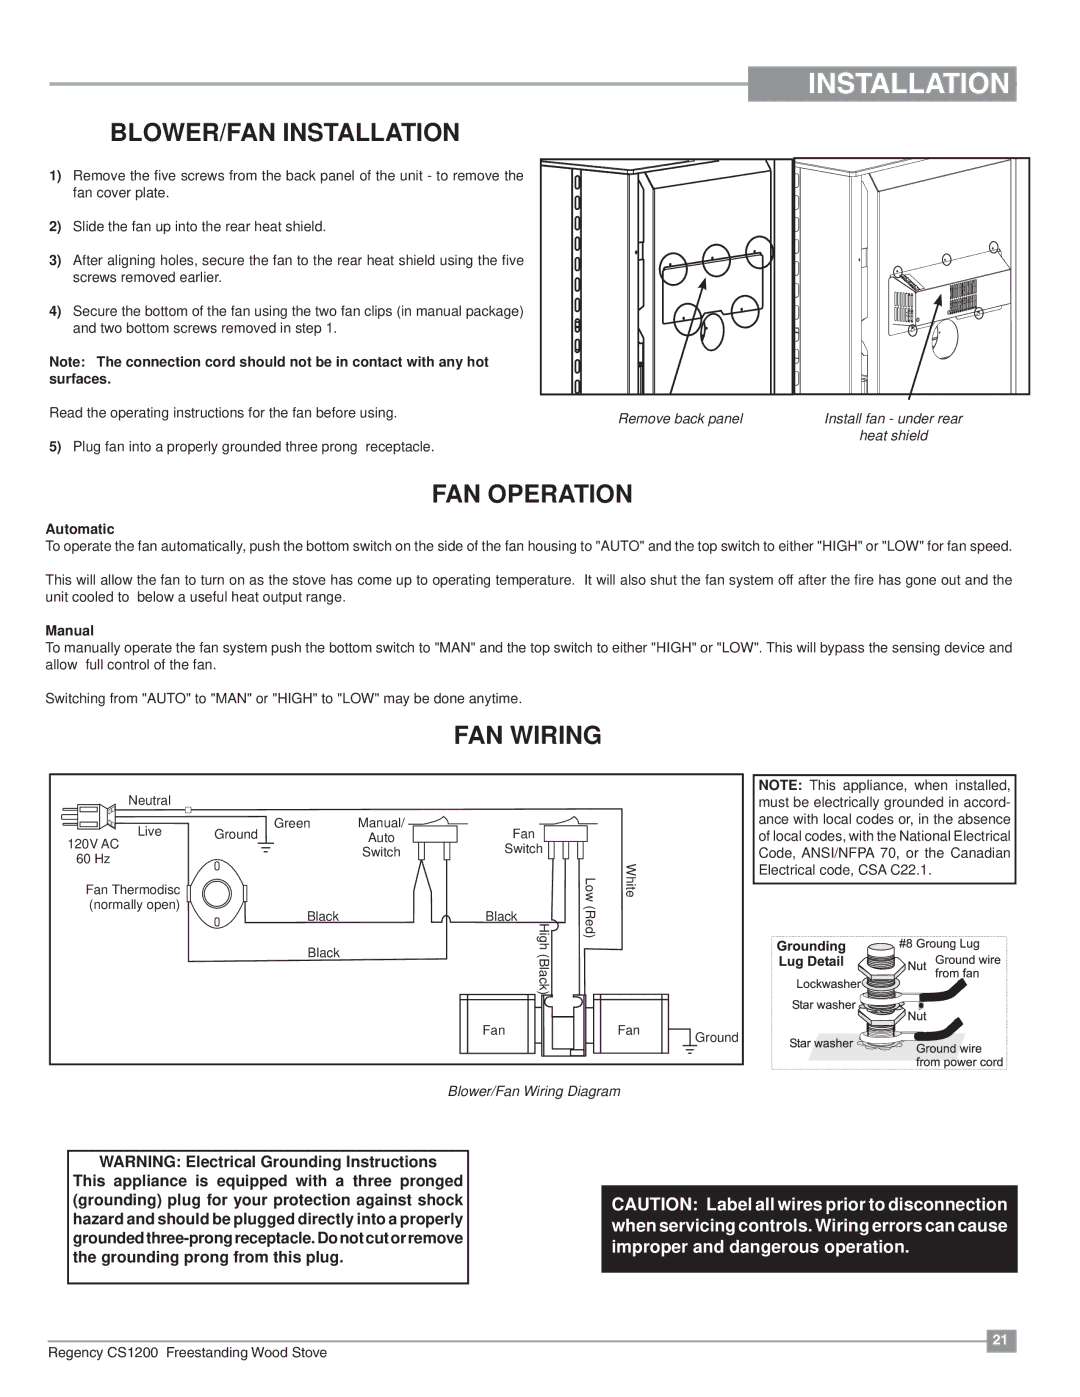
1)Remove the five screws from the back panel of the unit - to remove the fan cover plate.
2)Slide the fan up into the rear heat shield.
3)After aligning holes, secure the fan to the rear heat shield using the five screws removed earlier.
4)Secure the bottom of the fan using the two fan clips (in manual package) and two bottom screws removed in step 1.
Note: The connection cord should not be in contact with any hot surfaces.
Read the operating instructions for the fan before using.
5) Plug fan into a properly grounded three prong receptacle.
Remove back panel | Install fan - under rear |
| heat shield |
FAN OPERATION
Automatic
To operate the fan automatically, push the bottom switch on the side of the fan housing to "AUTO" and the top switch to either "HIGH" or "LOW" for fan speed.
This will allow the fan to turn on as the stove has come up to operating temperature. It will also shut the fan system off after the fire has gone out and the unit cooled to below a useful heat output range.
Manual
To manually operate the fan system push the bottom switch to "MAN" and the top switch to either "HIGH" or "LOW". This will bypass the sensing device and allow full control of the fan.
Switching from "AUTO" to "MAN" or "HIGH" to "LOW" may be done anytime.
FAN WIRING
Neutral |
|
|
|
|
|
|
Live | Green | Manual/ | Fan |
|
|
|
Ground | Auto |
|
|
| ||
120V AC |
| Switch | Switch |
|
|
|
60 Hz |
|
| White |
| ||
|
|
|
|
| ||
Fan Thermodisc |
|
|
| Low |
| |
(normally open) | Black |
| Black | (Red) |
|
|
|
|
|
| |||
| Black |
| High |
|
| |
|
| (Black) |
|
|
| |
|
|
|
|
|
| |
|
|
| Fan |
| Fan | Ground |
|
|
|
|
|
|
Blower/Fan Wiring Diagram
NOTE: This appliance, when installed, must be electrically grounded in accord- ance with local codes or, in the absence of local codes, with the National Electrical Code, ANSI/NFPA 70, or the Canadian Electrical code, CSA C22.1.
WARNING: Electrical Grounding Instructions
This appliance is equipped with a three pronged (grounding) plug for your protection against shock hazard and should be plugged directly into a properly
CAUTION: Label all wires prior to disconnection when servicing controls. Wiring errors can cause improper and dangerous operation.
Regency CS1200 Freestanding Wood Stove
21 ![]()
