INSTALLATION

Leg and Bottom Shield Assembly

F2400M & S2400M

Bottom Shield

020-911

Legs (set of 4)


Steel - Painted Black

850-125

Cast - Painted Black

850-126

Cast - Gold Plated

850-127

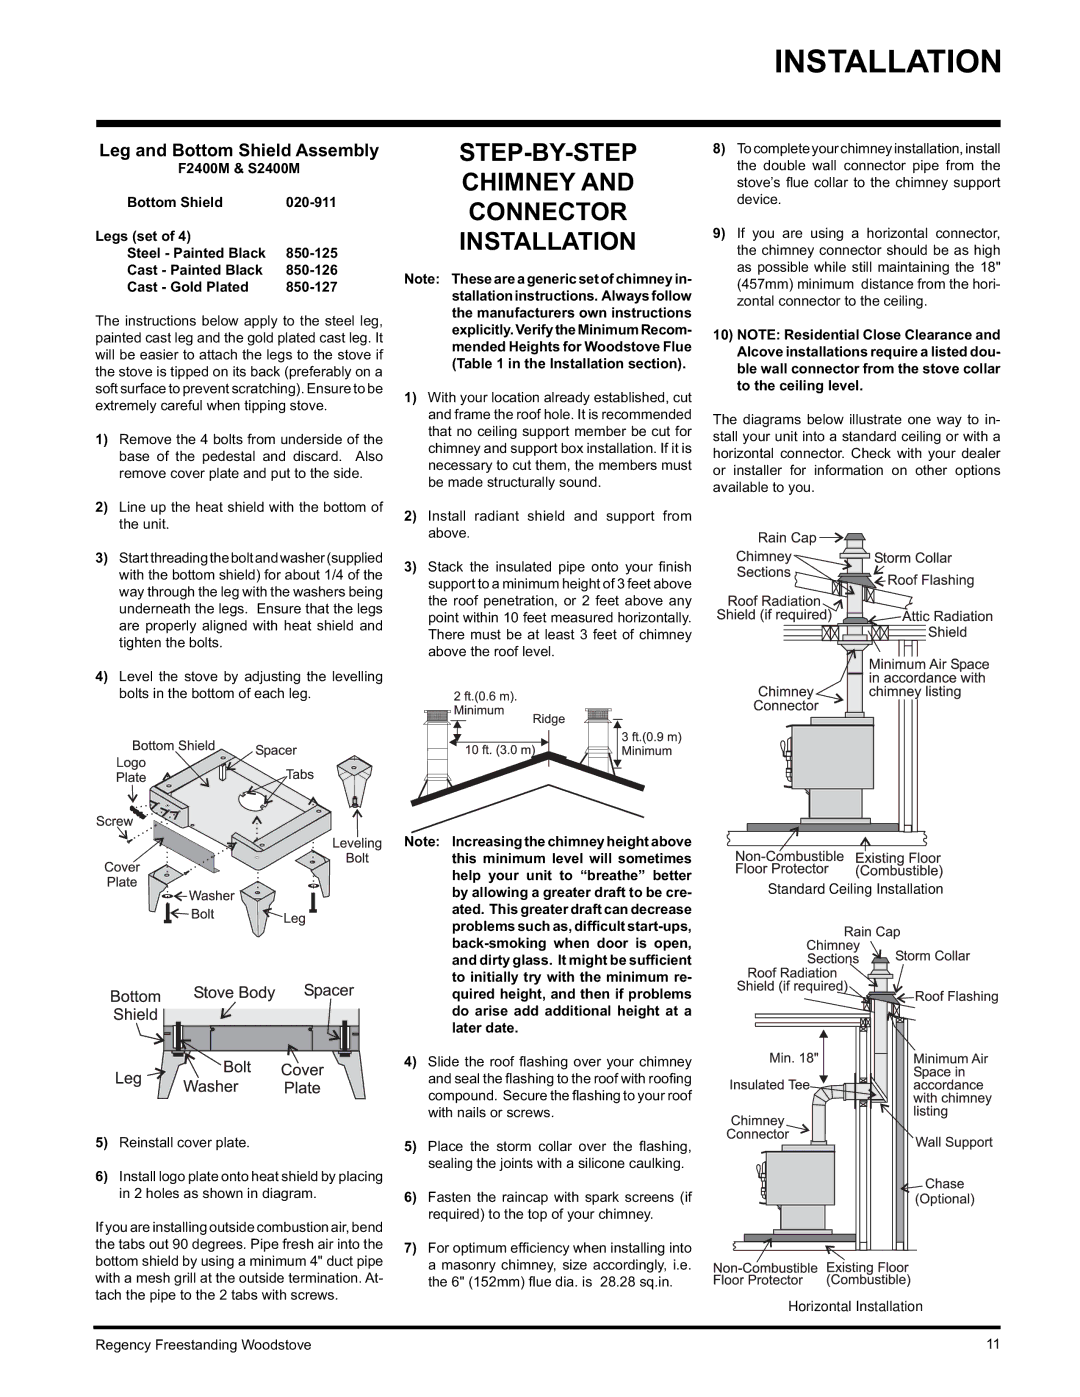
The instructions below apply to the steel leg, painted cast leg and the gold plated cast leg. It will be easier to attach the legs to the stove if the stove is tipped on its back (preferably on a soft surface to prevent scratching). Ensure to be extremely careful when tipping stove.

1)Remove the 4 bolts from underside of the base of the pedestal and discard. Also remove cover plate and put to the side.

2)Line up the heat shield with the bottom of the unit.

3)Start threadingtheboltandwasher (supplied with the bottom shield) for about 1/4 of the way through the leg with the washers being underneath the legs. Ensure that the legs are properly aligned with heat shield and tighten the bolts.

4)Level the stove by adjusting the levelling bolts in the bottom of each leg.

5)Reinstall cover plate.

6)Install logo plate onto heat shield by placing in 2 holes as shown in diagram.

If you are installing outside combustion air, bend the tabs out 90 degrees. Pipe fresh air into the bottom shield by using a minimum 4" duct pipe with a mesh grill at the outside termination. At- tach the pipe to the 2 tabs with screws.

STEP-BY-STEP

CHIMNEY AND

CONNECTOR

INSTALLATION

Note: These are a generic set of chimney in- stallation instructions. Always follow the manufacturers own instructions explicitly.VerifytheMinimumRecom- mended Heights for Woodstove Flue (Table 1 in the Installation section).

1)With your location already established, cut and frame the roof hole. It is recommended that no ceiling support member be cut for chimney and support box installation. If it is necessary to cut them, the members must be made structurally sound.

2)Install radiant shield and support from above.

3)Stack the insulated pipe onto your fi nish support to a minimum height of 3 feet above the roof penetration, or 2 feet above any point within 10 feet measured horizontally. There must be at least 3 feet of chimney above the roof level.

Note: Increasing the chimney height above this minimum level will sometimes help your unit to “breathe” better by allowing a greater draft to be cre- ated. This greater draft can decrease problems such as, difficult start-ups, back-smoking when door is open, and dirty glass. It might be sufficient to initially try with the minimum re- quired height, and then if problems do arise add additional height at a later date.

4)Slide the roof fl ashing over your chimney and seal the fl ashing to the roof with roofi ng compound. Secure the fl ashing to your roof with nails or screws.

5)Place the storm collar over the fl ashing, sealing the joints with a silicone caulking.

6)Fasten the raincap with spark screens (if required) to the top of your chimney.

7)For optimum effi ciency when installing into a masonry chimney, size accordingly, i.e. the 6" (152mm) fl ue dia. is 28.28 sq.in.

8)To complete your chimney installation, install the double wall connector pipe from the stove’s fl ue collar to the chimney support device.

9)If you are using a horizontal connector, the chimney connector should be as high as possible while still maintaining the 18" (457mm) minimum distance from the hori- zontal connector to the ceiling.

10)NOTE: Residential Close Clearance and Alcove installations require a listed dou- ble wall connector from the stove collar to the ceiling level.

The diagrams below illustrate one way to in- stall your unit into a standard ceiling or with a horizontal connector. Check with your dealer or installer for information on other options available to you.

Standard Ceiling Installation

Horizontal Installation

Regency Freestanding Woodstove

11

Page 11
Image 11
Regency Wraps F2400M, S2400M installation manual STEP-BY-STEP Chimney Connector Installation, Leg and Bottom Shield Assembly

F2400M, S2400M specifications

Regency Wraps has long been known for its innovative solutions in food packaging, and the F2400M and S2400M models are prime examples of this commitment to quality and efficiency. Both models are designed to meet the needs of the modern kitchen, catering to both professional chefs and home cooks alike.

The F2400M model is particularly notable for its robust construction and user-friendly interface. It features a powerful motor capable of handling various wrap materials including plastic, foil, and parchment. This versatility allows users to easily transition between different types of wrapping, making it suitable for a broad range of food preparation tasks. Additionally, the F2400M incorporates an adjustable cutter that provides precise slicing, ensuring that users can create the perfect wrap every time.

On the other hand, the S2400M is designed with efficiency in mind. This model boasts a sleek design that saves counter space while maintaining a powerful performance. The S2400M is equipped with a built-in storage compartment for wrap rolls, allowing operators to keep everything organized and easily accessible. One of its standout features is the automatic cutter, which enhances safety and reduces the risk of injury during the wrapping process.

Both models utilize advanced technology to improve their functionality. The thermal sensors in the F2400M help regulate the temperature, ensuring that wraps are sealed securely without compromising food quality. Meanwhile, the S2400M’s intuitive touch controls simplify the wrapping process, making it easier for users to achieve consistent results.

In terms of characteristics, both models are designed for durability. The heavy-duty materials used in their construction ensure that they can withstand the rigors of daily use, making them ideal for busy kitchens. Furthermore, they are both energy-efficient, helping users to minimize their environmental impact while keeping their operations cost-effective.

In summary, the Regency Wraps F2400M and S2400M are exceptional tools for anyone looking to streamline their food wrapping processes. With advanced features, user-friendly designs, and robust construction, these models represent the pinnacle of modern food packaging technology. Whether you’re a professional chef or a home cook, investing in either of these models will elevate your food preparation and storage experience.