ASSEMBLY

UNPACKING

This product requires assembly.

Carefully lift saw from the carton by the carrying handle and the saw base, and place it on a level work surface. NOTE: This tool is heavy. To avoid back injury, lift with your legs, not your back, and get help when needed.

This saw has been shipped with the saw arm secured in the down position. To release the saw arm, push down on the top of the saw arm, cut the tie-wrap, and pull out on the lock pin.

Lift the saw arm by the handle. Hand pressure should remain on the saw arm to prevent sudden rise upon release of the tie wrap.

Inspect the tool carefully to make sure no breakage or damage occurred during shipping.

Do not discard the packing material until you have care- fully inspected and satisfactorily operated the tool.

The saw is factory set for accurate cutting. After assembling it, check for accuracy. If shipping has influ- enced the settings, refer to specific procedures explained in this manual.

If any parts are damaged or missing, please call 1-866-539-1710 for assistance.

WARNING:

If any parts are damaged or missing, do not oper- ate this tool until the missing parts are replaced. Failure to heed this warning could result in serious personal injury.

WARNING:

Do not attempt to modify this tool or create acces- sories not recommended for use with this tool. Any such alteration or modification is misuse and could result in a hazardous condition leading to possible serious personal injury.

TRACE HOLES

AT THESE LOCATIONS

FOR HOLE PATTERN

SAW BASE

WARNING:

Do not connect to power supply until assembly is complete. Failure to comply could result in accidental starting and possible serious personal injury.

WARNING:

Do not start the compound miter saw without checking for interference between the saw blade and the miter fence. Damage could result to the blade if it strikes the miter fence during operation of the saw.

WARNING:

Always make sure the compound miter saw is securely mounted to a workbench or an approved workstand. Failure to heed this warning can result in serious personal injury.

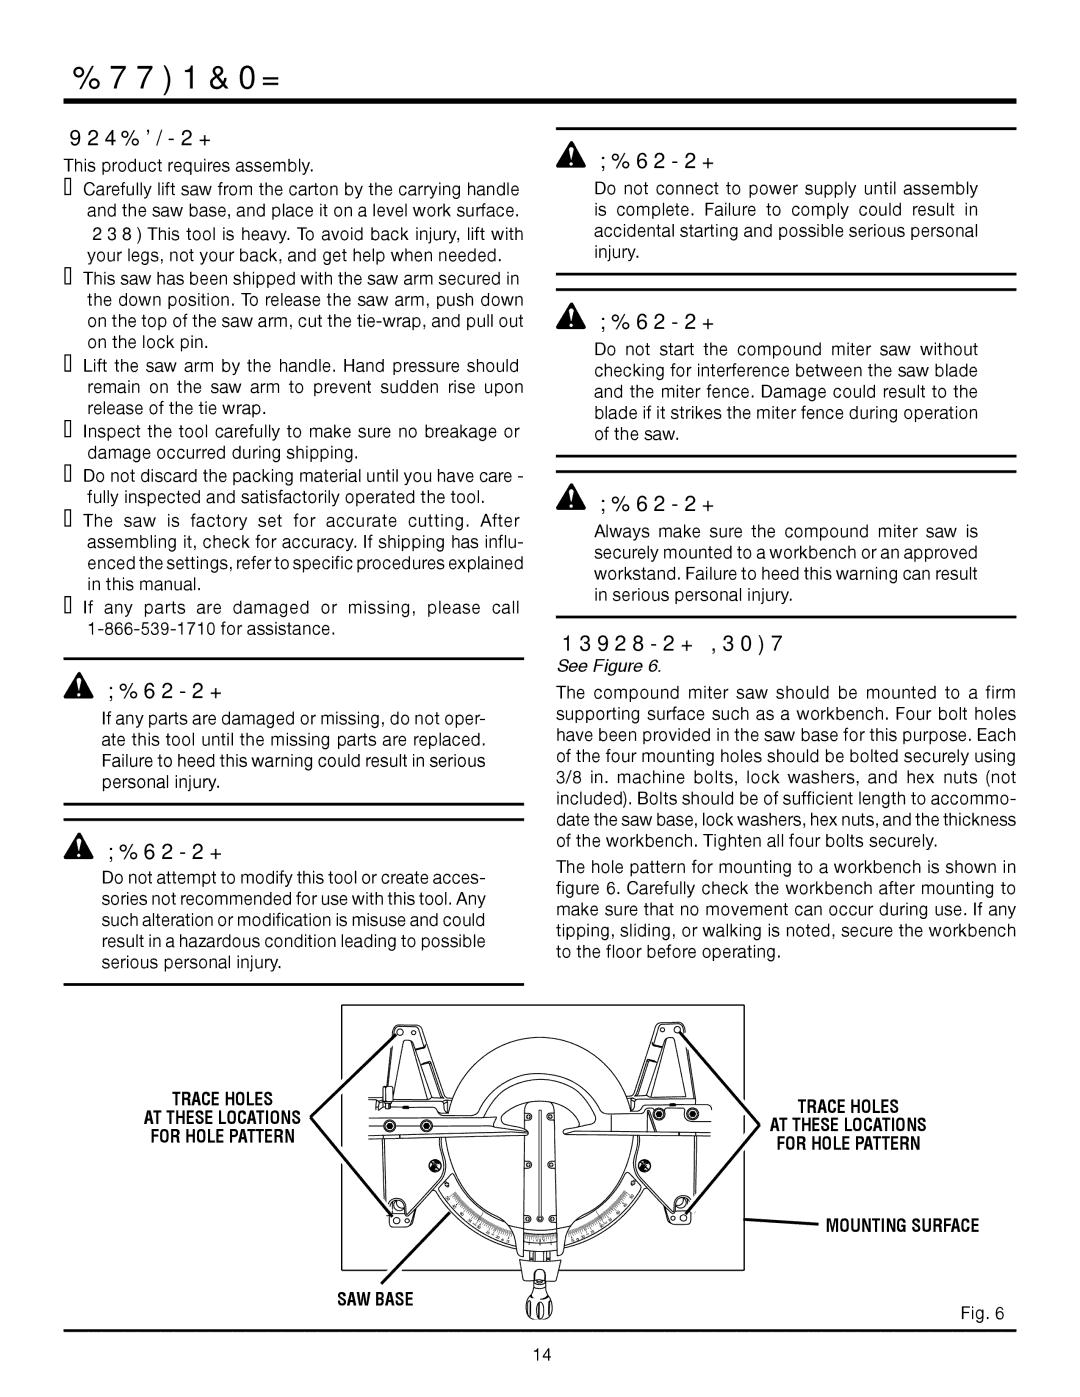
MOUNTING HOLES

See Figure 6.

The compound miter saw should be mounted to a firm supporting surface such as a workbench. Four bolt holes have been provided in the saw base for this purpose. Each of the four mounting holes should be bolted securely using 3/8 in. machine bolts, lock washers, and hex nuts (not included). Bolts should be of sufficient length to accommo- date the saw base, lock washers, hex nuts, and the thickness of the workbench. Tighten all four bolts securely.

The hole pattern for mounting to a workbench is shown in figure 6. Carefully check the workbench after mounting to make sure that no movement can occur during use. If any tipping, sliding, or walking is noted, secure the workbench to the floor before operating.

TRACE HOLES

AT THESE LOCATIONS

FOR HOLE PATTERN

MOUNTING SURFACE

Fig. 6

14

Page 14
Image 14
RIDGID MS1065LZA manual Assembly, Unpacking, Mounting Holes, Trace Holes AT These Locations For Hole Pattern SAW Base

MS1065LZA specifications

The RIDGID MS1065LZA is a high-performance miter saw designed for professional contractors and serious DIY enthusiasts alike. Known for its precision and versatility, this tool stands out in its category due to several key features and advanced technologies that enhance its functionality and ease of use.

One of the primary characteristics of the MS1065LZA is its robust 15-amp motor, which delivers a formidable 5,200 RPM. This powerful motor ensures smooth, consistent cuts through various materials including hardwood, softwood, and composite materials. Coupled with a 10-inch carbide-tipped blade, the saw is capable of making precise crosscuts and miter cuts, offering users the ability to tackle an array of projects with confidence.

The MS1065LZA includes an adjustable miter range of 0 to 60 degrees to the right and 0 to 52 degrees to the left, allowing for increased flexibility when making angled cuts. The dual bevel feature enables users to easily create bevel cuts in both directions without having to flip the material, which saves time and improves efficiency. The miter saw is also equipped with positive stops at common angles, ensuring quick and accurate settings.

Another notable feature is the innovative laser lighting system, which provides a clear cutting line for improved accuracy. This integrated laser guide helps users align their cuts precisely, reducing the likelihood of errors and waste material. Additionally, the transparent blade guard offers enhanced visibility while keeping the user safe during operation.

The MS1065LZA boasts a large, sturdy base that adds stability and supports larger workpieces, accommodating various project sizes. Its lightweight design enhances portability, making it easier to transport between job sites. The saw also comes with a dust bag that helps minimize mess, keeping the workstation cleaner while cutting.

In terms of user-friendly features, the large ergonomic handle enhances comfort during extended use. The saw is designed with easy-to-read scales and a simple locking mechanism for effortless adjustments. With its combination of power, precision, and practicality, the RIDGID MS1065LZA stands out as a top choice for professionals seeking reliable performance and exceptional results in their woodworking projects.