OPERATION

Bevel


Angle


Type of Cut

Setting


Left side, inside corner

0°

1.

Top edge of molding against fence

2. Miter table set right 45°


3.

Save left end of cut


Right side, inside corner

0°

1.

Bottom edge of molding against fence

2. Miter table set left 45°


3.

Save left end of cut


Left side, outside corner

0°

1.

Bottom edge of molding against fence

2. Miter table set left 45°


3.

Save right end of cut


Right side, outside corner

0°

1.

Top edge of molding against fence

2. Miter table set right 45°


3.

Save right end of cut


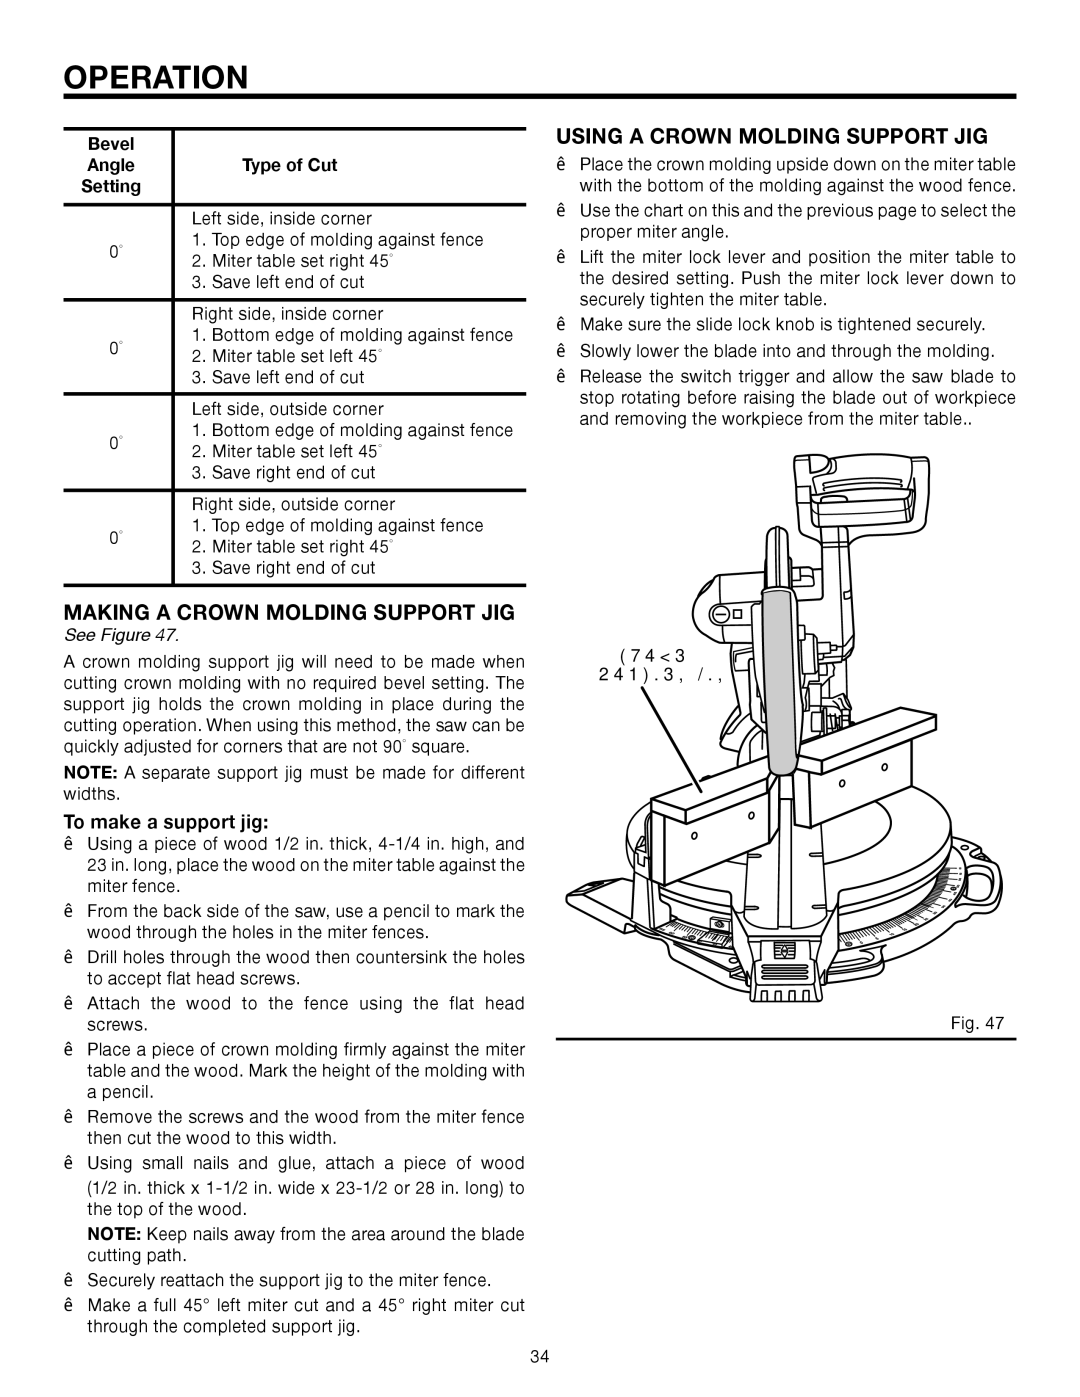
MAKING A CROWN MOLDING SUPPORT JIG

See Figure 47.

A crown molding support jig will need to be made when cutting crown molding with no required bevel setting. The support jig holds the crown molding in place during the cutting operation. When using this method, the saw can be quickly adjusted for corners that are not 90° square.

NOTE: A separate support jig must be made for different widths.

To make a support jig:

Using a piece of wood 1/2 in. thick, 4-1/4 in. high, and 23 in. long, place the wood on the miter table against the miter fence.

From the back side of the saw, use a pencil to mark the wood through the holes in the miter fences.

Drill holes through the wood then countersink the holes to accept flat head screws.

Attach the wood to the fence using the flat head screws.

Place a piece of crown molding firmly against the miter table and the wood. Mark the height of the molding with a pencil.

Remove the screws and the wood from the miter fence then cut the wood to this width.

Using small nails and glue, attach a piece of wood

(1/2 in. thick x 1-1/2 in. wide x 23-1/2 or 28 in. long) to the top of the wood.

NOTE: Keep nails away from the area around the blade cutting path.

Securely reattach the support jig to the miter fence.

Make a full 45° left miter cut and a 45° right miter cut through the completed support jig.

USING A CROWN MOLDING SUPPORT JIG

Place the crown molding upside down on the miter table with the bottom of the molding against the wood fence.

Use the chart on this and the previous page to select the proper miter angle.

Lift the miter lock lever and position the miter table to the desired setting. Push the miter lock lever down to securely tighten the miter table.

Make sure the slide lock knob is tightened securely.

Slowly lower the blade into and through the molding.

Release the switch trigger and allow the saw blade to stop rotating before raising the blade out of workpiece and removing the workpiece from the miter table..

CROWN

MOLDING JIG

Fig. 47

34

Page 34
Image 34
RIDGID MS1290LZ1 manual Making a Crown Molding Support JIG, Using a Crown Molding Support JIG, Crown Molding JIG

MS1290LZ1 specifications

The RIDGID MS1290LZ1 is a powerful miter saw designed for both professional tradespeople and avid DIYers, providing exceptional versatility, precision, and ease of use. With its robust features and innovative technologies, this miter saw stands out in the crowded market of power tools.

One of the standout features of the MS1290LZ1 is its powerful 15-amp motor, which generates an impressive 4,000 RPM. This high-speed operation allows for quick and clean cuts through various materials, including hardwood, softwood, and composites. Capable of making both bevel and miter cuts, the saw offers a cutting capacity of up to 12 inches, making it suitable for a range of applications, from framing to crown molding.

The MS1290LZ1 is equipped with a dual bevel system, allowing users to make beveled cuts to the left and right with ease. This means that operators can achieve precise angles without the need to flip or reposition their workpieces, significantly enhancing efficiency. The saw features a generous cutting capacity of 0 to 50 degrees for miter cuts on both sides, enabling a wide variety of projects with intricate angles.

Another notable characteristic of this miter saw is its advanced laser guide system. This technology projects an accurate line of cut directly onto the material, ensuring maximum precision. The adjustable laser can be aligned with the blade for improved accuracy, reducing the likelihood of errors. Additionally, the MS1290LZ1 includes a built-in work light that illuminates the cutting area, providing visibility in low-light environments.

The saw's ergonomic design enhances user comfort during operation. Equipped with a sturdy and lightweight chassis, the MS1290LZ1 is easy to transport, making it an excellent choice for on-site jobs. The handle features a comfortable grip, allowing for extended use without causing fatigue. Moreover, the saw includes a dust collection port that helps maintain a clean workspace by minimizing sawdust and debris.

In conclusion, the RIDGID MS1290LZ1 miter saw combines power, precision, and user-friendly features, making it an ideal tool for both novice and experienced users. With its powerful motor, dual bevel capabilities, advanced laser guide, and ergonomic design, this miter saw offers the versatility and performance needed to tackle any cutting task with confidence. Whether you're framing a house, crafting custom furniture, or working on detailed trim, the MS1290LZ1 is equipped to handle the job efficiently and accurately.