INSTALLATION

Glove Box

Mounting the source unit in the glove box is adequate, but does not provide easy access. Glove box mounting should only be done if “Instrument Panel” or ”Center Console,” mounting is not acceptable (i.e., maintaining integrity of older vehicles with metal dashboards.) The source unit should be mounted within ±20° from horizontal.

Under Dash

Mounting the source unit under the dash is adequate, but does not provide easy access. Under dash mounting should only be done if “Instrument Panel,” ”Center Console” or ”Glove Box” mounting is not acceptable. Mount the source unit off to the side of the driver's area to reduce interference with the parking brake, gear shift, or operating pedals.The source unit should be mounted within ±20° from horizontal.

STANDARD MOUNT

Installing;

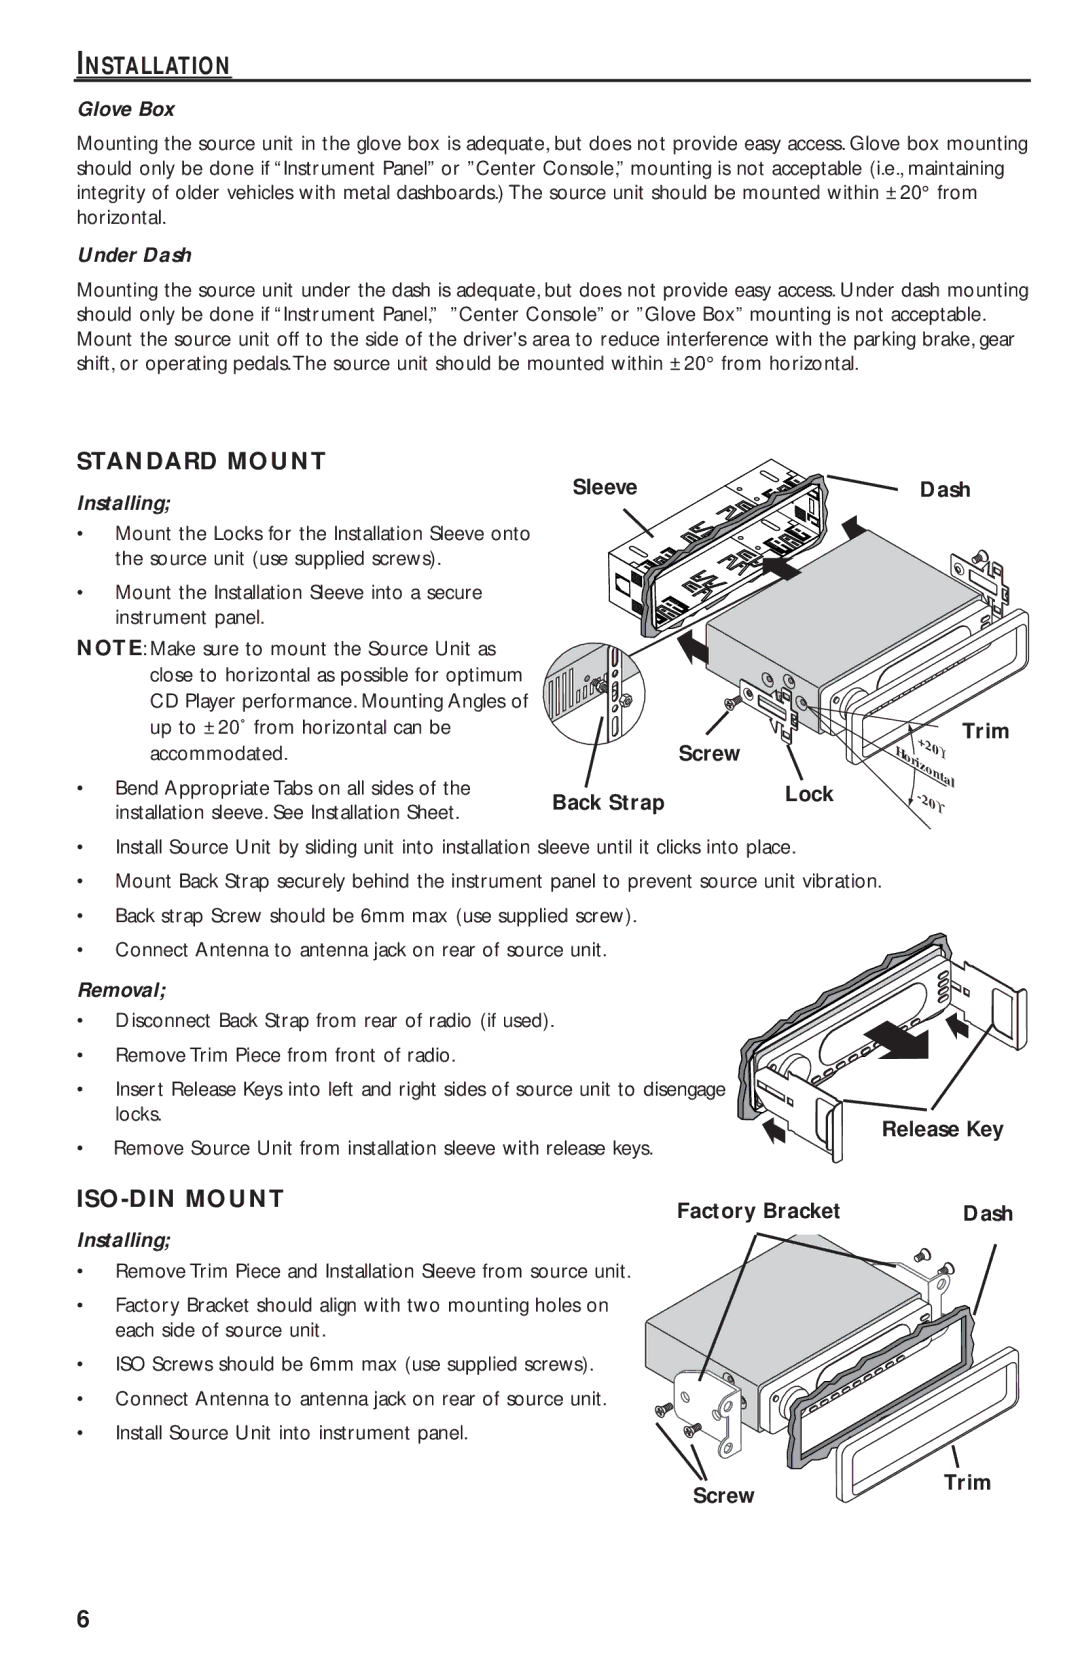
Mount the Locks for the Installation Sleeve onto the source unit (use supplied screws).

Mount the Installation Sleeve into a secure instrument panel.

NOTE: Make sure to mount the Source Unit as close to horizontal as possible for optimum CD Player performance. Mounting Angles of up to ±20˚ from horizontal can be accommodated.

Bend Appropriate Tabs on all sides of the installation sleeve. See Installation Sheet.

Sleeve

Dash


+


Trim


2


Screw

H


0


ϒ


ori


z


o


nt


Back Strap

Lock


-2


al


0ϒ


Install Source Unit by sliding unit into installation sleeve until it clicks into place.

Mount Back Strap securely behind the instrument panel to prevent source unit vibration.

Back strap Screw should be 6mm max (use supplied screw).

Connect Antenna to antenna jack on rear of source unit.

Removal;

• Disconnect Back Strap from rear of radio (if used).

• Remove Trim Piece from front of radio.

• Insert Release Keys into left and right sides of source unit to disengage locks.

Remove Source Unit from installation sleeve with release keys.

ISO-DIN MOUNT


Factory Bracket


Installing;


Remove Trim Piece and Installation Sleeve from source unit.

Factory Bracket should align with two mounting holes on each side of source unit.

ISO Screws should be 6mm max (use supplied screws).

• Connect Antenna to antenna jack on rear of source unit.

• Install Source Unit into instrument panel.

Release Key

Dash

Screw

Trim

6

Page 6
Image 6
Rockford Fosgate RFX9020M manual Standard Mount, ISO-DIN Mount

RFX9020M specifications

The Rockford Fosgate RFX9020M is a high-performance marine-grade multimedia receiver designed specifically for boat enthusiasts who want to enjoy their music while out on the water. This innovative unit stands out due to its blend of advanced technologies, user-friendly features, and durable construction.

One of the main features of the RFX9020M is its large, high-resolution touchscreen display. Measuring 9 inches diagonally, the display offers bright, vivid colors and excellent visibility even under direct sunlight, which is crucial when navigating bright, reflective surfaces. The touchscreen interface is intuitive, making it easy for users to navigate through their music libraries, radio stations, and settings.

The RFX9020M is equipped with Bluetooth technology, allowing for seamless wireless streaming of music from smartphones and other devices. This feature supports both audio streaming and hands-free calling, ensuring that users can maintain connectivity without fumbling with their devices. Additionally, the receiver is compatible with Apple CarPlay and Android Auto, offering users the ability to access their favorite apps directly from the receiver's display.

Another prominent aspect of the RFX9020M is its robust audio capabilities. The receiver boasts a built-in amplifier with an impressive power output, enhancing audio quality and ensuring that even on noisy waters, the music remains clear and loud. The unit also includes a customizable equalizer, allowing users to tweak the sound to their liking, optimizing the listening experience based on personal preferences and the unique acoustics of their boat.

Durability is crucial for marine applications, and the RFX9020M does not disappoint. It features a weather-resistant design with an IPX6 rating, providing protection against water exposure, making it ideal for marine environments. The rugged build ensures longevity, even under harsh conditions encountered on the water.

Other notable features include multi-zone audio control, allowing users to manage multiple speakers throughout their boat easily, and a wide array of connectivity options, including USB ports, AUX input, and compatibility with various audio formats. Whether you're enjoying a relaxing day on the water or hosting a lively gathering, the Rockford Fosgate RFX9020M delivers impressive performance, versatility, and resilience, making it a top choice for marine audio systems.