Rotel 
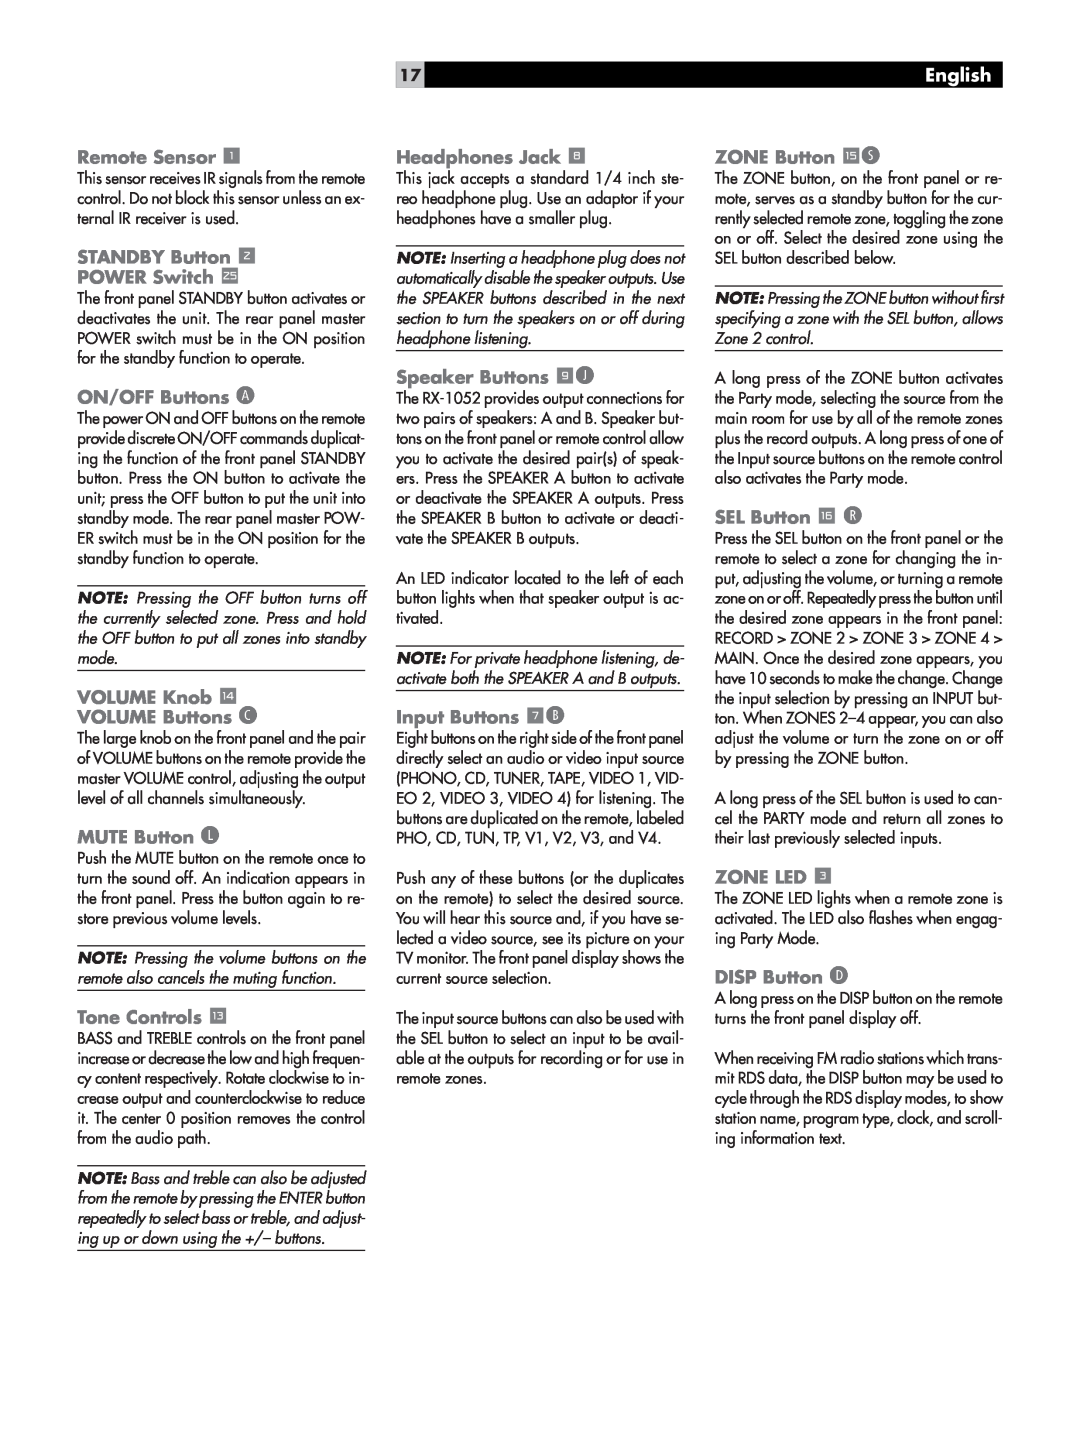
RX-1052 Remote Sensor, STANDBY Button POWER Switch, ON/OFF Buttons A, MUTE Button L

Models: RX-1052

1 26
Download 26 pages 4.25 Kb
Page 17
Image 17
Remote Sensor 1

Remote Sensor 1

This sensor receives IR signals from the remote control. Do not block this sensor unless an ex- ternal IR receiver is used.

STANDBY Button 2

POWER Switch \

The front panel STANDBY button activates or deactivates the unit. The rear panel master POWER switch must be in the ON position for the standby function to operate.

ON/OFF Buttons A

The power ON and OFF buttons on the remote provide discrete ON/OFF commands duplicat- ing the function of the front panel STANDBY button. Press the ON button to activate the unit; press the OFF button to put the unit into standby mode. The rear panel master POW- ER switch must be in the ON position for the standby function to operate.

NOTE: Pressing the OFF button turns off the currently selected zone. Press and hold the OFF button to put all zones into standby mode.

VOLUME Knob w

VOLUME Buttons C

The large knob on the front panel and the pair of VOLUME buttons on the remote provide the master VOLUME control, adjusting the output level of all channels simultaneously.

MUTE Button L

Push the MUTE button on the remote once to turn the sound off. An indication appears in the front panel. Press the button again to re- store previous volume levels.

NOTE: Pressing the volume buttons on the remote also cancels the muting function.

Tone Controls q

BASS and TREBLE controls on the front panel increase or decrease the low and high frequen- cy content respectively. Rotate clockwise to in- crease output and counterclockwise to reduce it. The center 0 position removes the control from the audio path.

NOTE: Bass and treble can also be adjusted from the remote by pressing the ENTER button repeatedly to select bass or treble, and adjust- ing up or down using the +/– buttons.

17

Headphones Jack 8

This jack accepts a standard 1/4 inch ste- reo headphone plug. Use an adaptor if your headphones have a smaller plug.

NOTE: Inserting a headphone plug does not automatically disable the speaker outputs. Use the SPEAKER buttons described in the next section to turn the speakers on or off during headphone listening.

Speaker Buttons 9J

The RX-1052 provides output connections for two pairs of speakers: A and B. Speaker but- tons on the front panel or remote control allow you to activate the desired pair(s) of speak- ers. Press the SPEAKER A button to activate or deactivate the SPEAKER A outputs. Press the SPEAKER B button to activate or deacti- vate the SPEAKER B outputs.

An LED indicator located to the left of each button lights when that speaker output is ac- tivated.

NOTE: For private headphone listening, de- activate both the SPEAKER A and B outputs.

Input Buttons 7B

Eight buttons on the right side of the front panel directly select an audio or video input source (PHONO, CD, TUNER, TAPE, VIDEO 1, VID- EO 2, VIDEO 3, VIDEO 4) for listening. The buttons are duplicated on the remote, labeled PHO, CD, TUN, TP, V1, V2, V3, and V4.

Push any of these buttons (or the duplicates on the remote) to select the desired source. You will hear this source and, if you have se- lected a video source, see its picture on your TV monitor. The front panel display shows the current source selection.

The input source buttons can also be used with the SEL button to select an input to be avail- able at the outputs for recording or for use in remote zones.

English

ZONE Button eS

The ZONE button, on the front panel or re- mote, serves as a standby button for the cur- rently selected remote zone, toggling the zone on or off. Select the desired zone using the SEL button described below.

NOTE: Pressing the ZONE button without first specifying a zone with the SEL button, allows Zone 2 control.

A long press of the ZONE button activates the Party mode, selecting the source from the main room for use by all of the remote zones plus the record outputs. A long press of one of the Input source buttons on the remote control also activates the Party mode.

SEL Button r R

Press the SEL button on the front panel or the remote to select a zone for changing the in- put, adjusting the volume, or turning a remote zone on or off. Repeatedly press the button until the desired zone appears in the front panel: RECORD > ZONE 2 > ZONE 3 > ZONE 4 > MAIN. Once the desired zone appears, you have 10 seconds to make the change. Change the input selection by pressing an INPUT but- ton. When ZONES 2–4 appear, you can also adjust the volume or turn the zone on or off by pressing the ZONE button.

A long press of the SEL button is used to can- cel the PARTY mode and return all zones to their last previously selected inputs.

ZONE LED 3

The ZONE LED lights when a remote zone is activated. The LED also flashes when engag- ing Party Mode.

DISP Button D

A long press on the DISP button on the remote turns the front panel display off.

When receiving FM radio stations which trans- mit RDS data, the DISP button may be used to cycle through the RDS display modes, to show station name, program type, clock, and scroll- ing information text.

Page 17
Image 17
Rotel RX-1052 Remote Sensor, STANDBY Button POWER Switch, ON/OFF Buttons A, VOLUME Knob w VOLUME Buttons C, MUTE Button L