Assembly (cont.)
13 |
|
| R |
T | 1 |
|
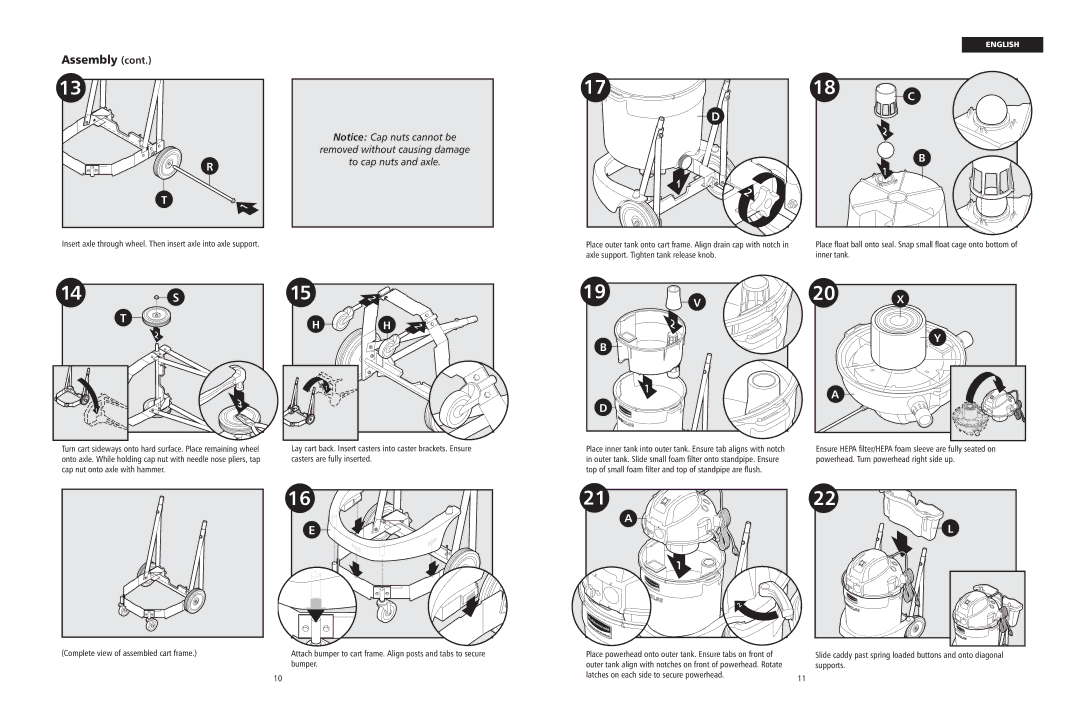
Insert axle through wheel. Then insert axle into axle support.
Notice: Cap nuts cannot be
removed without causing damage
to cap nuts and axle.
|
|
| ENGLISH |
17 |
| 18 | C |
|
|
| |
D |
|
|
|
|
|
| 2 |
|
|
| B |
|
|
| 1 |
1 | 2 |
|
|
|
|
| |
Place outer tank onto cart frame. Align drain cap with notch in | Place float ball onto seal. Snap small float cage onto bottom of | ||
axle support. Tighten tank release knob. |
| inner tank. |
|
14
T
1 |
![]() S
S
2
![]()
![]()
![]() 3
3
15 | 2 |
|
H | H | 2 |
1 |
19 | V |
| |
| 2 |
B |
|
| 1 |
D |
|
20 | X |
| Y |
A |
|
Turn cart sideways onto hard surface. Place remaining wheel onto axle. While holding cap nut with needle nose pliers, tap cap nut onto axle with hammer.
Lay cart back. Insert casters into caster brackets. Ensure casters are fully inserted.
Place inner tank into outer tank. Ensure tab aligns with notch in outer tank. Slide small foam filter onto standpipe. Ensure top of small foam filter and top of standpipe are flush.
Ensure HEPA filter/HEPA foam sleeve are fully seated on powerhead. Turn powerhead right side up.
(Complete view of assembled cart frame.)
10
16 |
E |
Attach bumper to cart frame. Align posts and tabs to secure bumper.
21 |
A |
1 |
2 |
Place powerhead onto outer tank. Ensure tabs on front of outer tank align with notches on front of powerhead. Rotate latches on each side to secure powerhead.
22 |
L |
Slide caddy past spring loaded buttons and onto diagonal supports.
11